


Oh my goodness, if you have a haul of fresh green beans right now, you are in for such a treat! There’s nothing quite like pulling perfectly crisp, tangy vegetables straight out of a jar. I learned safe preserving techniques from my aunt who canned everything under the sun, so I can assure you we’re doing this the right way. You can check out a bit more about my journey in the kitchen over on my About Me page if you’re curious! The best part about this recipe for my gorgeous dilly beans? I’m giving you the one-two punch! You can whip up a quick batch of refrigerator pickles for snacking right away, or you can safely process them using a hot water bath so you can enjoy them all winter long. Seriously, you’re getting two incredible vinegar preserved vegetables recipes in one!
Why This Crispy Dilly Beans Recipe Works for Everyone
I know canning sounds intimidating, but trust me—it’s just following directions! This recipe is designed to work whether you have three hours or just thirty minutes spare. We focus on creating truly flavorful, tangy side dish options that everyone will ask you for the recipe to. It’s super versatile, which is why I love making these all summer long.
- You get an unbelievable crunch—we aren’t messing around with mushy pickles here!
- The flavor is perfectly balanced between savory garlic, bright dill, and that sharp vinegar tang.
- You choose your commitment level: quick fridge pickles or long-term traditional canning.
Achieving the Perfect Crunchy Dilly Beans Texture
Texture is everything when it comes to a good pickled green bean recipe. The absolute secret weapon here is soaking those trimmed beans in ice water for a couple of hours beforehand. That shock hardens them right up! You end up with fantastic crispy dilly beans that stay snappy even months later in the pantry.
Quick Refrigerator Pickles vs. Shelf-Stable Canning
If you need a crunchy snack *today*, use the refrigerator pickles route: pack them up, add the hot brine, and stick them in the fridge. They’ll be ready in a day! If you want a stash for winter, you use the exact same brine recipe but run the sealed jars through a water bath canner process to make them shelf-stable for easy storage.
Gather Your Ingredients for Perfect Dilly Beans
Alright, let’s get everything lined up because the quality of your ingredients really determines how good these dilly beans end up tasting! Remember, we are maximizing flavor here, so freshness and quality matter, especially when we talk about our dill and garlic. If you’re looking for other easy homemade pickles inspiration after this, I’ve got a whole collection of refrigerator dill pickles recipes you might want to explore later!
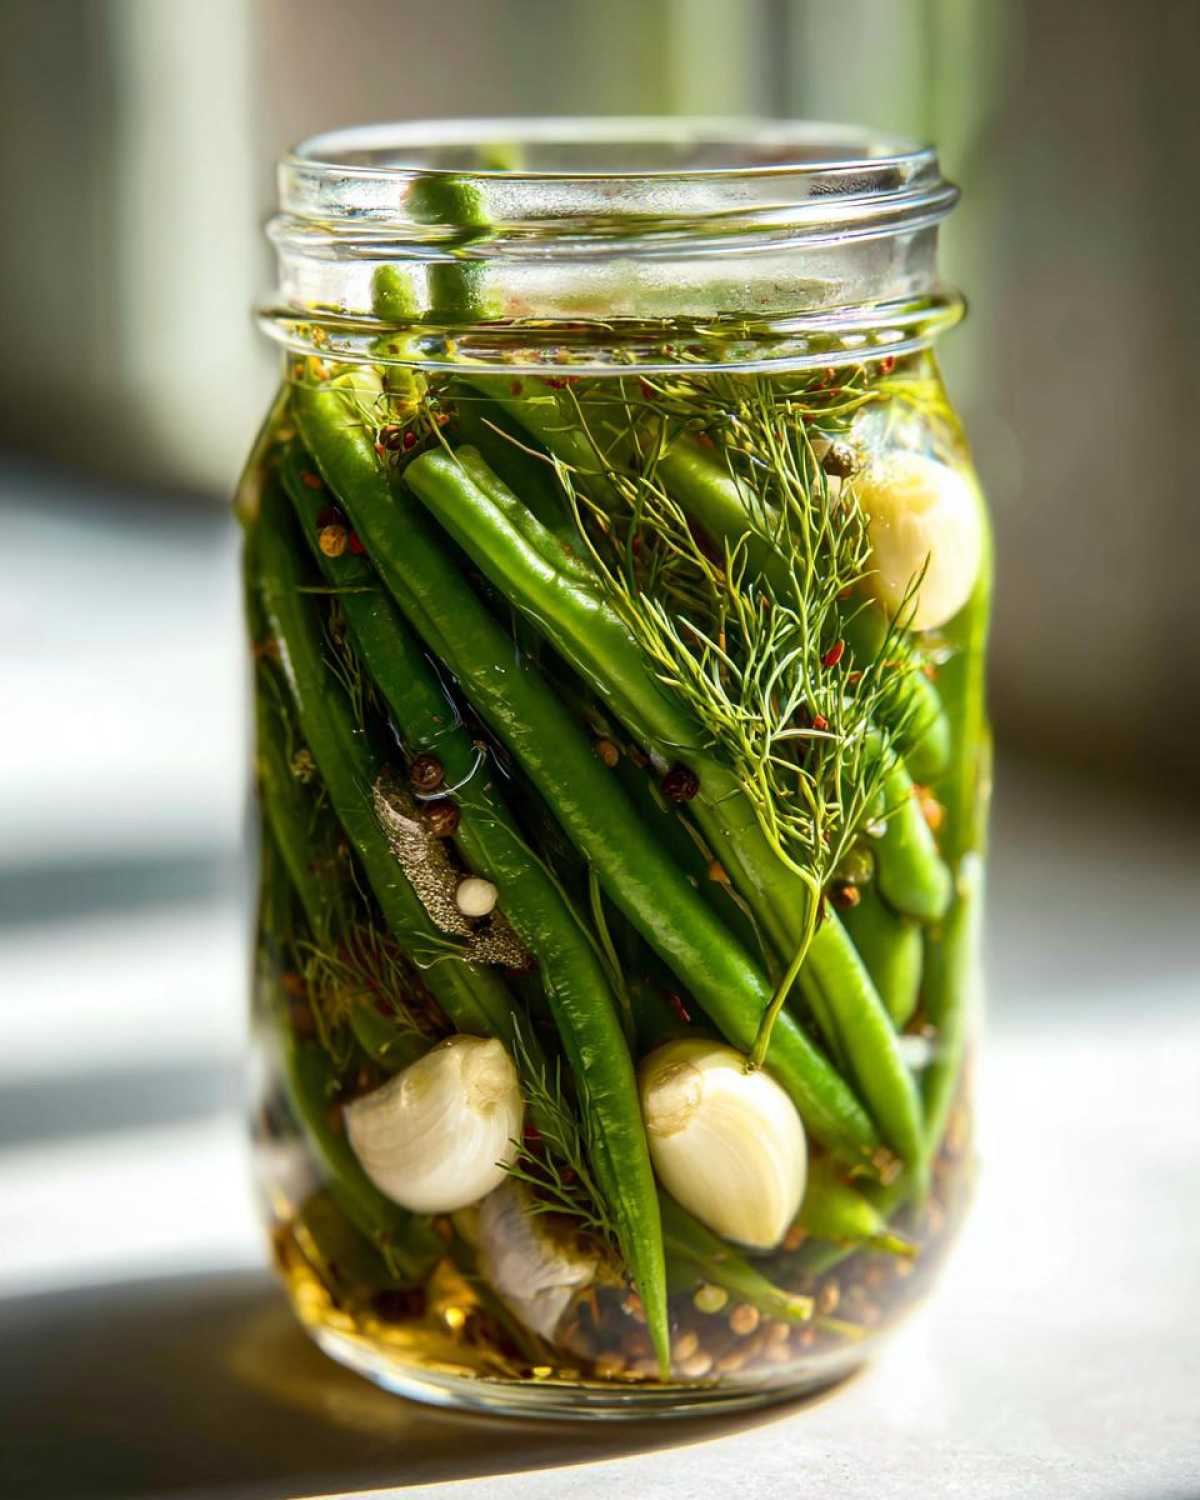
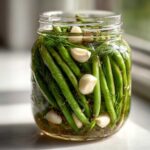
You’ll need about two pounds of the freshest green beans you can find—make sure they’re snapped or trimmed properly. Here’s everything else you need for four pint jars:
- 2 lbs fresh green beans, ends trimmed
- 4 cups water
- 4 cups white vinegar (it has to be 5% acidity, no cheating!)
- 2 tablespoons pickling salt (I’ll tell you why in a bit!)
- 4 cloves garlic, peeled and halved
- 4 teaspoons whole black peppercorns
- 4 teaspoons mustard seeds
- 4 heads fresh dill (or 4 teaspoons dill seed if you can’t find the heads)
Flavorings and Spice Options for Your Dilly Beans
This combination of garlic, peppercorns, mustard seeds, and fresh dill is what creates that classic, unmistakable flavor profile for proper dilly beans. Don’t skip the peppercorns; they offer a little earthy spice! Now, if you want to tap into that popular spicy pickled vegetables vibe, this is where you add the heat. I always toss in about 1/2 teaspoon of red pepper flakes total—that’s just 1/8th of a teaspoon per jar—to give them a gentle kick without overwhelming the dill. It makes for the best snack!
Essential Equipment for Making Pickled Green Beans
Before we even think about boiling brine, we need to get our kitchen ready to go! Having everything laid out makes the process so smooth, especially when you are juggling hot jars and boiling water. Safety first, always!
For this recipe, whether you’re doing the quick version or canning, you must have these basics ready on your counter:
- Pint-sized canning jars, lids, and bands (clean and ready).
- A large, non-reactive saucepan for making the brine.
- A second large pot for the water bath canner, if you are going that route.
- Jar lifters or sturdy tongs for safely moving the hot jars.
- A non-metallic utensil, like a chopstick, for removing air bubbles.
- A clean towel or rack to let the jars cool undisturbed.
Step-by-Step Instructions for Dilly Beans (Both Methods)
Okay, here is where the magic happens! We start by finishing the prep and then we move onto the brine. Remember what I said about getting those beans ice-cold? If you haven’t done the ice water soak yet, stop right now and do that! It makes a world of difference for crispy dilly beans. Once the beans are nice and stiff, give them a good shake to get rid of the excess water before packing them up.
We always want our jars ready to go—hot if we are canning, or just clean if we are making quick pickles. If you’re canning, pour all your brine ingredients (water, vinegar, and that crucial pickling salt) into your saucepan and bring it to a rolling boil. You MUST stir it until that salt completely vanishes; cloudy brine is usually a sign of undissolved salt!
Now, this is key: for both methods, you are putting your flavorings—the garlic, peppercorns, mustard seeds, and dill—into the bottom of the jar first. If you are canning, the flavorings go in first, then pack those cold beans tightly in vertically. If you are doing the refrigerator route, you can add the flavorings right into the jar after the beans are packed. I’ve got a fun little guide on quick pickle recipes that shows this in action if you need a refresher!
Brine Preparation and Flavor Infusion for Dilly Beans
The brine is the heart of any good dill pickle recipe, and for our dilly beans, it’s a simple four-to-four ratio of water and vinegar, plus the pickling salt to make sure it preserves properly. Get that mixture boiling until you can no longer see the salt crystals sticking to the bottom of the pot. That’s when you know your brine is robust enough! Once your flavor mix-ins are sitting in the bottom of the jars, you carefully ladle that hot brine right over the top of your beans.
Packing Jars and Processing Dilly Beans Safely
When pouring on that hot liquid, you have to watch that headspace—it needs to be exactly one inch from the top rim of the jar. Don’t overfill! Grab a chopstick or small plastic knife and gently poke around the sides to release any trapped air pockets. Then, wipe those rims clean, put the lids on finger-tight, and now you separate. For refrigerator pickles, let them cool on the counter and move them straight to the fridge. For canning, you gently lower the jars into your boiling water bath canner and process for 10 minutes. And hey, if you live way up high, remember you need to add extra time to that processing step! That’s how we ensure these garlic dill pickles are safe for long storage.
Expert Tips for the Best Dilly Beans Every Time
I have made so many batches of these wonderful crunchy snacks that I now know all the little tricks that guarantee success. The first thing I learned the hard way? You absolutely MUST use proper pickling salt. My first attempt at dilly beans, I thought, “Oh, table salt will be fine, right?” Wrong! That iodized stuff made my brine look murky and frankly, a little sad. I won’t make that mistake again, so please, stick to the pickling salt.
Also, that tiny instruction about soaking the beans in ice water? That’s not fluff, that’s the reason you get such great texture. When I first tried skipping it because I was in a rush, my beans came out… floppy. They were okay, but they weren’t that satisfying, loud crunch you want from a properly preserved vegetable! So, I always dedicate that little extra time to that ice bath. It takes my dilly beans from “fine” to “I need to hide these so my husband doesn’t eat them all in one sitting.” For more great advice on vinegar preserved vegetables like this, check out my general guide!
Storage and Enjoying Your Dilly Beans
Now that you’ve got your beautiful jars of dilly beans ready, let’s talk about eating them! If you went the refrigerator pickles route, you need to keep these jars tucked safely in the fridge. They are absolutely ready after 24 hours, but they taste best if you let them sit for at least three or four days. Honestly, they’ll stay wonderfully crunchy for about four to six weeks in the cold.
If you processed them correctly using the water bath method, you can un-screw those bands, wipe them down, and store them in a cool, dark spot like your pantry. Those shelf-stable beauties are good for a whole year! These are just the perfect tangy side dish—serve them alongside grilled chicken or use them as the best crunchy snacks alongside chips and dip. I love dropping a few right into a Bloody Mary, too! For more ideas on how to use up your summer haul, pop over to my post on summer preserving ideas.
Common Questions About Making Pickled Green Beans
It’s totally normal to have questions when you start canning or preserving things at home! I remember panicking over my first batch because I was terrified they wouldn’t turn out right. Don’t worry, we’ve covered the essentials, but here are the other things people always ask me about when they are attempting their first jar of dilly beans.
Can I use regular table salt instead of pickling salt in my dilly beans?
Oh, please don’t! This is a big safety one. You absolutely must use pickling salt or canning salt. Table salt has added iodine and anti-caking agents in it, and those chemicals interact with the vinegar and can turn your beautiful brine cloudy and yucky. We want clear, sharp flavor, not cloudy preserves!
How long do I need to wait before eating the refrigerator pickles?
With these refrigerator pickles, you technically *could* eat them after just a few hours, but honestly, they won’t taste great! The flavors—that bright dill and sharp garlic—need time to fully meld with the green bean. I say wait a bare minimum of 24 hours. If you can hold out until day three, that’s when they become the truly stellar, tangy side dish I promised you.
What if my canned dilly beans lids do not seal?
No crying allowed! If you check your jars the next morning and a lid pops up when you press it, that means it didn’t seal properly during the water bath. The good news is the vinegar brine has done its job, so they are still perfectly safe, but they are no longer shelf-stable. Just pull the band off, wipe it clean, and pop that jar right into the fridge. Treat them like standard refrigerator pickles and eat them within the next month!
Nutritional Snapshot of Dilly Beans
Because we are dealing with simple ingredients like green beans, vinegar, and salt, these dilly beans are wonderfully light! Of course, since these are preserved vegetables, the sodium content is higher, but the calories are incredibly low, making them a fantastic addition to any meal when you’re trying to keep things light. Keep in mind, these numbers are just estimates based on the recipe ingredients we used for four pints.
- Serving Size: 1/2 cup
- Calories: 15
- Sugar: 1g
- Sodium: 350mg
- Fat: 0g
- Protein: 1g
- Carbohydrates: 3g
Share Your Homemade Pickles
Now that you have mastered the art of making these fantastic dilly beans—whether you canned them or stuck them straight into the fridge—I would absolutely love to hear how they turned out for you! Seriously, the best part of sharing these recipes is seeing your beautiful jars show up on my feed or hearing about your family’s favorite way to eat them.
Did you go spicy, or did you stick to the classic garlic dill pickles flavor? Let me know down in the comments below! If you have questions while you’re enjoying them, feel free to drop those too—I try to answer every single one. If you need to reach out directly, you can always find my contact form linked right here if you need to reach out directly. Happy pickling, everyone!
PrintCrispy Dilly Beans: Refrigerator and Water Bath Canning Methods
Make crunchy, tangy dilly beans using fresh green beans, dill, and garlic. This guide provides instructions for both quick refrigerator pickles and shelf-stable water bath canning.
- Prep Time: 25 min
- Cook Time: 15 min
- Total Time: 40 min
- Yield: 4 pints
- Category: Side Dish
- Method: Pickling/Canning
- Cuisine: American
- Diet: Vegetarian
Ingredients
- 2 lbs fresh green beans, ends trimmed
- 4 cups water
- 4 cups white vinegar (5% acidity)
- 2 tablespoons pickling salt
- 4 cloves garlic, peeled and halved
- 4 teaspoons whole black peppercorns
- 4 teaspoons mustard seeds
- 4 heads fresh dill (or 4 teaspoons dill seed)
- 1/2 teaspoon red pepper flakes (optional, for spicy)
Instructions
- Prepare the jars: Wash pint-sized canning jars and lids thoroughly. Keep the jars hot if using the canning method.
- Prepare the beans: Wash the green beans well. If using the canning method, pack the beans tightly and vertically into the hot jars, leaving 1 inch of headspace.
- Prepare the brine: In a non-reactive saucepan, combine the water, vinegar, and pickling salt. Bring the mixture to a rolling boil, stirring until the salt dissolves.
- Add flavorings: For refrigerator pickles, place 1 garlic half, 1 teaspoon peppercorns, 1 teaspoon mustard seeds, 1 dill head, and 1/8 teaspoon red pepper flakes (if using) into each jar. For canning, place these flavorings into the bottom of the hot jars before adding the beans.
- Fill jars: Pour the hot brine over the beans in the jars, ensuring the liquid covers the beans completely, maintaining the 1 inch headspace. Remove air bubbles using a non-metallic utensil. Wipe the rims clean.
- Seal: For refrigerator pickles, seal the jars with lids and refrigerate once cooled. For canning, secure the lids and process the filled jars in a boiling water bath canner for 10 minutes (adjust time for altitude).
- Cool and store: Remove the jars from the canner and let them cool undisturbed on a towel for 12 to 24 hours. Check seals. Store canned pickles in a cool, dark place. Refrigerated pickles are ready to eat after 24 hours in the fridge.
Notes
- Use only pickling salt; table salt can make the brine cloudy.
- For the crispest texture, soak the trimmed green beans in ice water for 2 hours before packing them into the jars.
- If you prefer dill seed over fresh heads, use 1 teaspoon of dill seed per jar instead of one dill head.
Nutrition
- Serving Size: 1/2 cup
- Calories: 15
- Sugar: 1
- Sodium: 350
- Fat: 0
- Saturated Fat: 0
- Unsaturated Fat: 0
- Trans Fat: 0
- Carbohydrates: 3
- Fiber: 1
- Protein: 1
- Cholesterol: 0

Comments are closed.