


Okay, let’s be honest. Those bags of store-bought marshmallows? They’re fine if you’re desperate, but they’re usually gummy, a little stale tasting, and they definitely don’t melt right on your campfire treat. I used to think making candy was super complicated, like something only professionals could handle, but I was totally wrong!
The secret to truly luxurious desserts—the kind that melts immediately into your hot chocolate—is making your own **homemade marshmallows**. Once you see how fluffy and pillowy these turn out when you follow these simple steps, you’ll never look at the grocery store version again. Seriously. We’re talking cloud-like texture here, and you probably have everything you need right now!
Why You Will Make These Homemade Marshmallows From Scratch
I promise you, dealing with hot sugar syrup is easier than it sounds once you see the result. You’ll want to skip buying them forever once you taste this batch! These are truly the best homemade marshmallows you’ll ever have.
- You get that pure, melt-in-your-mouth texture that store-bought jars just can’t replicate. They are so incredibly soft and pillowy marshmallows!
- This is a fantastic Beginner Marshmallow Recipe—as long as you use a thermometer, the process is surprisingly straightforward.
- The flavor is completely customizable, but this baseline Vanilla Marshmallow Recipe is perfection on its own.
- They deliver the required fluffiness when used in amazing recipes like my brownie layer bars! Check out divine chocolate chip cookie brownies where these marshmallows shine.
- Seriously, watch them bloom in your hot chocolate; they transform the drink instantly. You’ll have the ultimate Dessert Toppings Homemade addition.
- Once you master this Easy Marshmallows From Scratch method, you’ll wonder why you ever waited so long to try some DIY Candy Making!
Essential Equipment for Perfect Homemade Marshmallows
Look, making candy sounds intimidating, but for these **homemade marshmallows**, you mostly just need the right tools. If you already have a stand mixer, you are halfway there! Trying to whip this gluey mixture by hand? No way, you’ll burn out before the sugar gets hot enough.
The real key here, and I can’t stress this enough for guaranteed success, is temperature accuracy. If your syrup isn’t exactly right, you’ll end up with stiff sugar instead of soft clouds. Trust me on this one; buy or borrow a reliable candy thermometer, okay?
Must-Have Tools for Your Homemade Marshmallows
Before you even think about turning on the stove, get all this stuff ready. Syrup gets hot fast, and you won’t have time to stop and grease a pan when you should be whisking!
- A reliable stand mixer with the whisk attachment. This is non-negotiable for getting the volume right.
- A solid, heavy-bottomed saucepan for cooking the syrup without scorching.
- A candy thermometer! Seriously, this is your life insurance policy for good marshmallows.
- A standard 9×13 inch baking pan.
- A tool for spreading—I use a small spatula lightly brushed with vegetable oil.
- A very sharp knife or a pizza cutter for slicing later. Make sure it’s sharp so you don’t crush the fluff!
My biggest piece of advice here: Prep that pan first! Get your coating mixture ready and dust that pan absolutely generously before you even touch the gelatin. You’ll thank me later when it comes time to flip the slab out!
Ingredients for Soft and Pillowy Homemade Marshmallows
Okay, get your measuring cups ready! When we talk about making the best homemade marshmallows, the ingredients have to be spot-on. I love that this recipe relies on pantry staples, which makes getting started on these easy marshmallows from scratch a breeze. You won’t believe the difference simple ingredients make!
You’ll notice we have two main groups of ingredients: the stuff that makes the fluff airy, and the coating that stops them from eating each other in the container. Don’t skimp on the vanilla—I always use pure extract because it makes such a difference in the final flavor profile.
Here is exactly what you need lined up on the counter. If you’re interested in how I make other kitchen foundations, my homemade classic Caesar dressing is another must-try!
- 3 tablespoons unflavored gelatin powder (This is the magic binder!)
- 1/2 cup cold water, just for soaking the gelatin.
- 1 1/2 cups granulated sugar (Don’t substitute this for brown sugar here; we need the pure white sugar for the syrup clarity!)
- 1 cup light corn syrup (This is what keeps our marshmallows soft and chewy instead of hard like rock candy.)
- 1/2 cup water, reserved for making the syrup base.
- 1/4 teaspoon salt (It just balances all that sweetness, trust me).
- 1 teaspoon pure vanilla extract (Use the good stuff—you deserve it!)
- 1/2 cup powdered sugar, for dusting
- 1/2 cup cornstarch, for dusting
Remember to weigh or carefully measure your coating mix (powdered sugar and cornstarch) out ahead of time, because once those marshmallows are whipped and ready to pour, you need that mixture sitting right there, waiting to smother them!
Step by Step Marshmallow Guide: How To Make Marshmallows At Home
This is where the alchemy happens! I know the thought of making candy sounds scary, but honestly, the machine does most of the work once you get the syrup right. We are making sure these result in those beautiful, airy **cloud like marshmallows** that you dream about. Pay close attention to the heat and the whisking time; that’s what separates a perfect batch of **homemade marshmallows** from a sticky mess! If you’re wondering about other whipped wonders, you should totally check out my Cloud Eggs Recipe for a fun breakfast!
Preparing the Pan and Blooming the Gelatin
First things first, remember what I said about prepping the pan? Go do that now! Grease your 9×13 pan and dust it heavily with that cornstarch and powdered sugar mix. You want every surface coated. While that’s sitting, go sprinkle your gelatin powder over the 1/2 cup of cold water in your stand mixer bowl. Just let it sit there for about 10 minutes—that’s called blooming—and it gets all puffy. Don’t touch it!
Creating the Sugar Syrup for Fluffy Marshmallows
Now for the hot part! Get your sugar, corn syrup, salt, and the remaining 1/2 cup of water into your saucepan. Stir it gently over medium heat just until that sugar completely melts away. Now stop stirring! Attach your thermometer and let it boil until it hits exactly 240 degrees Fahrenheit. This soft-ball stage is crucial for getting that soft, bouncy texture. If you go much higher, they get chewy; lower, and they won’t set right. Accuracy matters here!
Whipping and Finishing Your Homemade Marshmallows
As soon as that thermometer hits 240°F, take it off the heat! Turn your mixer on low. Now, you have to pour that gorgeous hot syrup slowly, down the side of the bowl, avoiding the whisk itself. Once it’s all in, crank that mixer up to high. You need to whip this for a solid 12 to 15 minutes. Set a timer! You’ll know it’s done when the bowl feels warm, not hot, and the mixture is incredibly thick, white, and glossy, holding stiff peaks. Don’t stop early—that long whip builds the air!
Finally, turn the speed down to low and quickly drizzle in that vanilla extract. Scrape all that gorgeous, thick fluff into your prepared pan right away. Use an oiled spatula or your oiled hands to gently spread it out evenly. Don’t press too hard, or you’ll deflate all that amazing air we just whipped in. Dust the top liberally one last time!
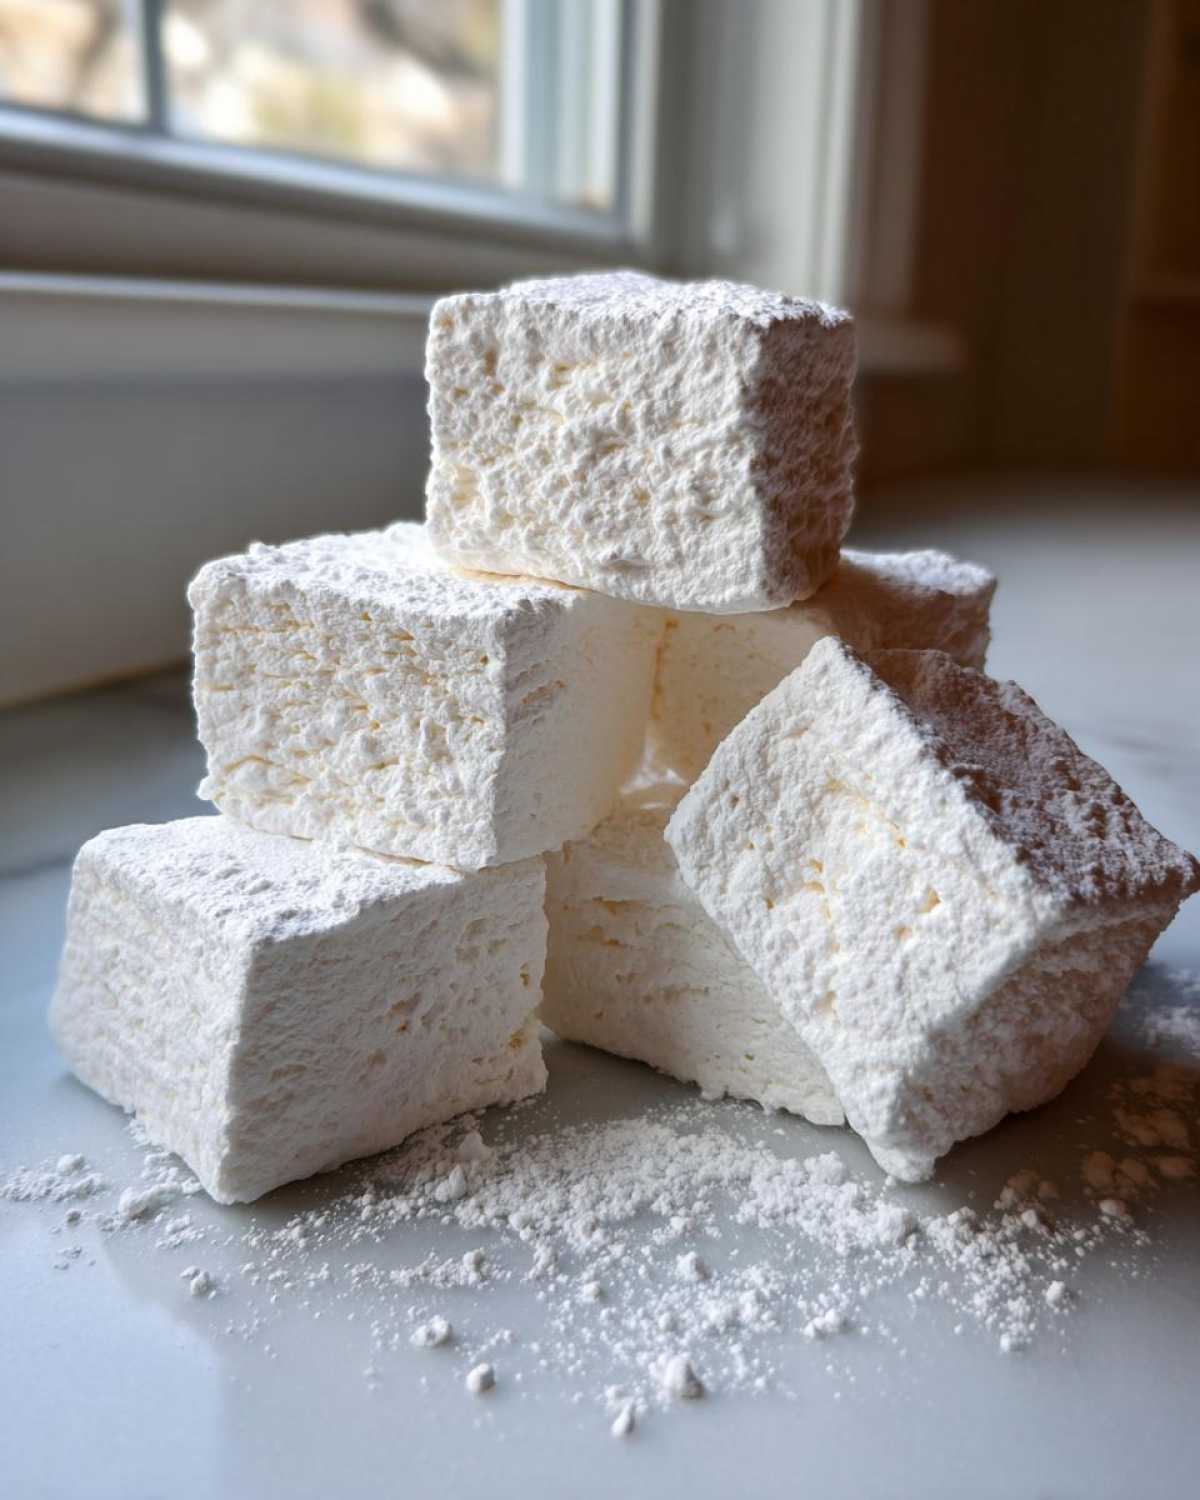
Setting and Cutting Your Cloud Like Marshmallows
Patience is the final ingredient! You absolutely must let the marshmallows set uncovered on the counter for at least 4 hours, but I always leave mine overnight. They need time to stabilize. When you’re ready to cut them, dust your cutting board well.
Turn the slab out carefully. Use a large, sharp knife—oiling the blade helps a ton—to cut them into your desired squares. Immediately toss those fresh-cut sides into the leftover coating mixture so they don’t stick to each other. These are now ready to be the star of your next S’mores!
Tips for Success with Your Beginner Marshmallow Recipe
I know that 240°F sounds intense, but trust me, sticking to that temperature is the secret sauce for making these **soft and pillowy marshmallows** instead of sticky candy sludge. If you’re worried about things going sideways, don’t stress! Most marshmallow failures are easy fixes. This process requires a little respect for the heat, but once you conquer that, you’re practically a candy-making pro.
If you are looking for other foundational kitchen wins, you absolutely have to try my homemade classic Caesar dressing while you wait for the marshmallows to set up!
Here are the little things I learned over years of testing recipes to make sure your homemade marshmallows turn out perfectly fluffy every single time:
- Oil Your Tools, Not Your Hands (Mostly): While you need to dust the pan heavily, when you handle the batter to spread it, use a spatula or your hands coated lightly with neutral oil (like canola or vegetable). Flour or the coating mix will just get absorbed and make the spots dense.
- Don’t Scrape the Bottom of the Pot: When you pour the syrup into the mixer, only pour the liquid part. If any crunchy, crystallized sugar from the bottom of the pan sneaks in there, it can sometimes cause the whole batch to seize up. Be careful!
- Temperature Matters More Than Time: If your mixture isn’t reaching 240°F, it means the sugar ratio is off, and it won’t set properly. If you accidentally overshoot 240°F by a degree or two, don’t panic, just whip it for the full 15 minutes anyway; the extra whipping volume might save you a slightly too-hot syrup.
- The Mixing Bowl Temperature Clue: I can tell the marshmallows are ready for the vanilla when the mixing bowl has cooled down significantly—it should feel just warm to the touch, not aggressively hot. If it’s still radiating heat, keep whipping; you need to incorporate enough air to cool the mixture down physically.
- Avoid Humidity Invaders: If it’s raining outside or super humid, your marshmallows might be a little tacky, even with the full coating. Sugar loves moisture! If it’s a wet day, you might need an extra heavy dusting or slightly longer setting time uncovered.
Follow these tricks, and you’ll have those better than store bought marshmallows you’ve been dreaming of. It’s all about controlling the heat and giving the gelatin the time it needs to build that amazing structure!
Ingredient Notes and Variations for Gourmet Marshmallows
While this vanilla recipe is my absolute go-to for incredible **homemade marshmallows**, I totally get that people want to experiment! Maybe you’re out of corn syrup, or perhaps you want to make a holiday batch. Since this is a foundational candy making recipe, you can swap some things, but there are a few spots where you just can’t cheat if you want that gorgeous, melt-in-your-mouth texture.
For example, if you were after a Marshmallow Recipe No Corn Syrup option, you’d typically need to switch to a pure liquid invert sugar like agave or honey, but that changes the flavor profile dramatically, so I stick to the recipe above for the best results! But for flavor swaps? We are totally safe to mix that up! Give these ideas a try for next-level gourmet treats.
If you’re looking for other ways to amp up your dessert game, you should check out my Vanilla Chia Seed Pudding while you’re gathering your flavoring ingredients!
Achieving Vanilla Bean Marshmallow Recipe Flavor
I love using vanilla bean paste. It’s so much easier than scraping a whole vanilla bean pod, but it gives you those beautiful dark flecks floating around in your white marshmallow cloud. For this recipe, if you want to punch up that classic flavor, swap out the 1 teaspoon of vanilla extract for an equal amount of high-quality vanilla bean paste. It deepens the flavor profile and just looks fancy, which is great if you’re gifting these!
Making Chocolate Homemade Marshmallows
Chocolate marshmallows are perfect for when you want a richer alternative to the classic flavor, maybe for a dark hot chocolate or as a special addition to your Homemade Smores Ingredients haul. This modification is awesome because it doesn’t mess with the actual structure of the fluffy marshmallow itself, which is super important!
Instead of adding anything to the main batch—which might interfere with the whipping time—we change up the outside coating. When you go to mix your powdered sugar and cornstarch for dusting and coating, just toss in about 1/4 cup of high-quality, unsweetened cocoa powder to that mix first! Then, when you cut the marshmallows, you roll the sticky sides in that chocolatey dust instead of plain white powder. It gives you a stunning contrast and a lovely cocoa finish!
Storage & Reheating Instructions for Homemade Marshmallows
Now that you’ve made the fluffiest, most amazing homemade marshmallows known to humanity, you need to treat them right! Don’t ask me why, but they taste even better the second day, once they’ve really settled into their final pillowy form. But storing them incorrectly means you could end up with one giant, sticky cube!
The biggest mistake people make is thinking they need to refrigerate them. Nope! Keep them out in the cool, dry air. The fridge introduces moisture, and moisture is the mortal enemy of a perfectly coated marshmallow. If you’re planning ahead for holidays, these keep really well, so you can knock out your candy making early.
If you’re looking for other make-ahead, long-lasting favorites, check out my post on Vanilla Chia Seed Pudding—it’s perfect to keep on hand!
Follow these simple rules, and your marshmallows will stay perfect for weeks:
- Airtight Container is Mandatory: Get the best airtight container you own. These things attract humidity like nobody’s business, so seal them up tight once they are fully set and cut.
- Room Temperature Only: Keep them stored on your counter or in a pantry. If your kitchen gets really hot (like summer in an un-air-conditioned house), maybe a cool basement works, but keep them away from the stove!
- Shelf Life Expectation: Honestly, they’ll last about two weeks at peak fluffiness. They might dry out slightly after that, but honestly, they never last that long in my house anyway!
- No Reheating Needed: These aren’t like bread or cookies that need reviving. They are best enjoyed at room temperature or gently warmed by the heat of a campfire or mug of cocoa.
If you managed to keep these around for two weeks, give yourself a huge pat on the back! They are worth every single minute of whipping time.
Serving Suggestions: Marshmallows for Hot Chocolate and S’mores
Now that you’ve created these impossibly light, cloud-like beauties, the fun part is actually eating them! Believe me, seeing these **homemade marshmallows** transform a standard mug of cocoa is a moment of pure magic. It melts slowly, creates that perfect, creamy layer on top, and tastes worlds away from the little white cylinders you’d normally grab.
These are amazing for gifting too! Seriously, put a custom-colored or vanilla batch in a cute cellophane bag tied with a ribbon, and that’s instant homemade holiday cheer. But the two uses everyone asks me about are the classic pairings: hot chocolate and s’mores. You’ll need to decide which activity you’re planning when you cut them!
If you need a delicious beverage to go alongside your gourmet toppings, you absolutely must check out my recipe for the Iced Brown Sugar Latte—it’s the perfect cool counterpart to warm, gooey marshmallows!
Here is how I make sure my candy is perfectly shaped for both uses:
- For Hot Chocolate: Cut these beauties into standard quarter-sized squares (about 1 inch). They hold their shape just long enough to look fantastic floating on top before disappearing into the warm drink. You can even roast these slightly with a kitchen torch before dropping them in for extra flavor!
- For S’mores: This is the trick to getting that perfect gooey interior without burning the outside too fast. You want a thicker marshmallow for s’mores, so cut them into taller rectangles—maybe 1 inch thick by 2 inches long. The larger surface area gives you more melted marshmallow goodness between your graham crackers.
- The S’mores Timing Tip: If you know you are specifically planning to toast these over a fire soon (like within 24 hours of cutting), you can actually cut them and then let them sit *uncoated* for about 30 minutes before tossing them in the coating mix. This slightly firms up the exterior, which helps them stay on the stick better when roasting, even though they will still be perfectly soft inside.
- Baking Ingredient Bonus: Don’t forget when you bake! These are incredible when dropped randomly into your Rice Krispie Treats batter for an ultra-fluffy marshmallow bar—even better than the tiny bits you usually use!
Honestly, once you’ve had a s’more made with a fresh, fluffy marshmallow tutorial creation like this, you realize you’ve been settling for campfire crackers your whole life. Go on, get roasting!
Nutrition Estimates for Homemade Marshmallows
I always include this section because, hey, we need to know what we’re dealing with, right? While these are definitely more of a holiday or special treat than an everyday snack, it’s good to have a ballpark idea of what’s in a square of pure, sweet joy. Remember, these numbers are just estimates based on the ingredients listed above—the specific brands of corn syrup or the exact amount of coating powder you use can shift things slightly.
But look at that! Zero fat! That’s the beauty of sticking to a classic sugar-and-gelatin recipe for your **homemade marshmallows**. It’s all sugar and a little protein from the gelatin. I think that makes them guilt-free enough to justify making a double batch!
Here is the breakdown for what I calculated for one delightfully soft square:
- Serving Size: 1 square
- Calories: 110
- Sugar: 24g
- Sodium: 15mg
- Fat: 0g
- Saturated Fat: 0g
- Unsaturated Fat: 0g
- Trans Fat: 0g
- Carbohydrates: 27g
- Fiber: 0g
- Protein: 2g
- Cholesterol: 0mg
See? Mostly sugar, but they are light as air! You can’t beat that when you are looking for something light and fun to top your coffee or use in your s’mores. Knowing the basics helps when you’re planning out your holiday treat table!
Share Your Best Homemade Marshmallows Creations
Phew! We made it through the hot syrup and the long whip! Now the real fun begins: enjoying and showing off your incredible work. Seriously, I get so excited when I see pictures of what you all make using this homemade marshmallows recipe. Making candy from scratch truly feels like an accomplishment, and I want to hear all about your results!
Did you manage to get those perfectly stiff peaks? Did they become the amazing topping for your hot chocolate, or did you burn them making s’mores (that’s okay, it happens to the best of us!)? Do not keep those fluffy textures a secret!
I really want to know how your batch turned out. Please drop a rating below on how amazing these soft and pillowy marshmallows turned out for you. And if you took pictures of your finished cubes—maybe dusted with chocolate cocoa powder or maybe just sitting next to a giant mug of cocoa—you can send them my way!
If you have any last-minute questions or need a little troubleshooting tip for cutting or storing, drop those in the comments too. I’m always hanging around to help make sure your next batch of **easy marshmallows from scratch** is even better! You can reach out directly if you need anything using my contact page as well. Happy sweet making!
PrintThe Best Easy Homemade Vanilla Marshmallows Recipe
Make soft, pillowy vanilla marshmallows from scratch that are much better than store-bought versions. This beginner recipe guides you through the simple steps for fluffy, melt-in-your-mouth candy.
- Prep Time: 20 min
- Cook Time: 15 min
- Total Time: 4 hr 35 min
- Yield: About 40 pieces
- Category: Candy
- Method: Mixing and Setting
- Cuisine: American
- Diet: Vegetarian
Ingredients
- 3 tablespoons unflavored gelatin powder
- 1/2 cup cold water (for blooming gelatin)
- 1 1/2 cups granulated sugar
- 1 cup light corn syrup
- 1/2 cup water (for syrup)
- 1/4 teaspoon salt
- 1 teaspoon pure vanilla extract
- 1/2 cup powdered sugar, for dusting
- 1/2 cup cornstarch, for dusting
Instructions
- Lightly grease a 9×13 inch baking pan. Mix the powdered sugar and cornstarch together in a small bowl. Dust the entire inside of the pan generously with this mixture, tapping out any excess. Set aside.
- In the bowl of a stand mixer fitted with the whisk attachment, sprinkle the gelatin over the 1/2 cup of cold water. Let it sit for 10 minutes to bloom.
- While the gelatin blooms, combine the granulated sugar, corn syrup, 1/2 cup water, and salt in a medium saucepan. Stir over medium heat until the sugar dissolves.
- Attach a candy thermometer to the saucepan. Bring the mixture to a boil without stirring. Cook until the syrup reaches 240 degrees Fahrenheit (soft-ball stage).
- Once the syrup reaches 240 degrees F, remove the pan from the heat. Turn the stand mixer on low speed. Slowly and carefully pour the hot syrup down the side of the mixing bowl into the bloomed gelatin. Avoid pouring directly onto the whisk.
- Increase the mixer speed to high. Beat for 12 to 15 minutes until the mixture is very thick, glossy, white, and holds stiff peaks. The outside of the bowl should feel warm, not hot.
- Stop the mixer. Beat in the vanilla extract on low speed for 30 seconds.
- Working quickly, scrape the marshmallow mixture into the prepared pan. Use a lightly oiled spatula or oiled hands to gently spread the mixture evenly into the pan.
- Dust the top surface generously with more of the powdered sugar and cornstarch mixture. Let the marshmallows set uncovered at room temperature for at least 4 hours, or preferably overnight.
- Once set, turn the marshmallow slab out onto a cutting board dusted with the coating mixture. Use a sharp, oiled knife or pizza cutter to cut into squares. Toss the cut sides in the coating mixture to prevent sticking.
Notes
- For a richer vanilla flavor, substitute 1 teaspoon of vanilla bean paste for the extract.
- If you want to make chocolate marshmallows, reduce the vanilla to 1/2 teaspoon and add 1/4 cup of sifted unsweetened cocoa powder to the dry coating mixture.
- To make marshmallows for s’mores, cut them into thick squares before they fully set (about 2 hours after pouring).
- Store finished marshmallows in an airtight container at room temperature for up to two weeks.
Nutrition
- Serving Size: 1 square
- Calories: 110
- Sugar: 24
- Sodium: 15
- Fat: 0
- Saturated Fat: 0
- Unsaturated Fat: 0
- Trans Fat: 0
- Carbohydrates: 27
- Fiber: 0
- Protein: 2
- Cholesterol: 0
Comments are closed.