


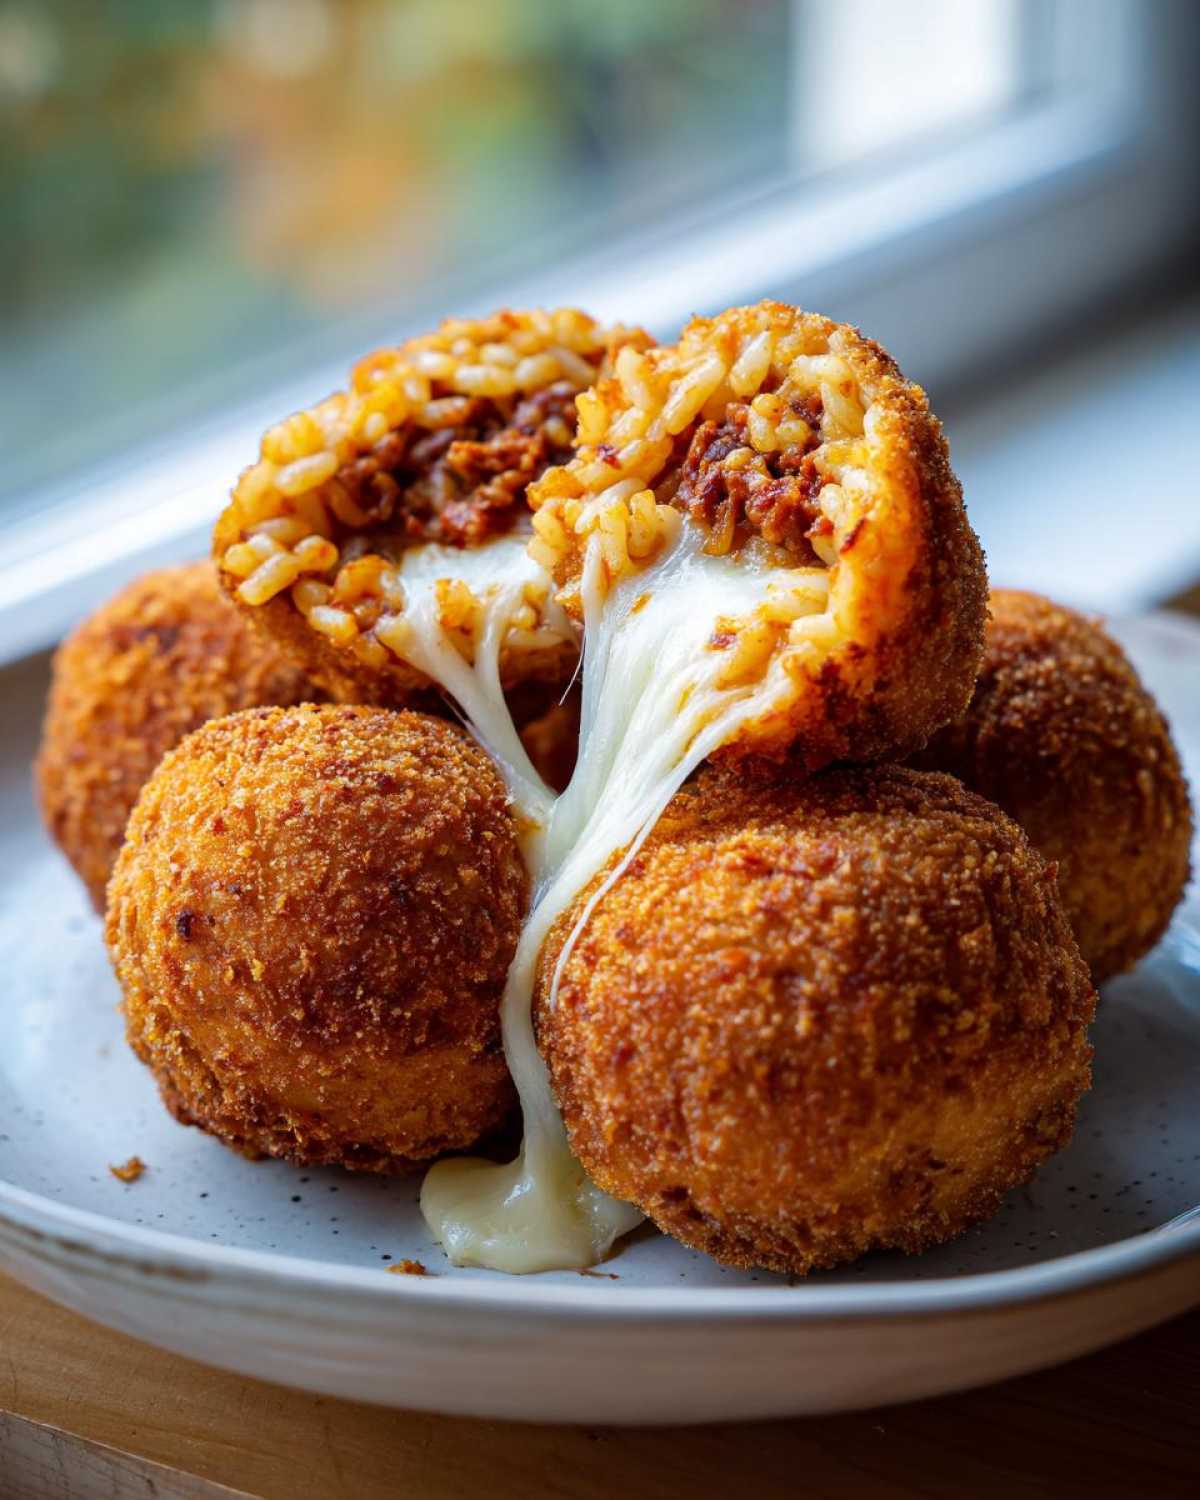
Forget sad, dry appetizers! If you’re looking for the ultimate crowd-pleaser, you have to try making authentic Italian Arancini. These aren’t just any snack; they are golden, crispy, savory orbs of pure comfort, hiding a molten core of cheese and rich meat ragu. After years of perfecting this Sicilian favorite in my own kitchen, I promise these homemade rice balls are worth the small effort. We’re talking about perfectly fried spheres that shatter slightly when you bite into them, making them the best party food or dinner idea with rice you can imagine. Trust me, watching someone pull one apart to reveal the gooey mozzarella center is half the fun!
Why You Will Love These Italian Rice Balls
Honestly, why wouldn’t you love these? They hit every single comfort button, and they really shine when you serve them up as appetizers.
- The Crunch Factor: Seriously, the exterior is perfectly fried—it’s the ideal crispy contrast to the creamy rice inside.
- Gooey, Cheesy Center: That mozzarella stretch when you cut one open? It’s mandatory for any good Arancini recipe.
- Savory Depth: The slow-cooked meat ragu inside means these rice balls taste rich, not just like plain rice.
- Perfect Appetizer Recipes: They look fancy, but they’re simple finger food snacks that vanish immediately at any gathering.
- Comfort Food Balls Done Right: If you need a warm, stick-to-your-ribs snack that transports you straight to Italy, this is it.
- Make-Ahead Magic: You can form them during the day, and just fry them right before your guests arrive!
They truly are the ultimate crispy rice bites. Making a big batch of these homemade rice balls is the best feeling!
Essential Ingredients for Authentic Rice Balls
Okay, we need to talk about what goes into these beauties! For authentic Arancini, you can’t just throw leftover plain white rice in there. We need structure, flavor, and that perfect gooey melt. I’ve broken down exactly what you need below. Remember, having everything prepped and measured before you start assembling your rice balls is the move, especially since oil gets hot fast!
Don’t forget to check out my Zucchini Mac and Cheese if you’re looking for other cheesy comfort food ideas for later!
The Rice and Filling Components for Your Rice Balls
The absolute, non-negotiable first step is that your base rice needs to be risotto—and it must be completely cold! I mean it—day-old, refrigerated risotto works best because it firms up beautifully. This cold, slightly sticky rice is what holds the whole structure together when you’re making these amazing **savory rice balls**. For the inside, you need your savory meat ragu also chilled, along with plenty of fat mozzarella for that classic cheese pull and some salty Parmesan mixed right into the rice base for deep flavor. Warm fillings equal sad, broken rice balls!
Breading Station for Crispy Rice Balls
This is how we get that gorgeous, deep golden crust. You’ll need three shallow dishes set up in a row, just like you would for chicken cutlets. First, plain flour—this helps the egg stick. Second, your lightly beaten eggs; they’re the sticky glue. And finally, the most important layer: fine breadcrumbs. Don’t use panko unless you want huge spikes; we want the fine crumbs so you get that smooth, tight coating all over your homemade rice balls before they hit the fryer.
How to Make Perfect Stuffed Rice Balls Step-by-Step
This is where the magic happens, turning cold rice into glorious, hot, edible treasures! The whole process of assembling these rice balls takes patience, but trust me, if you follow the shape-and-seal method below, you won’t have any leaks when you fry them up. Don’t rush the chilling process; it pays off big time when you get to the shaping stage. We are aiming for simple, delicious rice appetizer ideas here!
If you’re looking for an appetizer that isn’t fried, you should check out these Crispy Baked Zucchini Fries for a lighter bite!
Shaping and Stuffing the Savory Rice Balls
Grab a small amount of that cold risotto—about two tablespoons—and flatten it right out in the palm of your hand. Think of it like creating a little rice pancake. Now, put your filling right in the middle: a tiny dollop of ragu and one small cube of mozzarella. This is the critical moment! You have to gently fold the edges of the rice up and over the filling. Keep rolling and pressing gently between your palms until you have a very tight, smooth sphere, about an inch and a half wide. It has to be tight so the hot oil won’t rush your delicious stuffing out. Keep repeating this until all your filling is tucked away safely inside these beautiful stuffed rice balls.
Achieving the Ultimate Crispy Coating on Homemade Rice Balls
Now that they are perfectly shaped, it’s coating time! You should have your three stations ready: flour, beaten egg, and breadcrumbs. First, gently dredge the ball in the flour—make sure every bit is covered, then tap off the excess. Next, it dips into the egg bath; just a quick dip is fine, we just need stickiness. Finally, roll it firmly in the breadcrumbs. I mean firmly. Use your hands to gently pat the crumbs onto the surface, making sure you get a really thick, even layer. This dense coating is what keeps the steam in and guarantees those amazing crispy rice bites!
Frying Technique for Golden Fried Rice Balls
Safety first here! You need about three inches of vegetable oil in a deep, heavy pot, heated precisely to 350°F (175°C). If it’s too cool, your rice balls will soak up grease; too hot, and the outside burns before the cheese melts. Carefully lower just three or four coated balls into the shimmering oil—don’t crowd the pot, or the temperature will drop instantly! Let them fry undisturbed for about two minutes so the crust sets, then gently turn them using tongs every minute or so. They are ready when they are a deep, lovely golden brown, which usually takes about 4 to 6 minutes total. Lift these beauties out with a slotted spoon and let them rest on paper towels to drain.
Tips for Success When Preparing Your Rice Balls
Honestly, getting perfect rice balls every single time is all about planning ahead. My number one tip, and I can’t stress this enough, is you absolutely must use cold, day-old risotto. If you try to shape warm rice, gravity wins, and you’ll end up with a sticky mess instead of firm spheres. Seriously, cook the risotto one day, refrigerate it, and tackle the shaping the next afternoon!
If deep frying just isn’t happening for your party or your kitchen vibe, you have options! Baking is totally doable for these homemade rice balls. The trick is to brush them lightly with oil so they don’t dry out. Pop them in a 400°F oven for about fifteen to twenty minutes. They won’t get that deep, even crust like they do in the fryer, but they’ll still be hot, cheesy, and delicious! You can also whip up a great pasta dish if you decide to save your frying adventures for another day.
Variations for Your Rice Balls: Beyond Italian Arancini
I know, I know. Arancini is king, but sometimes you want something faster, or maybe you’re just tired of frying things up for every snack. That’s why I love exploring other amazing kinds of rice balls! It shows how versatile simple cooked rice can be, right?
While my recipe above is strictly for that hearty, fried Italian style, you can totally pivot if you need easy rice balls for a lunchbox or a lighter appetizer. Think about Japanese Onigiri recipes. Those are often triangular or round, but they aren’t usually fried or stuffed with ragu. Instead, they use seaweed (nori) and simple fillings like salty Spam or that amazing canned tuna mixed with mayo.
If you want to adapt this basic shell for a vegetarian option, sticking to the Arancini method, just swap out the meat ragu for something like sautéed spinach mixed with extra Parmesan, or maybe rich, chunky mushrooms. You still get that incredible crispy exterior, but it’s totally meat-free! They bake up beautifully too, if you want to go that route. For something truly different, you can even skip the frying/baking altogether and try grilling them slightly after shaping—that’s the Yaki Onigiri trick! It gives the outside a lovely smoky char that tastes amazing paired with soy sauce. I always make a side like my Mango Chicken Stir Fry when I’m craving something Asian-inspired!
Serving Suggestions for These Savory Rice Balls
You’ve made the perfect batch of golden, hot Arancini—now what? You can’t just serve them naked on a plate, though honestly, they taste amazing all by themselves! Since these are such rich, satisfying little spheres, they pair best with something tangy or bright to cut through that delicious fried goodness. Think of these as the star of any appetizer recipes spread you put together.
My absolute go-to dipping sauce for these savory rice balls is a simple, chunky homemade marinara. It doesn’t need to be fancy; just a warm, slightly acidic tomato sauce gives you that perfect salty-sweet, tangy contrast when you dunk the rich rice ball in. It’s the classic pairing for a reason, folks!
If you are planning a big game day spread or holiday party, these deserve a spot among your best finger food snacks. I usually arrange them beautifully on a big platter with little bowls of dipping sauce scattered between them. For other ideas that complement the Italian theme, try serving them alongside some good quality olives, maybe a sharp Provolone cheese cut into cubes, and definitely a side of my Homemade Roasted Tomato Basil Soup for dipping if you want to turn them into a real meal!
Don’t overcomplicate your rice appetizer ideas! A little fresh basil sprinkled over the top right before serving makes them look professional without any extra work. Enjoy seeing them disappear!
Storage and Reheating Instructions for Leftover Rice Balls
Oh, leftovers! While these golden beauties never last long in my house, sometimes you get lucky or you just made way too many perfect little fried rice balls. Storing them correctly is key so that they don’t turn into sad, soggy spheres the next day. You absolutely cannot just toss them in a plastic container!
The best way to store your already cooked rice balls is to let them cool completely to room temperature on a wire rack first. That cooling step is crucial because if you trap any heat, you create steam, and steam equals instant sogginess. Once they are fully cool, you want to place them in a single layer on a baking sheet lined with parchment paper. Then, cover that whole tray loosely with plastic wrap and slide it into the fridge. This keeps them from getting squished and helps airflow.
Now, for reheating—forget the microwave! Microwaving these delicious comfort food balls is a one-way ticket to rubbery disaster. We need to bring back that glorious crispiness we worked so hard for!
The oven or the air fryer are your best friends here. If you’re using the oven, preheat it to about 375°F (190°C). Lay the chilled Arancini out on a baking sheet—again, no crowding! Pop them in for about 10 to 12 minutes. They should come out perfectly hot and crispy throughout, with the cheese gooey again inside. If you have an air fryer, that’s even faster! Just air fry them at about 350°F for 6 to 8 minutes until they look golden brown again. It really regenerates that crust.
You can also prep them unfried! Once shaped, lay those raw stuffed rice balls on a parchment-lined tray and freeze them solid before moving them to a zip-top bag. When you want them later, just add about 5 more minutes to your frying or baking time. Easy peasy!
If you’re looking for other make-ahead snacks, my BLT Galette freezes incredibly well too!
Frequently Asked Questions About Making Rice Balls
I always get questions about these—it’s easy to get nervous when deep-frying things that are full of soft cheese! Hopefully, these quick answers can help smooth out any bumps before you dive into making your own batch of amazing **homemade rice balls**.
Can I make the rice balls ahead of time before frying?
Oh, absolutely! In fact, I kind of insist you do! This is the secret to making easy rice balls that don’t collapse when they hit the oil. You should fully assemble and shape every single rice ball, and then place them on a baking sheet lined with parchment paper. Cover them loosely and chill them in the fridge for at least an hour, or even overnight. This gives the rice time to really relax and bind together around the filling, ensuring they are structurally sound for frying or even baking!
What is the best way to ensure my rice balls stay together?
It all comes down to two things: temperature and pressure. First, the rice has to be super cold and firm—remember, we need risotto rice for the right starch content. If it’s warm, it’s too loose. Second, when you’re packing the filling inside, you need to press firmly as you fold the outer rice layer over the top. You are essentially squeezing out any air pockets around the filling. A nice, tight seal means the pressure stays inside the ball during frying, keeping everything neatly contained. If you get a little tear in the breading later, a quick dip back in the egg followed by more breadcrumbs usually patches it up!
Can I use leftover plain rice instead of risotto for these rice balls?
This is where I have to be firm: for authentic Italian rice balls like these Arancini, plain steamed rice just won’t cut it. Risotto is cooked slowly with broth, which makes the starch gluey and creamy—that’s the binder we need! If you use plain leftover rice, it tends to be too fluffy and dry, and your balls will likely crumble apart in the fryer. If you absolutely, positively have nothing but plain rice, you might be able to salvage it by mixing in an extra egg yolk and a tablespoon of cornstarch to the rice before shaping, but honestly, the texture won’t be the same as a proper Arancini. Stick to risotto for these delicious appetizer recipes!
If you want a recipe where plain rice works better, you should look into my simple Easy 5-Ingredient Corn Soup recipe; it utilizes plain rice beautifully for thickening!
Nutritional Estimate for These Cheesy Rice Balls
Look, I won’t pretend that deep-fried, cheese-stuffed orbs are exactly health food, but when you’re making something this comforting and delicious, sometimes you just have to lean into the goodness! Knowing the ballpark figures is always responsible, though, right? It’s important to remember that these numbers are just estimates based on my recipe using standard measurements.
The values can shift quite a bit depending on the cut of meat you use in your ragu, how much oil is actually absorbed during frying, and the specific brand of mozzarella you pick up. If you’re looking for lighter options later, you might want to check out how I manage my macros over on my Low-Carb Zucchini Enchiladas page, but for these glorious cheesy rice balls, we embrace the richness!
Here is the approximate breakdown per single ball:
- Calories: Around 280
- Fat: About 14 grams (with 6 grams being the saturated kind)
- Carbohydrates: Roughly 28 grams
- Protein: Approximately 10 grams
- Sodium: This one creeps up because of the Parmesan and the savory ragu, hitting close to 450mg per ball.
Enjoy them warm! They are meant to be a show-stopping appetizer, not an everyday staple. Knowing you’ve made these rice balls from scratch totally beats anything out of a box!
PrintAuthentic Arancini (Italian Fried Rice Balls)

Make classic Italian Arancini, which are deep-fried rice balls stuffed with savory meat ragu and melted mozzarella cheese.
- Prep Time: 30 min
- Cook Time: 20 min
- Total Time: 50 min
- Yield: 12 servings
- Category: Appetizer
- Method: Frying
- Cuisine: Italian
- Diet: Meat
Ingredients
- 3 cups cooked risotto rice (cooled)
- 1 cup beef or mixed meat ragu (cooled)
- 1 cup shredded mozzarella cheese
- 1/2 cup grated Parmesan cheese
- 2 large eggs, lightly beaten
- 1 cup all-purpose flour
- 2 cups fine breadcrumbs
- Vegetable oil, for deep frying
- Salt and black pepper to taste
Instructions
- Prepare the risotto rice the day before, if possible, to ensure it is cold and firm.
- Take about 2 tablespoons of the cold risotto rice and flatten it in your palm.
- Place a small spoonful of ragu and a small piece of mozzarella cheese in the center of the rice.
- Carefully fold the rice around the filling, shaping it into a tight ball, about 1.5 inches in diameter. Repeat until all filling is used.
- Set up a breading station: one shallow dish with flour, one with beaten eggs, and one with breadcrumbs.
- Roll each rice ball first in the flour, shaking off excess.
- Dip the floured ball into the beaten egg, allowing excess to drip off.
- Roll the ball thoroughly in the breadcrumbs until completely coated. Press lightly to adhere.
- Heat about 3 inches of vegetable oil in a deep pot to 350°F (175°C).
- Carefully place 3-4 rice balls into the hot oil, ensuring you do not overcrowd the pot.
- Fry for 4 to 6 minutes, turning occasionally, until they are deep golden brown and crispy.
- Remove the Arancini with a slotted spoon and place them on a wire rack or paper towel-lined plate to drain excess oil.
- Serve warm.
Notes
- Use day-old, cold risotto for the best structure; warm rice will fall apart during shaping.
- For a vegetarian version, substitute the meat ragu with a mushroom or spinach filling.
- If you prefer not to deep fry, you can bake these at 400°F (200°C) for 15-20 minutes, brushing lightly with oil first.
Nutrition
- Serving Size: 1 ball
- Calories: 280
- Sugar: 2
- Sodium: 450
- Fat: 14
- Saturated Fat: 6
- Unsaturated Fat: 8
- Trans Fat: 0
- Carbohydrates: 28
- Fiber: 1
- Protein: 10
- Cholesterol: 45


Comments are closed.