


Oh my gosh, are you craving that perfect, snappy crunch of a homemade dill spear but you absolutely do not have the time (or desire!) to deal with hot water baths and canning lids? Believe me, I get it. Most weekends, I want that tangy satisfaction *right now*, not next Tuesday!
That’s why I’m obsessed with this method. I’ve perfected my secrets for making the absolute best refrigerator pickles that hit peak flavor and crunch in just 24 hours. Seriously, no specialized equipment needed here—just a jar, some cucumbers, and a little bit of spice magic. We’re talking Easy Garlic Dill Refrigerator Pickles Ready in 24 Hours, and trust me, once you try these quick pickles, you’ll never go back to store-bought when you need them fast. I’ve been making these on Sunday afternoons so we can snack on them Monday!
Why This Easy Homemade Pickles Recipe Works So Well
The magic of these easy homemade pickles is all about cutting the waiting game while maximizing the snap factor. We’ve taken all the fiddly, complicated parts of traditional canning and tossed them out the window. You get full flavor payoff without any of the pressure!
Here’s why this quick pickling recipe becomes my go-to method:
- Maximum flavor infusion in minimal time.
- Perfectly crisp texture every single time.
- Definitely no canning pickles required—just a jar and a fridge!
Speed: Get Crunchy Refrigerator Pickles in Just 24 Hours
Traditional canning takes forever with sterilizing jars and waiting for processing times. With this quick brine, the heat helps the flavors penetrate fast. You’re looking at maybe 20 minutes of active work, and then you can say hello to your yummy 24 hour pickles!
Texture: Achieving Ultra-Crispy Refrigerator Pickles
Soft pickles are the absolute worst, right? That’s the big worry with any fast recipe. But I’ve cracked the code! Using fresh, firm cucumbers is half the battle. If you have an extra five minutes, throw those cukes in an ice bath beforehand—it firms them up beautifully. It’s my trick for guaranteed crispy refrigerator pickles.
Ingredients for Your Garlic Dill Refrigerator Pickles
This is where the simplicity really shines. You don’t need any fancy pickling salts or bizarre ingredients. We are using staples from your pantry combined with the freshest cucumbers we can get our hands on. Just look at this list—it’s short and sweet, perfect for whipping up some refrigerator pickles recipe tonight!
Here’s what you need to gather for about two lovely pint jars:
- 2 lbs pickling cucumbers, washed and sliced into spears or rounds (make sure they’re perfect!)
- 4 cloves garlic, smashed a little bit—just enough to crack them open
- 2 sprigs fresh dill (or if you only have the dried stuff, grab 1 teaspoon of dill seed)
- 1.5 cups water
- 1.5 cups white vinegar (it absolutely needs to be 5% acidity, don’t use cleaning vinegar, oops!)
- 2 tablespoons kosher salt (I love Morton’s or Diamond Crystal for pickling)
- 1 tablespoon granulated sugar
Cucumber Selection for the Best Refrigerator Pickles Recipe
Listen, if you use those long, waxy slicing cucumbers from the regular veggie aisle, you’re going to get floppy pickles. Don’t do it! You absolutely need pickling cucumbers, usually called Kirby cucumbers if you see them listed that way. They are small, blocky, and firm to begin with, which is the entire foundation for getting those perfect crunchy fridge pickles.
When you’re selecting them at the store or farmer’s market, give each one a good squeeze. If there is any soft spot or bendiness, leave it behind. We want rock-hard cukes for this recipe so we can guarantee the texture for our easy homemade pickles!
Step-by-Step Instructions for Quick Pickling Recipe Success
This is the fun part, and I promise it moves fast! Since we aren’t sealing these jars forever, our process for getting these refrigerator pickles ready is delightfully straightforward. Just follow these steps, and you’ll be on your way to snacking tomorrow!
Preparing Cucumbers and Aromatics for Dill Refrigerator Pickles
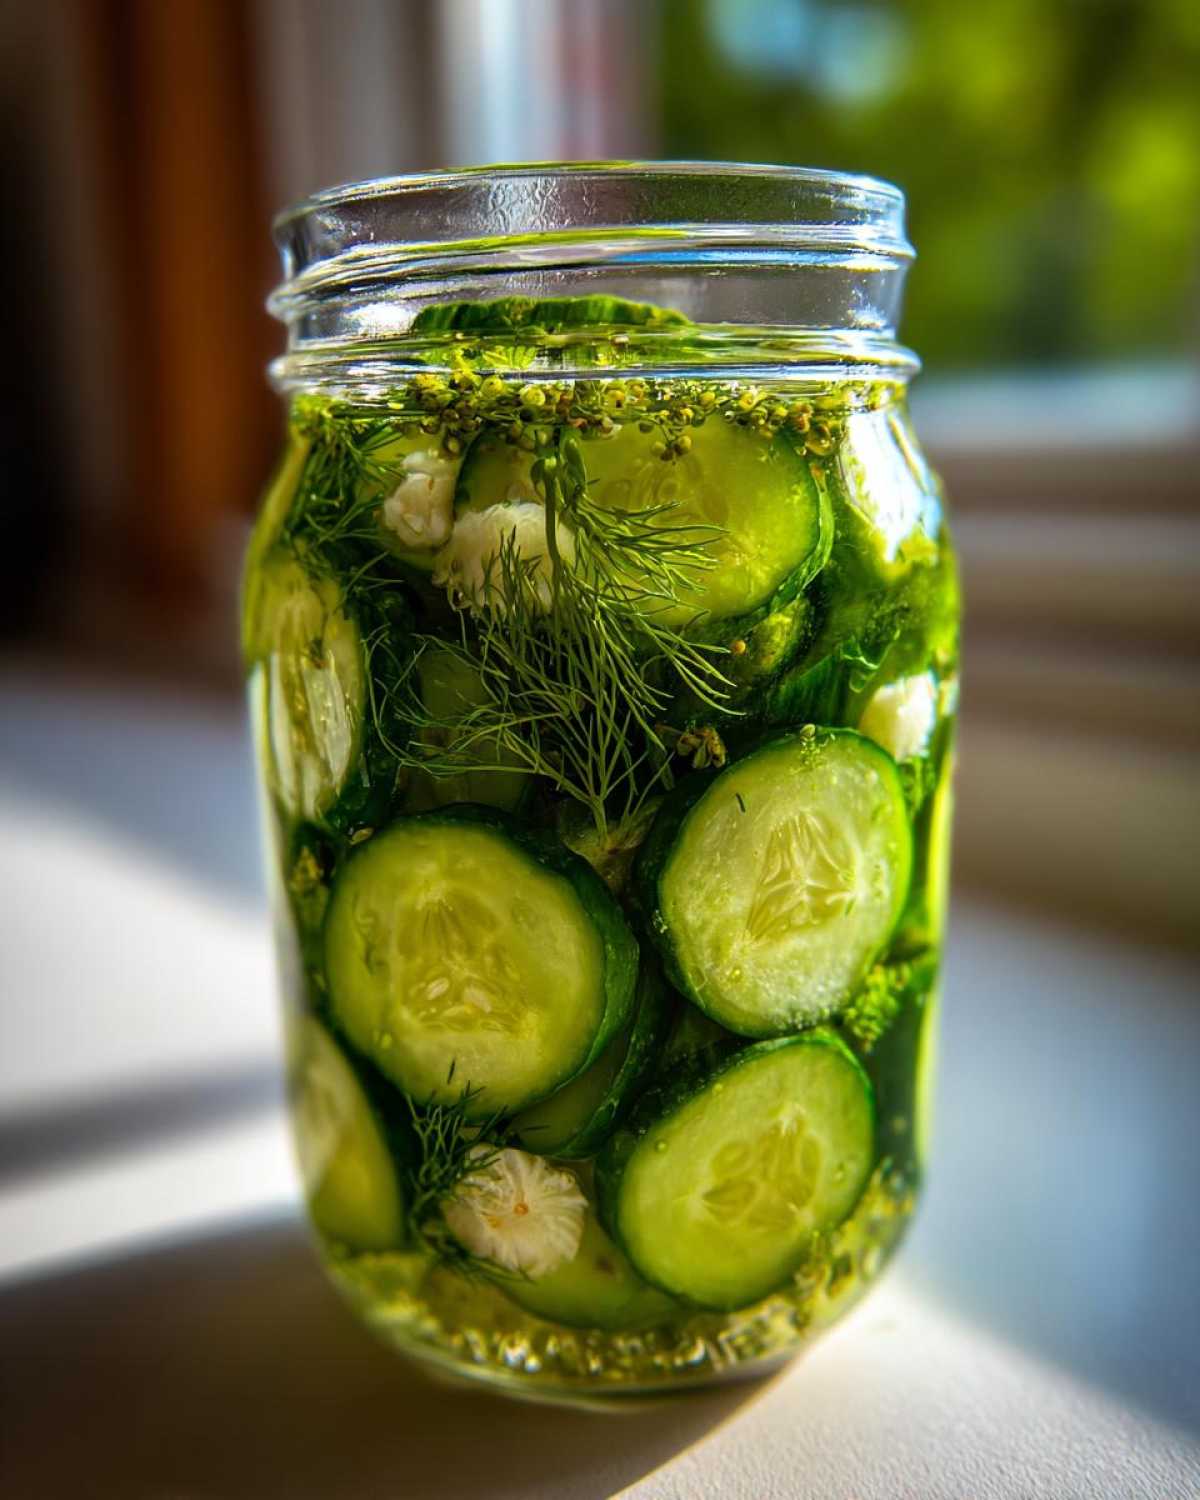
First up, get those gorgeous cucumbers sliced! I usually go for spears because they look so good lined up in the jar, but rounds work great too. Pack them into your clean pint jars really tightly—you want to squeeze in as many veggies as possible. Then, divide up your flavor boosters. That means dropping in the smashed garlic cloves and those lovely fresh dill sprigs so they are nestled right down in there. This tight packing and even spice distribution is key for flavor uniformity.
Making the Brine for Crunchy Fridge Pickles
Time for the brine! Grab a little saucepan and whisk together your water, vinegar (remember, 5% acidity is what we need for this quick method!), kosher salt, and sugar. Put that right on the heat and bring it up to a full, rolling boil. Keep stirring until you can’t see any salt or sugar crystals hanging out at the bottom anymore. We need that mixture piping hot so it properly permeates the cucumbers.
Cooling and Refrigerating Your Easy Cucumber Pickles
Once the brine is dissolved, carefully pour that hot liquid right over your cucumbers until they are totally submerged. Leave about half an inch of space at the very top of the jar—that’s important. Screw the lids on tight, but don’t worry about water bathing them! Just let those hot jars sit on the counter for about an hour to naturally cool down a bit. Once they aren’t scalding hot anymore, transfer them to the fridge. Now for the hard part: waiting at least 24 hours. Seriously, don’t cheat! You can read more about how to make pickles without canning in this post if you want more background!
Expert Tips for Perfect Refrigerator Pickles Every Time
I really think what separates a good batch of refrigerator pickles from a *great* batch is tweaking just a couple of things in that simple brine. I learned pretty quickly that while the basic recipe is fantastic, you can totally jazz it up based on what you’re craving. I feel like a scientist when I experiment with these little jars!
It’s all about adding those little extras right when you boil your water and vinegar solution. These small additions don’t affect the speed or crunch, but they make the final flavor totally yours.
Ingredient Adjustments for Flavor Variations of Refrigerator Pickles
If you want something with a little kick, this is your chance! I absolutely love adding about half a teaspoon of red pepper flakes right into the brine mixture with the salt and sugar. It gives the pickles a lovely background heat without being overwhelmingly spicy. Or, if you’re feeling very traditional, throw in a teaspoon of black peppercorns and a teaspoon of mustard seed along with your garlic and dill.
For a slightly deeper, more complex garlic flavor, try roasting your garlic cloves lightly in the oven before smashing them. It mellows out the sharp bite and gives the final product a beautiful, earthy depth. That’s my secret weapon for truly gourmet-tasting quick pickles that still only took me 20 minutes to prep!
Storage and Shelf Life for Your Quick Pickles
Okay, this is the huge upside of making refrigerator pickles: cleanup is simple, and storage is even simpler! Since we aren’t sealing these hot jars for shelf stability, you can’t just leave them on the pantry shelf. Nope, they have to stay cold.
You must keep these easy cucumber pickles sealed up tight in the refrigerator at all times after the initial cooling period on the counter. The cold temperature is what slows down the pickling process and keeps that precious crunch intact for longer than just one day.
Now, how long do they last? This is where I always tell people to taste as they go! They’re edible after 24 hours, but honestly, the flavor really deepens and gets rich between day two and day five. That’s when they hit their absolute peak for my family. If you manage to hide them from yourself, they generally stay perfectly crisp and delicious for about two to three weeks in the fridge. After that, they start getting a little softer, but they’re still tasty!
If you notice your brine starting to look cloudy or if you see any fuzziness forming on top (which usually only happens if the cucumbers weren’t totally submerged), toss them—better safe than sorry when you are making quick pickling recipe batches like this!
Serving Suggestions for These Garlic Dill Pickles
Now that you’ve successfully produced the snappiest, most intensely flavored refrigerator pickles known to humankind (thanks to that 24-hour wait!), the real fun begins: eating them! These aren’t just for snacking, although trust me, I’ve eaten an entire jar standing over the sink more times than I’ll admit. The strong garlic and dill profile means they really cut through rich, heavier foods.
The first place I always use these is on sandwiches. Forget those soggy, sad pickles you get at the deli! My spicy turkey club is totally transformed when I chop up a few pickle spears and layer them right on top. They add that perfect acidic crunch that holds everything together. Plus, they’re mandatory for a proper cheeseburger setup.
Speaking of burgers, these homemade pickles are the ultimate topping. They stand up so well to fatty meat and melted cheese. I even chop them up finely and stir them into my homemade burger sauce for an instant flavor boost. You can find my favorite spicy burger quesadilla recipe that begs for a side of these spears!
But don’t stop at sandwiches! These garlic dill pickles are fantastic chopped up and mixed into potato salad or tuna salad. They bring a far more complex, fresh flavor than the usual sweet relish. And honestly? Sometimes I just slice them thinly and serve them right alongside a charcuterie board when we have company over. They look so vibrant in the jar, and everyone always asks for the recipe!
Frequently Asked Questions About No Canning Pickles
I always get so many questions when people see how easy these refrigerator pickles are! It seems almost too good to be true when you realize you don’t need any of that specialized gear for no canning pickles. Folks get nervous about safety or texture sometimes, so here are the answers to the most common things I hear from folks trying this easy homemade pickles method for the first time. For more background on making easy homemade pickles, check out my general guide!
Can I use regular slicing cucumbers for refrigerator pickles?
You sure can, but I really have to warn you: you won’t get that amazing snap!
Regular slicing cucumbers have much thinner skin and way more water content. They are bred to be eaten fresh, not brined. When you use them in this quick pickling recipe, they absorb the brine quickly, but they also soften up really fast. If you must use them, you absolutely need to do that ice water soak trick for at least an hour beforehand. Otherwise, you’ll end up with okay-tasting, but floppy, cucumbers.
Are these refrigerator pickles safe if I skip boiling the brine?
For this specific style of quick pickle, you are generally safe, but I highly recommend you don’t skip the boil! The brine MUST come to a boil only for one reason: to make sure that salt and sugar totally dissolve. If they dissolve properly, they get into the cucumber evenly. The vinegar is the real preservation agent here, since it’s highly acidic and keeps bad stuff from growing when it’s kept cold.
However, when I explain how to make pickles without canning, I always tell people to follow the boiling step religiously. It’s not about sterilizing the jar; it’s about making sure your salt and sugar ratio is perfect throughout the liquid for the best texture and flavor infusion. Never compromise on the salt and vinegar measurements, though!
How long do I really need to wait for the 24 hour pickles?
This is the toughest question because everyone wants them *now*! Technically, after a full 24 hours in the fridge, you can open the jar and have a perfectly edible, tangy pickle. They’ll taste like they’ve been brining overnight, which is great for a quick fix.
But listen to me: If you can hold out for 48 hours, you will be rewarded tenfold. The dill, garlic, and spices really penetrate the center of the cucumber spear in that second day. Trust me on this one; those extra few hours make the difference between a good batch of refrigerator pickles and a batch you’ll write home about. My personal favorite batch is at three days old!
Understanding the Nutrition of These Simple Pickles
If you’re anything like me, you love snacking on refrigerator pickles because they feel like such a guilt-free treat! I was so happy when I mapped out the nutrition for these quick pickles, especially since we aren’t frying them or adding mountains of sugar like some commercial brands do.
Because these are made with a simple water/vinegar brine and minimal sugar, they are incredibly light. You get a lot of flavor bang for your buck without worrying about heavy calories. Remember, this is just an estimate based on a standard serving size of about three spears, so adjust if you’re like my brother and eat half the jar in one sitting!
Here’s a quick look at what you can expect from a small serving of these easy cucumber pickles:
- Serving Size: 3 spears
- Calories: 10
- Sugar: 1 gram (mostly from that tiny bit in the brine)
- Sodium: 300 mg (This is the biggest thing to watch, but totally normal for pickles!)
- Fat: 0 grams
- Protein: 0 grams
The best part, in my opinion, is that they offer zero cholesterol and almost no carbohydrates. They’re seasoned, flavorful vegetables that happen to be great for satisfying that savory craving between meals. You can feel really good about grabbing these crunchy fridge pickles whenever the mood strikes!
Share Your Perfect Refrigerator Pickles Experience
Alright, my friends, now it’s time for the best part: bragging rights! You’ve made these magnificent, snappy refrigerator pickles, and I am dying to know how they turned out. Did you get that beautiful crunch we were aiming for? Was the garlic subtle or powerful? Don’t keep your amazing results a secret!
The absolute best feedback I get is when you tell me exactly what you thought. Please head down to the comments section below and leave me a rating—five stars if you’re obsessed, but even a three-star review helps me know what I can tweak in the brine next time. I want to see pictures of your finished jars, too! Did you choose spears or rounds? Did you add extra spice?
If you had any trouble at all, or if you want to swap tips on how you managed to keep any leftovers (because that’s the real challenge with this quick pickling recipe), drop a comment. I read every single one, and I love connecting with you all about our shared love for all things pickled!
If you have any general questions about substitutions or storage that I somehow missed, feel free to reach out through my contact page as well. Happy pickling, and enjoy those gorgeous dill refrigerator pickles!
PrintEasy Garlic Dill Refrigerator Pickles Ready in 24 Hours
Make crunchy, flavorful dill pickles using fresh cucumbers stored in the refrigerator. This simple recipe requires no canning and is ready to eat in one day.
- Prep Time: 15 min
- Cook Time: 5 min
- Total Time: 20 min (plus 24 hours chilling)
- Yield: About 2 pints
- Category: Side Dish
- Method: Quick Pickling
- Cuisine: American
- Diet: Vegetarian
Ingredients
- 2 lbs pickling cucumbers, washed and sliced into spears or rounds
- 4 cloves garlic, smashed
- 2 sprigs fresh dill (or 1 teaspoon dill seed)
- 1.5 cups water
- 1.5 cups white vinegar (5% acidity)
- 2 tablespoons kosher salt
- 1 tablespoon granulated sugar
Instructions
- Prepare the cucumbers by slicing them into spears or rounds. Pack the cucumbers tightly into one or two clean pint-sized glass jars.
- Add the smashed garlic cloves and dill sprigs (or seeds) evenly between the jars.
- In a medium saucepan, combine the water, vinegar, kosher salt, and sugar. Bring the mixture to a boil over medium-high heat, stirring until the salt and sugar dissolve completely. This is your brine.
- Carefully pour the hot brine over the cucumbers in the jars, ensuring the cucumbers are fully submerged. Leave about 1/2 inch of headspace at the top of each jar.
- Seal the jars with tight-fitting lids. Let the jars cool on the counter for about 1 hour.
- Transfer the sealed jars to the refrigerator. Allow the pickles to chill for a minimum of 24 hours before eating for best flavor and crunch. They will continue to pickle for up to two weeks.
Notes
- For extra crispness, soak the cucumbers in ice water for 30 minutes before slicing and packing.
- If you prefer a spicier pickle, add 1/2 teaspoon of red pepper flakes to the brine mixture.
- Always use fresh cucumbers for the best texture. Old or soft cucumbers will result in soft pickles.
Nutrition
- Serving Size: 3 spears
- Calories: 10
- Sugar: 1
- Sodium: 300
- Fat: 0
- Saturated Fat: 0
- Unsaturated Fat: 0
- Trans Fat: 0
- Carbohydrates: 2
- Fiber: 0
- Protein: 0
- Cholesterol: 0


Comments are closed.