


Oh my goodness, if you’re looking for a dessert that stops traffic and demands an immediate photograph before anyone is allowed to touch it, you absolutely need these red velvet cheesecake brownies in your life right now. Forget plain old brownies; we are stepping up the game with this incredible two-layer wonder. I spent way too many afternoons fiddling with the measurements—seriously, I nearly ran out of cream cheese—just to nail down the perfect ratio.
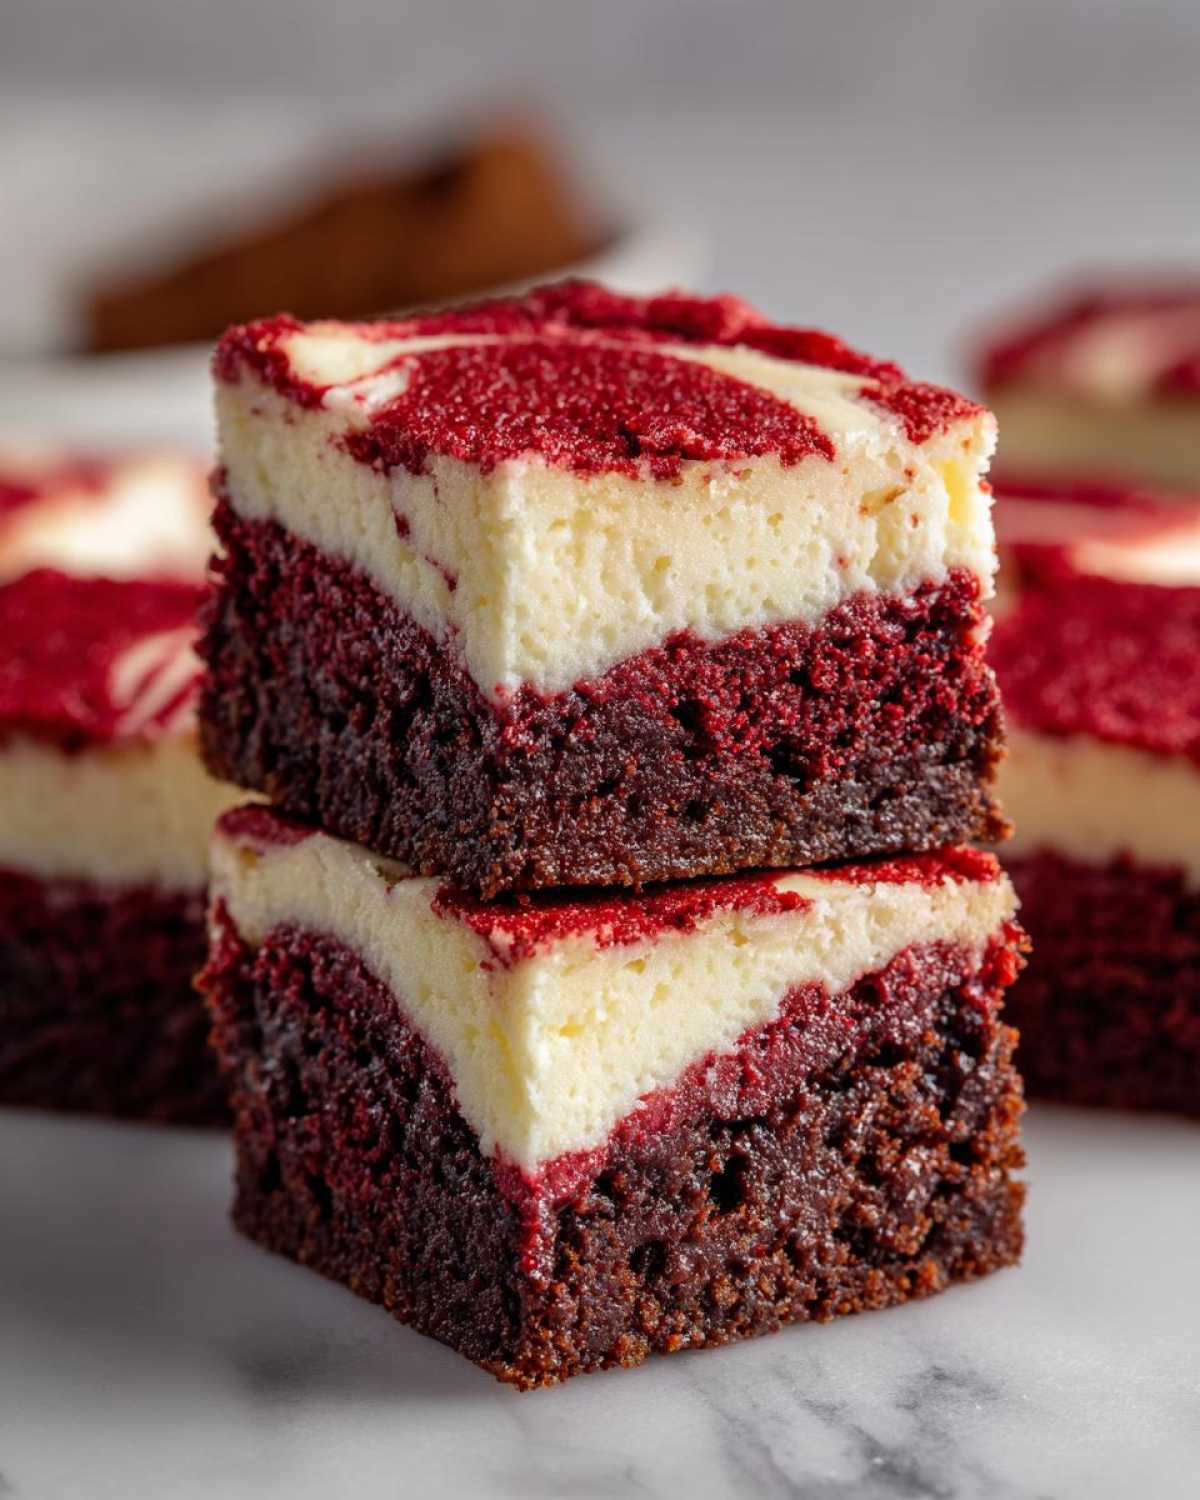
What makes this recipe my absolute favorite is that crackly, fudgy brownie base meeting that pool of tangy, impossibly creamy cheesecake on top. That swirl you see in the pictures? That took R&D, trust me! But the payoff is huge. These aren’t just good; they’re showstopping baked goods that look like they came from a fancy bakery, yet they are totally achievable in your home oven. I think you’re going to make these often, especially when I show you the nearly foolproof layering trick!
If you’re curious about mixing layers like this, make sure you check out my ultimate cookie brownie bars; that method helped me perfect this swirl technique!
Why You Will Love These Red Velvet Cheesecake Brownies
Seriously, you need to make these because they check every single dessert box:
- The brownie is intensely fudgy—not cakey, never dry!
- That cheesecake layer is rich, tangy, and perfectly creamy.
- The marbled effect is pure magic and makes these a showstopper for holidays like Valentine’s Day or Christmas.
- It’s a two-in-one decadence that feels way fancier than the short amount of time it takes!
Essential Ingredients for Perfect Red Velvet Cheesecake Brownies
Okay, listen up. When you’re making something this layered and indulgent—true red velvet cheesecake brownies—you cannot skimp on quality here. Every component matters, but these two things make or break the final look: that vibrant red and that perfectly smooth cream cheese. Please, if you can swing it, grab the gel food coloring over the liquid kind; we need that deep red without adding extra liquid that messes with the fudginess!
I always lay out every single thing before I start mixing. It keeps me calm, and more importantly, it makes sure the cream cheese is ready to go when we need it. Speaking of which, I tested versions where the cream cheese was just room temperature, and, nope, it ended up lumpy. We want smooth clouds of cheesecake, not little cream cheese pebbles, right? If you want to see another amazing use of this flavor profile, check out my red velvet cheesecake bites recipe!
For the Fudgy Red Velvet Brownie Layer
This is where we build that rich, dense base. Don’t try to substitute the butter for applesauce here; we need that fat for the fudgy structure!
- 1 cup (2 sticks) unsalted butter, melted
- 2 cups granulated sugar
- 4 large eggs
- 1 teaspoon vanilla extract
- 1 teaspoon white vinegar (this helps boost that classic red velvet tang!)
- 1 teaspoon red food coloring (gel preferred, remember!)
- 1/4 cup unsweetened cocoa powder
- 1 cup all-purpose flour
- 1/2 teaspoon salt
For the Creamy Cheesecake Swirl Dessert
This layer needs to be perfectly smooth and ready to drop right onto that brownie batter. Make sure your cream cheese has been sitting out for at least an hour so it’s nice and pliable.
- 8 ounces cream cheese, softened to room temperature
- 1/2 cup granulated sugar
- 1 large egg
- 1/2 teaspoon vanilla extract
Step-by-Step Guide: How to Make Red Velvet Cheesecake Brownies
This is the fun part, where all those beautiful ingredients come together! We’re building layers here, so flow is everything. Keep your oven mitts handy and your eye on the clock. This whole process, from mixing to baking, is surprisingly quick, which is great news for those midnight dessert cravings.
Preparing the Pan and Oven for Your Red Velvet Cheesecake Brownies
First things first: get that oven cranked up to 350 degrees Fahrenheit. Preheat time is your friend! Next, grab that 9×13 inch pan. I learned the hard way that trying to pry these out without help is a recipe for disaster, so line that pan with parchment paper, leaving a good couple of inches hanging over the sides. You’ll use those flaps like handles later to lift the whole thing out in one clean slab. Seriously, that parchment overhang is crucial for presentation!
Mixing the Fudgy Red Velvet Brownie Batter
In your biggest bowl, we start with the wet things. Whisk the melted butter and the two cups of sugar until they look happy together. Then, you’re going to add those four eggs, one by one, making sure each one is incorporated. Now for the color! Add your vanilla, vinegar, and that beautiful red food coloring. Whisk until it’s a uniform, vibrant red. Separately, just whisk your flour, cocoa, and salt together.
Here is the most important tip for fudginess: once you add the dry stuff to the wet stuff, mix only until you see those last few streaks of flour disappear. Stop! Seriously, stop mixing. Overworking the batter develops gluten, and we want dense and fudgy, not tough. We want cookies that mimic brownies, not cakes!
Creating the Creamy Cheesecake Swirl Dessert Layer
While the oven is heating up, use a clean bowl for the cheesecake side. Since your cream cheese is perfectly softened—I hope!—just use a mixer or a whisk and beat it with its sugar until it’s completely smooth. No lumps allowed! Then, mix in that last egg and vanilla until it’s just combined. If you look in my dreamy cheesecake brownie cookies post, you’ll see how important that smooth texture is for a good contrast!
Layering and Achieving the Perfect Marbled Red Velvet Bars
Pour that gorgeous, fudgy red velvet batter into your prepared pan and spread it out evenly. Now, take big spoonfuls of that cheesecake mixture and dot them randomly all over the top of the brownie layer. Once they are all placed, take a butter knife or a thin skewer. Gently weave it back and forth across the top to create that stunning marbled effect. Be careful not to drag the knife all the way down to the bottom; we just want a gentle swirl on the surface to get those beautiful marbled red velvet bars!
Tips for Success with Your Red Velvet Cheesecake Brownies
I know we talked about not overmixing, but I have a couple more pointers to make sure these red velvet cheesecake brownies are perfect every single time you bake them. Remember how I mentioned fudgy texture relies on timing? If you want that super dense, almost gooey center, pull them out of the oven about two minutes *before* you think they are done. That residual heat will finish the job perfectly.
Another non-negotiable? The cooling! You *must* let these set completely. The cheesecake layer is very soft when it comes out, and trying to cut a hot brownie bar is just going to result in a sugary mess that sticks to your knife. I actually chill mine in the fridge for at least two hours after they come to room temperature. That chill time solidifies the creamy swirl, giving you those clean, amazing squares you want to show off. It’s worth the wait, I promise. For other baking swirls, check out my blackberry lavender swirl cake for inspiration!
Making This a Showstopping Baked Goods Centerpiece (Serving Suggestions)
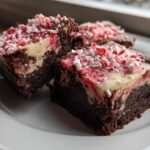
This is where we really make these babies shine! These red velvet cheesecake brownies aren’t just something you throw on a plate for dessert; they are meant to be center stage. Because of that gorgeous red and white contrast, they are absolute stars for holidays, but honestly, they deserve their own party.
If you’re making these for Valentine’s Day, forget fussy desserts! These marbled bars are rich, romantic, and incredibly decadent without needing fancy piping equipment. Just slice them into neat squares, and the color does all the talking—it’s the perfect cheesecake pairing for a cozy night in.
For Christmas, they look amazing dusted lightly with powdered sugar, which makes the red pop even more against the white background. Or, if you’re feeling extra, grab some high-quality white or dark chocolate shavings to sprinkle over the top right before serving. That little bit of extra texture is just divine!
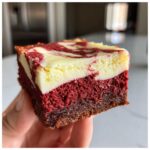
When it comes to presentation, serving these slightly cool from the fridge is best, as the cheesecake layer stays firm and those clean slices really show off the marbling. Believe me, once you put these on the table, they disappear faster than anything else. They are truly the best of both worlds: the comforting richness of a brownie with the bright tang of cheesecake!
Storage and Reheating Instructions for Red Velvet Cheesecake Brownies
Listen, these brownies are so rich and indulgent you might actually have leftovers—though I doubt it! But if you do, storage is really important because of that beautiful, creamy cheesecake layer we worked so hard to perfect. Since cream cheese is involved, these need to live in the fridge, not just sitting out on the counter like a regular fudgy brownie might.
Wrap them up tightly. I usually use plastic wrap first, maybe following it with a layer of aluminum foil, just to keep all the moisture locked in. When they are stored this way in the refrigerator, they keep beautifully for about four or five days. Honestly, I think they taste even better on day two, as the flavors really meld together overnight.
Now, reheating? That’s tricky. If you tried to microwave a chilled bar, the brownie parts might get warm, but the cheesecake swirl will get weirdly soft and separate a bit. I almost always serve these straight from the fridge, cool and firm—that’s when the texture contrast is best!
If you absolutely must take the chill off, I recommend letting one square sit on the counter for about 20 minutes before you dive in. If you’re making a giant batch and need to freeze them, that actually works great! Just follow the tight wrapping instructions above and pop them in the freezer for up to three months. Thaw them in the fridge overnight, and they should be perfect. See? Practicality is key in my kitchen!
Ingredient Notes and Substitutions for Your Red Velvet Cheesecake Brownies
I always get questions after people see the ingredient list for these red velvet cheesecake brownies, and that’s great! It means you care about the details, and that’s how you get that amazing, showstopping result. When it comes to baking something this hybrid, small ingredient choices have huge impacts on texture and color.
Let’s talk about two things that always cause readers to pause: the food coloring and the cream cheese. Don’t worry, I have the answers right here, straight from my test kitchen notes!
For the cream cheese, I firmly believe that full-fat, brick-style cream cheese is the only way to go, especially for that cheesecake layer. Low-fat versions have too much water content, and that throws off the richness and the set of the swirl. Trust me, that extra bit of fat is what keeps your swirl creamy instead of rubbery.
Gel Food Coloring Versus Liquid Drops
If you take one thing away from this whole giant recipe, let it be this: Use the gel food coloring. I learned this the hard way years ago when making my first red velvet cake. If you use the standard liquid coloring you shake out of a tiny bottle, you need so much of it to get that deep, vibrant red that you actually change the structure of the brownie batter.
Too much liquid means you have to compensate with extra flour or cocoa, and suddenly your fudgy base is tasting a little chalky or baking up too cakey. The gel pastes, however, are super concentrated. You can get that perfect, rich red color with just a small dab, keeping our beloved dry-to-wet ratios totally intact. It’s a simple swap that makes a huge visual difference!
Can I Skip the Vinegar in the Brownie Batter?
That little teaspoon of white vinegar seems weird in a brownie, right? It feels out of place, but it’s part of that traditional red velvet profile. Red velvet, at its heart, is just chocolate cake with an acidic component that reacts slightly with the cocoa, boosting the red pigments and adding a tiny bit of tang. You won’t taste vinegar at all once these red velvet cheesecake brownies are baked, but leaving it out means you lose that classic, subtle complexity that balances the sweetness of the cheesecake top.
If you absolutely don’t have vinegar, a teaspoon of fresh lemon juice works in a pinch, but white vinegar is always my first choice for the cleanest result. We’re aiming for balance, even in our indulgent dessert bars!
Frequently Asked Questions About This Creamy Cheesecake Swirl Dessert
I totally get it—when you’re mixing two beloved recipes like this, questions are bound to pop up! These questions usually revolve around getting that perfect texture and color, which is what we worked so hard for. Here are some things folks always ask me about making these red velvet cheesecake brownies.
Can I use a box of red velvet cake mix instead of making the batter from scratch?
I totally understand wanting a shortcut! For a quick fix, you can substitute the brownie batter ingredients with a box of red velvet cake mix, but you have to adjust it. Usually, you replace the oil called for on the box with melted butter and maybe reduce the liquid slightly so it stays thick. However, I have to warn you: the texture won’t be the same. Box mixes are formulated to be cakey, and these brownies are meant to be fudgy. If you use the mix, you’ll get delicious marbled bars, but they won’t have that deep, dense chewiness that my scratch recipe provides. Trust me, making the brownie part from scratch is easy and worth it!
My swirl disappeared! What went wrong with my marbled red velvet bars?
Oh, this is the most common heartbreak! If your swirl vanishes, it almost always means you swirled too much. Think of it like gentle kisses on the top, not aggressive churning! You should only run your knife or skewer through the batter a maximum of three or four times across the entire pan. If you mix it too much, the red velvet batter and the cheesecake batter combine completely, resulting in a uniform pinkish-brown color instead of that beautiful, distinct contrast. Next time, swirl less—you want the cheesecake dots to remain highly visible!
Can I freeze these red velvet cheesecake brownies?
Yes, you totally can! This batch makes a big 9×13 pan, so freezing is a great idea for later. Just make sure you chill them completely until the cheesecake layer is completely firm first. Wrap each individual square tightly in plastic wrap, and then place them all into a freezer-safe zip-top bag or an airtight container. They hold up incredibly well in the freezer for up to three months. When you’re ready to enjoy one of these indulgent dessert recipes, just move it to the fridge the night before to thaw, and it’s ready to go. So convenient!
Why is my cheesecake layer not tangy enough?
If you aren’t getting that lovely, bright tang that cuts through the richness of the chocolatey red velvet, you probably need to check your sugar ratio in the filling. The sugar in the cheesecake part is what balances its natural sourness. If you’re heavy on the sugar, it tastes sweet, not tangy. Also, make sure you’re using the recommended amount of cream cheese, and perhaps add a tiny squeeze of lemon juice if you want a real punch of flavor next time—I know some followers who do that for extra zing! You can check out my lemon cream cheese dump cake for ideas on boosting that bright flavor profile!
Estimated Nutritional Data for This Indulgent Dessert Recipe
Look, I’m not going to sit here and pretend these glorious red velvet cheesecake brownies are diet food. They are rich, they are decadent, and they are absolutely worth every single calorie! But I know some of you like to keep track, so I ran the numbers based on our ingredient list. This way, you know exactly what you’re diving into when you cut that first square!
Please remember, these figures are just an educated guess based on the amounts listed in the recipe. Every brand of flour, the exact size of your eggs, and how thick you cut your pieces can change things up a bit. So take these numbers as a good guide, definitely not gospel truth!
- Serving Size: 1 square
- Calories: About 350—I mean, they are thick squares, so that’s a bargain!
- Sugar: Hold onto your sweet tooth, there’s about 35 grams here.
- Fat: Around 22 grams total, with 14 grams being that delicious saturated fat from the butter and cream cheese.
- Carbohydrates: Roughly 35 grams total.
- Protein: We get about 5 grams in there from all those eggs and dairy.
See? Pure indulgence! Just make sure you serve them chilled because that texture is everything. Enjoy every single bite of this magnificent creamy cheesecake swirl dessert!
PrintRed Velvet Cheesecake Brownies
Make fudgy red velvet brownies topped with a creamy, tangy cheesecake swirl for a decadent layered dessert.
- Prep Time: 20 min
- Cook Time: 35 min
- Total Time: 55 min
- Yield: 16 servings
- Category: Dessert
- Method: Baking
- Cuisine: American
- Diet: Vegetarian
Ingredients
- 1 cup (2 sticks) unsalted butter, melted
- 2 cups granulated sugar
- 4 large eggs
- 1 teaspoon vanilla extract
- 1 teaspoon white vinegar
- 1 teaspoon red food coloring (gel preferred)
- 1/4 cup unsweetened cocoa powder
- 1 cup all-purpose flour
- 1/2 teaspoon salt
- 8 ounces cream cheese, softened
- 1/2 cup granulated sugar (for cheesecake layer)
- 1 large egg (for cheesecake layer)
- 1/2 teaspoon vanilla extract
Instructions
- Preheat your oven to 350°F (175°C). Line a 9×13 inch baking pan with parchment paper, leaving an overhang for easy removal.
- Prepare the brownie batter: In a large bowl, whisk together the melted butter and 2 cups of sugar until combined.
- Whisk in the 4 eggs one at a time. Mix in the vanilla extract, white vinegar, and red food coloring until the color is uniform.
- In a separate bowl, whisk together the cocoa powder, flour, and salt. Gradually add the dry ingredients to the wet ingredients, mixing until just combined. Do not overmix.
- Prepare the cheesecake layer: In a medium bowl, beat the softened cream cheese and 1/2 cup sugar until smooth. Beat in the remaining egg and 1/2 teaspoon vanilla extract until fully incorporated.
- Spread the red velvet brownie batter evenly into the prepared pan.
- Drop spoonfuls of the cheesecake mixture over the brownie batter.
- Use a knife or skewer to gently swirl the cheesecake mixture into the brownie batter to create a marbled effect. Do not over-swirl.
- Bake for 30 to 35 minutes, or until the edges are set and a toothpick inserted near the center comes out with moist crumbs attached, not wet batter.
- Let the brownies cool completely in the pan on a wire rack before lifting out using the parchment paper overhang and cutting into squares.
Notes
- For a fudgier texture, slightly underbake the brownies by about 2 minutes.
- Use gel food coloring for the most intense red color without adding too much liquid.
- Chill the brownies for at least 2 hours before slicing for cleaner cuts.
Nutrition
- Serving Size: 1 square
- Calories: 350
- Sugar: 35
- Sodium: 150
- Fat: 22
- Saturated Fat: 14
- Unsaturated Fat: 8
- Trans Fat: 0.5
- Carbohydrates: 35
- Fiber: 1
- Protein: 5
- Cholesterol: 85
Comments are closed.