


Oh my goodness, have you started your holiday baking yet? It’s the best time of year, and I swear the smell of peppermint and cocoa instantly makes me feel cozy! Every December, I go on a mission to conquer the perfect festive square, and let me tell you, I finally nailed it this year. Forget those cakey, crumbly things—I’m talking about intensely fudgy bases that practically dissolve in your mouth. These candy cane brownies are my absolute new favorite. After a few attempts that were just too dry (oops!), I figured out the magic ratio of butter to cocoa, and now every batch comes out jaw-droppingly rich. The combination of deep dark chocolate with that bright, cool peppermint swirl? It’s pure Christmas magic right there.
Why You Will Love These Fudgy Candy Cane Brownies
Trust me, you’re going to want to bookmark this one because it checks every single holiday dessert box! I just had to tell you why these candy cane brownies deserve a spot on your dessert table this year:
- Seriously Fudgy Texture: These aren’t your average brownies; they are dense, chewy, and pull apart perfectly thanks to the butter-to-cocoa ratio. You won’t find any cakey bits here.
- Peppermint Perfection: That hint of bright mint cutting through the dark chocolate base is exactly what holiday dreams are made of. It’s festive without being overwhelming.
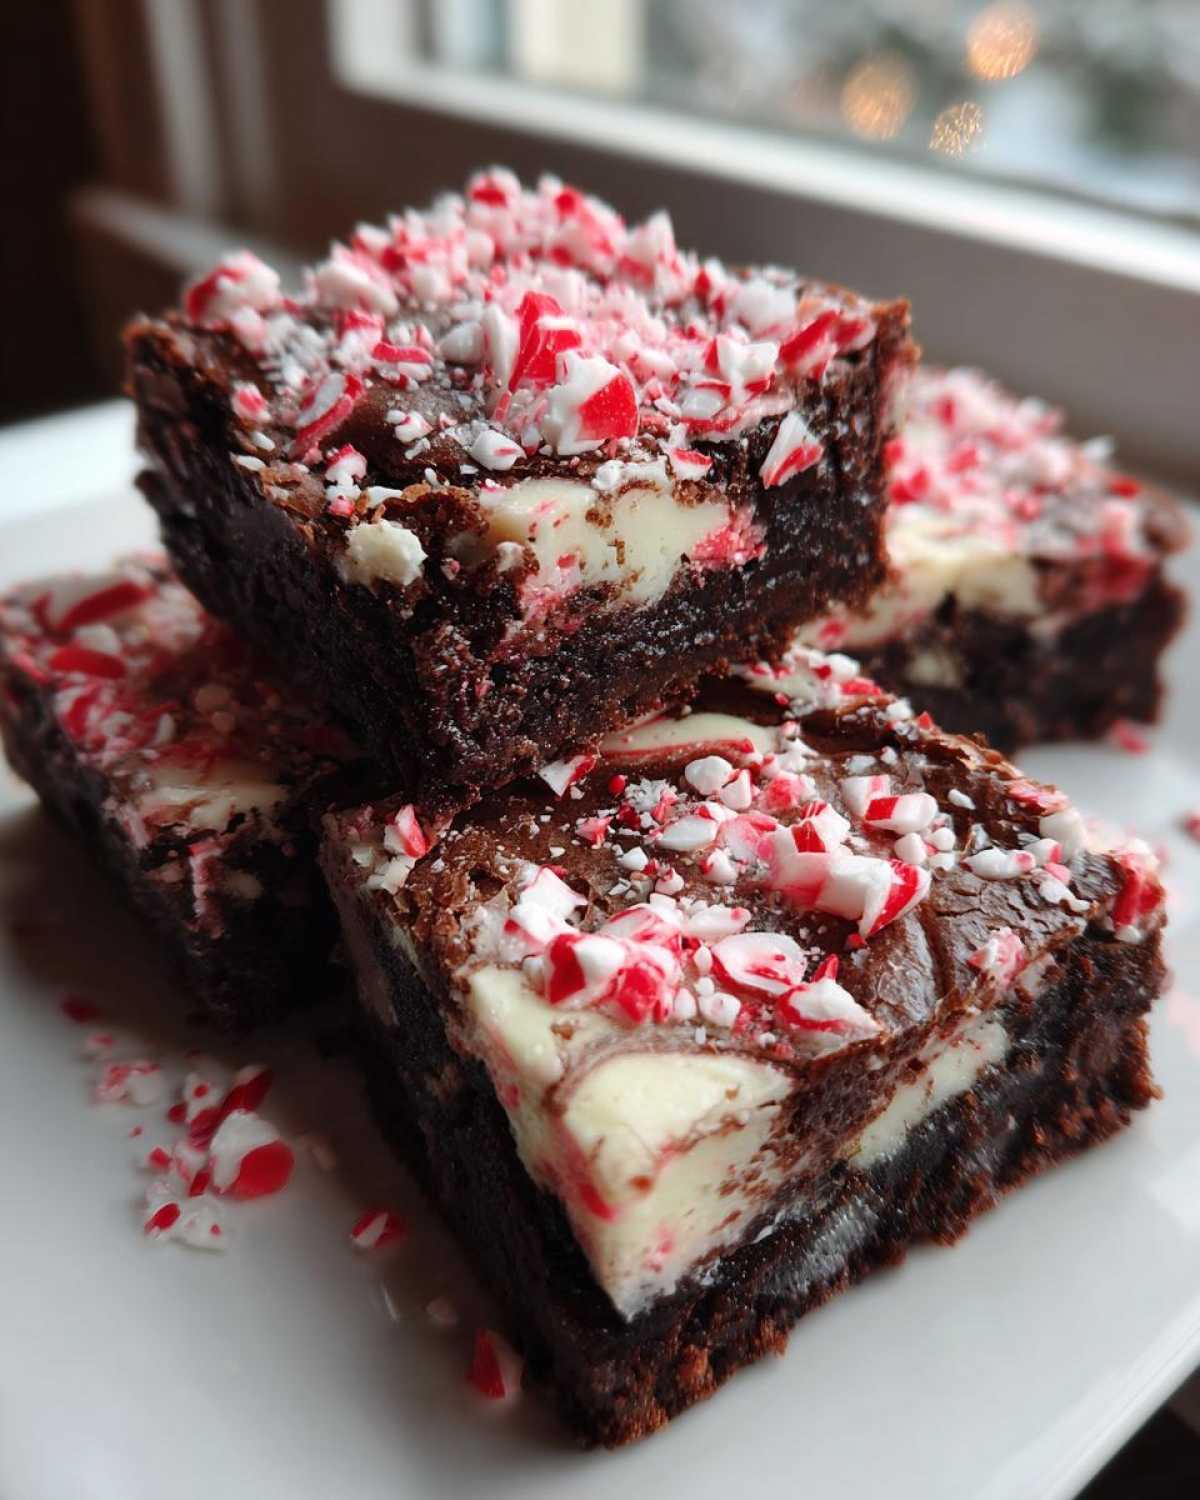
- Stunning Visual Appeal: The chocolate peppermint swirl looks fancy, but it’s so easy to achieve! They look like they took hours, making them perfect for any holiday party spread.
- Great for Make-Ahead Baking: Honestly, they taste even better the next day. You can whip these up on Christmas Eve and have dessert completely handled.
- Incredibly Crowd-Pleasing: Everyone loves candy canes, and everyone loves rich chocolate. This pairing is a guaranteed hit for neighbors, friends, or family gatherings.
- Easy Execution: Despite looking gourmet, the process is straightforward. You just need to check out the details in our guide to layered brownies if you need an extra confidence boost!
When you get that first rich, minty bite, you’ll see why I’m so excited about this recipe!
Essential Ingredients for Rich Candy Cane Brownies
I’ve learned that the difference between a *good* brownie and a truly great, fudgy candy cane brownie comes down to respecting the ingredients. We don’t stray from this list, especially because we want that signature chewy texture every single time we bake these Christmas dessert squares.
Here is exactly what you need assembled before you even turn the oven on. Organization is half the battle, right?
- 1 cup (2 sticks) unsalted butter (This is key for that rich texture!)
- 1 1/4 cups unsweetened cocoa powder (Don’t even think about instant mix here!)
- 2 cups granulated sugar
- 4 large eggs
- 1 teaspoon vanilla extract
- 1 cup all-purpose flour
- 1/2 teaspoon salt
- 4 ounces white chocolate, chopped (crucial for the swirl)
- 1/4 cup heavy cream
- 1/2 teaspoon peppermint extract
- 1 cup crushed candy canes
Ingredient Notes and Substitution Tips
Now, let’s talk specifics! You asked me about fudge versus cake, and that mostly comes down to the butter and cocoa ratio in these fudgy brownie recipe stars. It’s loaded with fat, which is what keeps them chewy rather than cakey.
For the chocolate swirl, please go for good quality white chocolate chunks or a bar that you chop yourself. The stuff that comes pre-shredded or in chips often has stabilizers that make it seize up or turn grainy when you try to melt it with the cream. We want it smooth and gorgeous for that chocolate peppermint swirl effect.
The peppermint extract is strong stuff, so if you’re using a different brand than what I use, maybe try half a teaspoon first, taste your swirl mixture, and then add more if you need that extra punch of mint! If you can’t find peppermint, you could potentially use a drop of pure mint oil, but I haven’t tested that for these peppermint chocolate treats yet, so proceed with caution!
Step-by-Step Instructions for Perfect Candy Cane Brownies
Okay, now for the fun part where all those amazing ingredients come together! Getting the technique right is how you guarantee these candy cane brownies come out perfectly fudgy and marbled every single time. I know you want results fast, and this whole process, from mixing to topping, is surprisingly quick—you can totally sneak these in between wrapping gifts!
Preparing the Fudgy Brownie Base
First things first, get your oven humming at 350°F (175°C), and make sure you’ve lined that 9×13 pan with parchment paper, leaving those overhang “handles.” That way, lifting them out later is a breeze! We start by melting the butter gently on the stove, then whisking in the cocoa powder until it’s smooth as silk. Next, you stir in the sugar and then beat those four eggs in one by one, followed by the vanilla.
Here’s the non-negotiable rule for fudgy flavor: Add the flour and salt mixture gradually, mixing *just* until you don’t see white streaks anymore. Overmixing at this stage develops gluten, and we want chewy, not tough! Once combined, pour half of that gorgeous batter into the pan. Don’t forget that link to my favorite brown butter cookie post—it uses a similar principle to build flavor!
Creating the Chocolate Peppermint Swirl
While the first half of the batter rests, let’s whip up our beautiful topping. Melt the white chocolate slowly in the microwave (30 seconds at a time!), then stir in the heavy cream and the peppermint extract until you have a smooth, pourable ganache. This mixture is what gives us that wonderful peppermint chocolate swirl contrast.
Dollop this lovely white mixture randomly over the batter already in the pan. Pour the remaining brownie batter right on top—don’t try to be neat! Now, grab a knife or a skewer and gently run it through the two layers just a few times to get that marbled, pretty look. Be gentle! We aren’t combining them; we’re just creating ribbons!
Baking and Topping Your Candy Cane Brownies
Pop your pan into the preheated oven for about 25 to 30 minutes. This is the most important check: when you test them, you’re looking for moist crumbs clinging to the toothpick, not a clean, dry stick, or you’ve baked them too long! Since these are rich and fudgy, they need a touch of wetness when they come out.
The second they come out of the oven—immediately!—sprinkle those crushed candy canes all over the surface. The residual heat helps them stick beautifully. Seriously, do this while they are still sizzling hot! If you wait even five minutes, they just won’t adhere as well. Then, let them cool completely—and I mean *completely*—before slicing up these fantastic festive dessert squares.
Tips for Making the Best Candy Cane Brownies
I think persistence pays off in baking, and these little tips are what take my candy cane brownies from good to absolutely legendary for the holidays. My number one piece of advice? Patience during the cooling stage!
You’ll be tempted—oh, I know you will be—to cut into them the moment they are just warm, but resist! If you cut them warm, that gorgeous white chocolate swirl smears everywhere, and you lose those neat, chewy holiday brownies squares we worked so hard for. Let them cool completely in the pan, maybe even chilling them in the fridge for an hour. Trust me, the wait is worth the clean slice.
Also, think about how you crack those candy canes. If you put them in a plastic bag and whack them with a rolling pin, you get giant shards, which makes eating tricky. I like to put mine in a clean kitchen towel and tap them lightly. This gives you a mix of tiny powder for color and medium pieces for crunch!
Storage and Make Ahead Tips for Holiday Brownies
One of the biggest blessings during the busy holiday season is being able to cross treats off the list early, am I right? These candy cane brownies are champions when it comes to making ahead. You absolutely do not need to stress about baking these the day of your party!
The notes suggested they are best the next day, and I completely agree. Once they are completely cool—and I mean stone-cold, which ensures the peppermint doesn’t melt weirdly—you just need to wrap that pan tightly. Use plastic wrap first, then maybe a layer of aluminum foil. Store them right on the counter at room temperature. They stay perfectly fudgy and moist for a solid three days if you keep them sealed up well!
If you need to make them even further out, say a week ahead, you can definitely freeze them! Once cooled and cut into squares (this is important—don’t try to freeze the whole thing), stack them with small squares of parchment paper between each one. Pop them into a freezer-safe zip-top bag or container. They freeze beautifully for up to a month. When you want to serve them, just pull out the number you need and let them thaw on the counter for an hour or two. Serving them slightly chilled is actually fantastic for texture!
If you’re storing them long-term or just trying to organize your kitchen for the whole week, you should check out my guide on overall Christmas make-ahead dishes. It has saved me so many last-minute headaches!
Variations on Peppermint Chocolate Treats
While I absolutely stand by the core recipe for these candy cane brownies—it’s the best, trust me—sometimes you just want to mix things up a little bit when you’re baking for the holidays every single year! I always keep a few tricks up my sleeve for when I want to serve something familiar but with a little twist. This way, they feel special even if you’ve made them three times already this month!
One of my favorite things to do is create a peppermint bark brownie variation. Instead of just crushing up traditional red and white candy canes for the topping, I use actual pieces of broken peppermint bark—you know, the stuff with the dark chocolate base and the white chocolate drizzle on top? When you crush that up and sprinkle it on while the brownies are hot, you get that double hit of dark and white chocolate right on the surface, which is just incredible with the mint swirl we already have hiding inside.
Another really fun change is jazzing up the base batter itself. If you feel like these are too chocolate-heavy, try throwing in about a cup of semi-sweet chocolate chips right before you pour the batter into the pan. They melt during baking, creating little pockets of gooey chocolate bliss throughout the fudgy center. That makes them even richer than the standard chocolate peppermint swirl!
If you’re feeling bold, you can experiment with extracts! While peppermint is the queen of Christmas, sometimes I cut the peppermint extract in half and add just a tiny little dash (and I mean tiny!) of almond extract. It adds a subtle, almost cherry-like complexity that plays wonderfully with the chocolate. It’s a very grown-up flavor profile, which is nice if you’re serving these alongside some sophisticated holiday cocktails. If you like experimenting with minty desserts, you really should check out my recipe for swirled mint ice cream; it uses a similar concept!
Ultimately, these festive dessert squares are strong enough to handle most additions you throw at them, but honestly, keeping the filling swirl is what ensures you get that signature look for your Christmas desserts.
Serving Suggestions for Festive Dessert Squares
Once you manage to cut these perfect, cool, chewy candy cane brownies, the next big question is, what do you serve them with? Because they are so rich and intensely chocolatey, you don’t need much to go alongside them, but a few little thoughtful additions can take them from amazing to absolutely unforgettable, especially if you’re serving them after a huge holiday dinner!
For me, it’s all about balance. The brownies hit that deep, sweet cocoa spot, and the peppermint swirl is cool and sharp. So, you need something simple to wash it down or cut the richness.
- A Simple Glass of Milk: Seriously, don’t knock a classic! A tall, ice-cold glass of whole milk is the ultimate partner for any rich brownie. It cleans the palate between bites of that dense chocolate layer.
- Hot Coffee or Espresso: This is my go-to for an evening treat. The slight bitterness of a good dark roast coffee cuts through the sugar beautifully, and the warmth contrasts wonderfully with the cool mint flavor of the peppermint. If you want to get fancy, you can whip up my shaken espresso recipe and serve it alongside these squares—the brown sugar note is delicious with dark chocolate!
- Vanilla Ice Cream: If you serve these slightly warm (which involves risking a messy cut, but sometimes you just have to!), a small scoop of high-quality vanilla bean ice cream is heavenly. The melting creaminess mixes perfectly with the crushed candy cane topping.
- Whipped Cream with a Dusting: If you want to keep it light but elegant, stick a dollop of freshly whipped cream on top right before serving. Don’t sweeten the cream too much; let the brownie do the heavy lifting. A tiny sprinkle of extra crushed candy cane on the whipped cream adds visual appeal too!
Because these are such stellar Christmas desserts on their own, you don’t need complex sauces. Just pair them with a comforting drink, and you’ve got the perfect ending to any holiday meal!
Frequently Asked Questions About Candy Cane Brownies
I know sometimes reading a recipe makes you worry if you’re doing it right, especially when you’re aiming for that perfect, dense brownie! Here are a few things people ask me all the time about making sure these candy cane brownies turn out absolutely perfect for the holidays.
How do I keep my candy cane brownies from getting dry?
Oh, this is the million-dollar question for any fudgy brownie recipe! The biggest secret, which I hammered home in the instructions, is *not* to overmix the flour into the batter. Once you add that flour, you stop stirring as soon as the white streaks disappear. Overmixing makes them tough and cakey, which is the fast lane to dryness.
Secondly, you must pull them out right when they are done. Don’t bake them until the toothpick comes out totally clean! For these chewy holiday brownies, that toothpick should have moist, soft crumbs clinging to it. If you wait until it’s dry, they’ll continue baking on the counter and dry out even more. Better too gooey than too crumbly!
Can I use extract instead of melting white chocolate for the swirl?
Technically, you could add peppermint extract to the plain brownie batter, sure, but it won’t create the swirl effect we are looking for in these chocolate peppermint swirl treats. The white chocolate mixture we create serves two purposes here.
First, the melted white chocolate mixed with cream is visually stunning—it creates those gorgeous ribbons and marbled look that makes these festive dessert squares so appealing! Second, and this is important, those pockets of white chocolate melt into little puddles of creamy, minty goodness that keep the finished brownie extra moist. Trying to achieve that moisture and visual impact with just extract is really tough. Stick to melting that white chocolate for the best results!
If you want extra mint everywhere without changing the swirl structure, you can always just add a tiny drop of peppermint extract to the main brownie batter right at the end, but the swirl needs that white chocolate fat content!
Nutritional Estimates for These Festive Candy Cane Brownies
Okay, my friends, let’s chat quickly about the numbers! I know some of you are meticulously tracking everything, and if that’s you, I totally get it. But I have to give you my usual friendly warning when it comes to the nutrition facts for these wonderful candy cane brownies.
Because I encourage so much improvisation—whether you use organic butter or that slightly crushed topping method—the actual nutritional content of your batch can fluctuate wildly! I’m just a home baker sharing tried-and-true methods, not a registered dietitian, you know?
So, treat any calorie or sugar estimate provided on a recipe card as just a rough guideline. The numbers are an estimation based on standard ingredient brands and measurements, and they can vary based on what brands you grab off the shelf.
If you need perfect, precise tracking, I always recommend plugging in the specific ingredient brands you use into your preferred tracking app. For the rest of us just trying to enjoy a delightful Christmas dessert square, just know that these are rich, decadent, and meant to be savored! For more general baking disclaimers about recipes, you can always check out my general site disclaimer page.
PrintFudgy Candy Cane Brownies with Peppermint Swirl

Make rich, fudgy chocolate brownies marbled with peppermint white chocolate and topped with crushed candy canes for a festive holiday dessert.
- Prep Time: 20 min
- Cook Time: 30 min
- Total Time: 50 min
- Yield: 24 squares
- Category: Dessert
- Method: Baking
- Cuisine: American
- Diet: Vegetarian
Ingredients
- 1 cup (2 sticks) unsalted butter
- 1 1/4 cups unsweetened cocoa powder
- 2 cups granulated sugar
- 4 large eggs
- 1 teaspoon vanilla extract
- 1 cup all-purpose flour
- 1/2 teaspoon salt
- 4 ounces white chocolate, chopped
- 1/4 cup heavy cream
- 1/2 teaspoon peppermint extract
- 1 cup crushed candy canes
Instructions
- Preheat your oven to 350°F (175°C). Line a 9×13 inch baking pan with parchment paper, leaving an overhang for easy removal.
- In a medium saucepan over low heat, melt the butter. Remove from heat and whisk in the cocoa powder until smooth.
- Stir the granulated sugar into the chocolate mixture. Add the eggs one at a time, mixing well after each addition. Stir in the vanilla extract.
- In a separate bowl, whisk together the flour and salt. Gradually add the dry ingredients to the wet ingredients, mixing only until just combined. Do not overmix.
- Pour half of the brownie batter into the prepared pan.
- In a small microwave-safe bowl, melt the chopped white chocolate in 30-second intervals, stirring until smooth. Stir in the heavy cream and peppermint extract.
- Dollop the white chocolate mixture randomly over the batter in the pan. Pour the remaining brownie batter over the top.
- Use a knife or skewer to gently swirl the white chocolate mixture into the brownie batter to create a marbled effect.
- Bake for 25 to 30 minutes, or until a toothpick inserted near the center comes out with moist crumbs attached, not wet batter.
- Remove the pan from the oven. Immediately sprinkle the crushed candy canes evenly over the hot brownies.
- Let the brownies cool completely in the pan on a wire rack before lifting them out using the parchment overhang. Cut into squares.
Notes
- For the fudgiest texture, avoid overbaking. Check the brownies slightly before the suggested time.
- You can make these brownies one day ahead and store them covered at room temperature.
- Reserve a few whole candy cane pieces for decoration if you prefer a less crushed topping.
Nutrition
- Serving Size: 1 square
- Calories: 250
- Sugar: 28
- Sodium: 85
- Fat: 14
- Saturated Fat: 9
- Unsaturated Fat: 5
- Trans Fat: 0
- Carbohydrates: 31
- Fiber: 2
- Protein: 3
- Cholesterol: 55


Comments are closed.