


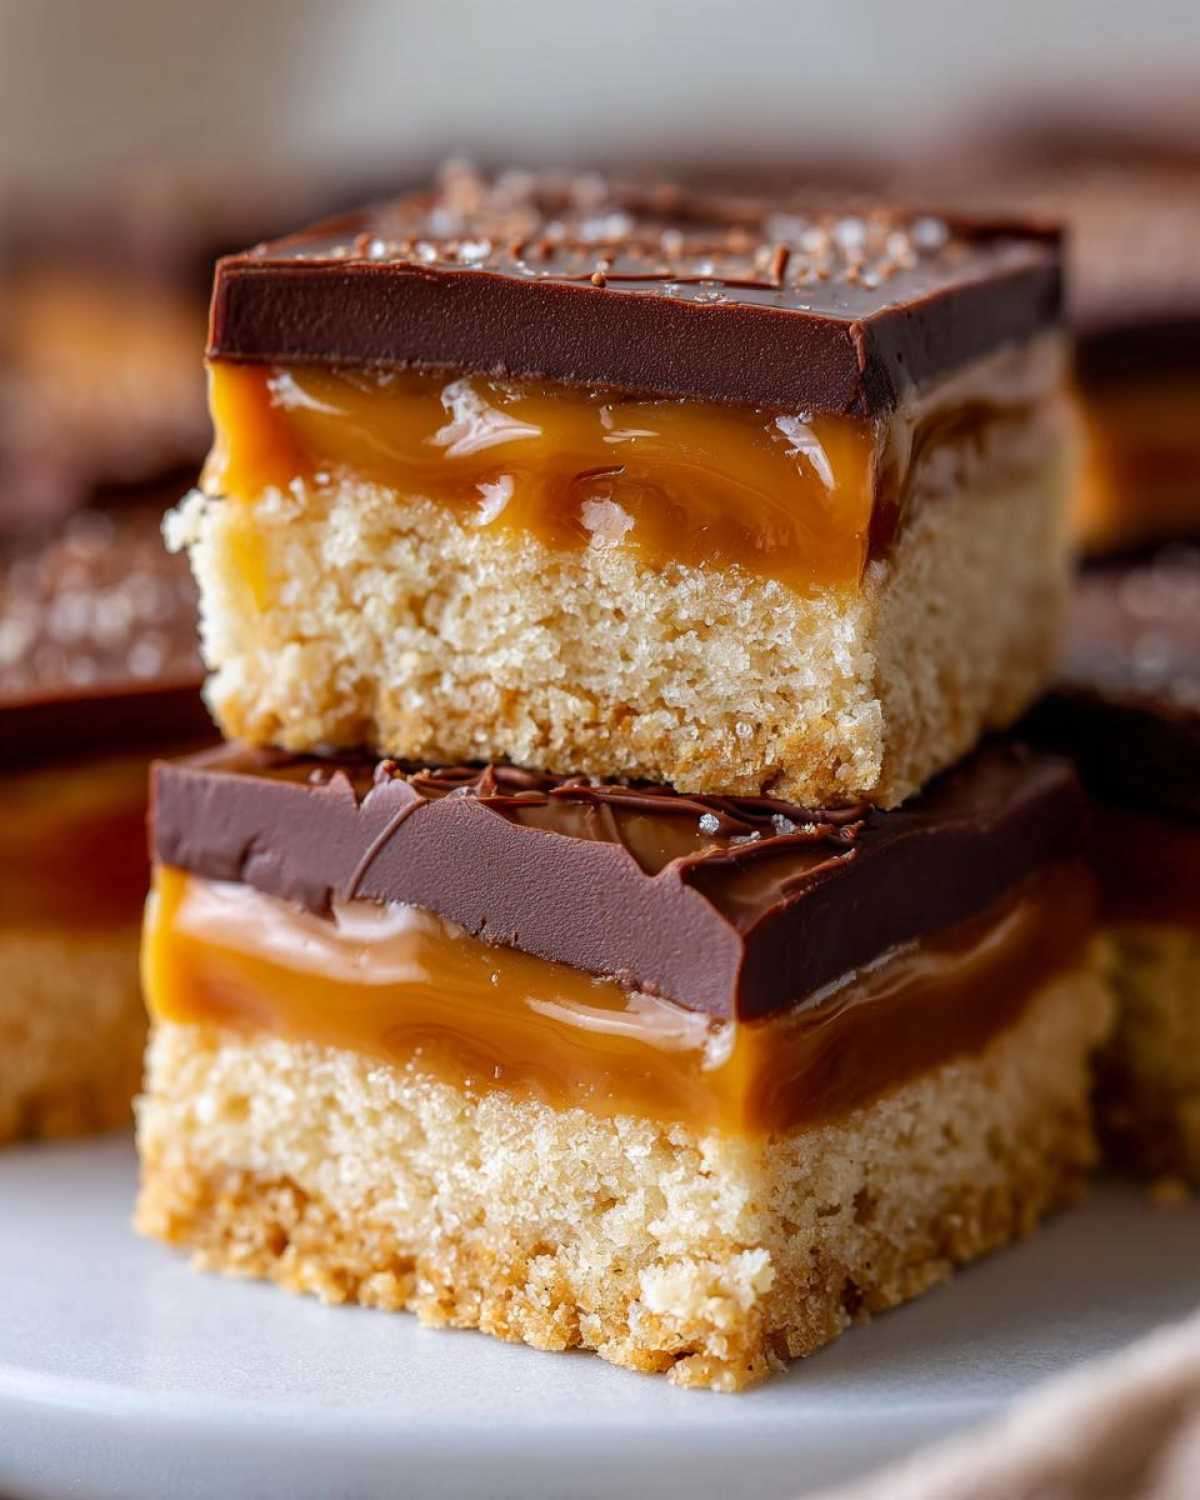
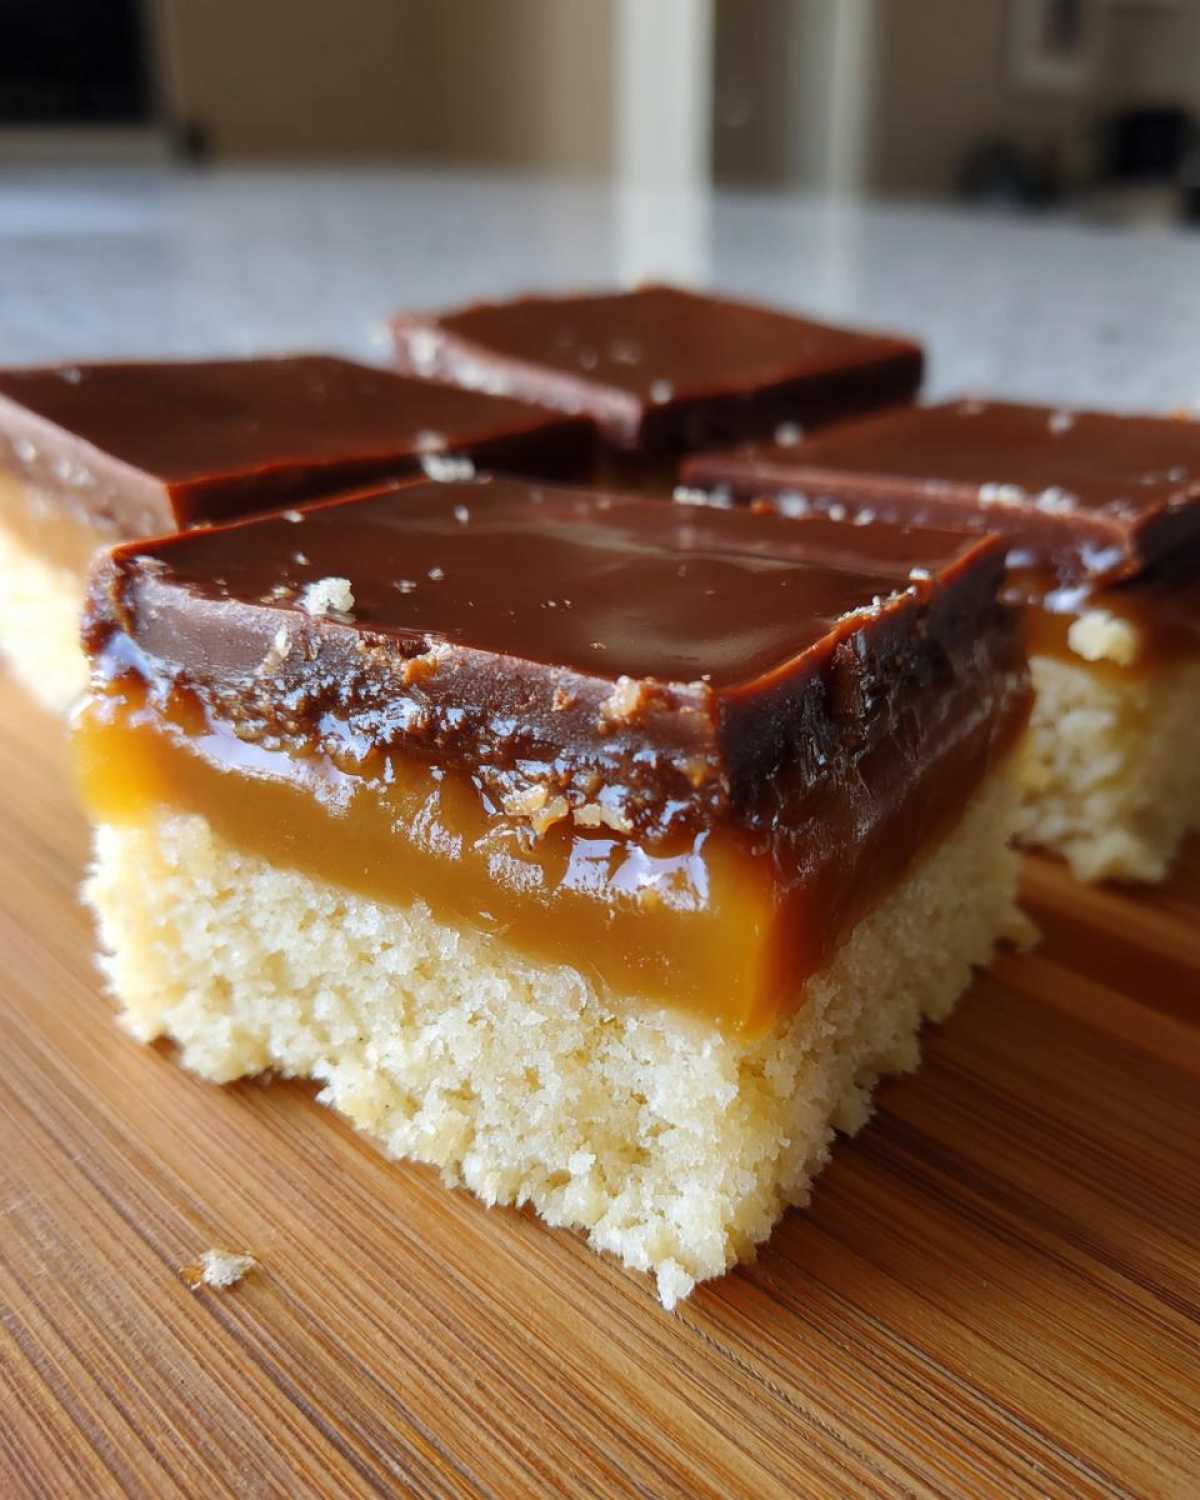
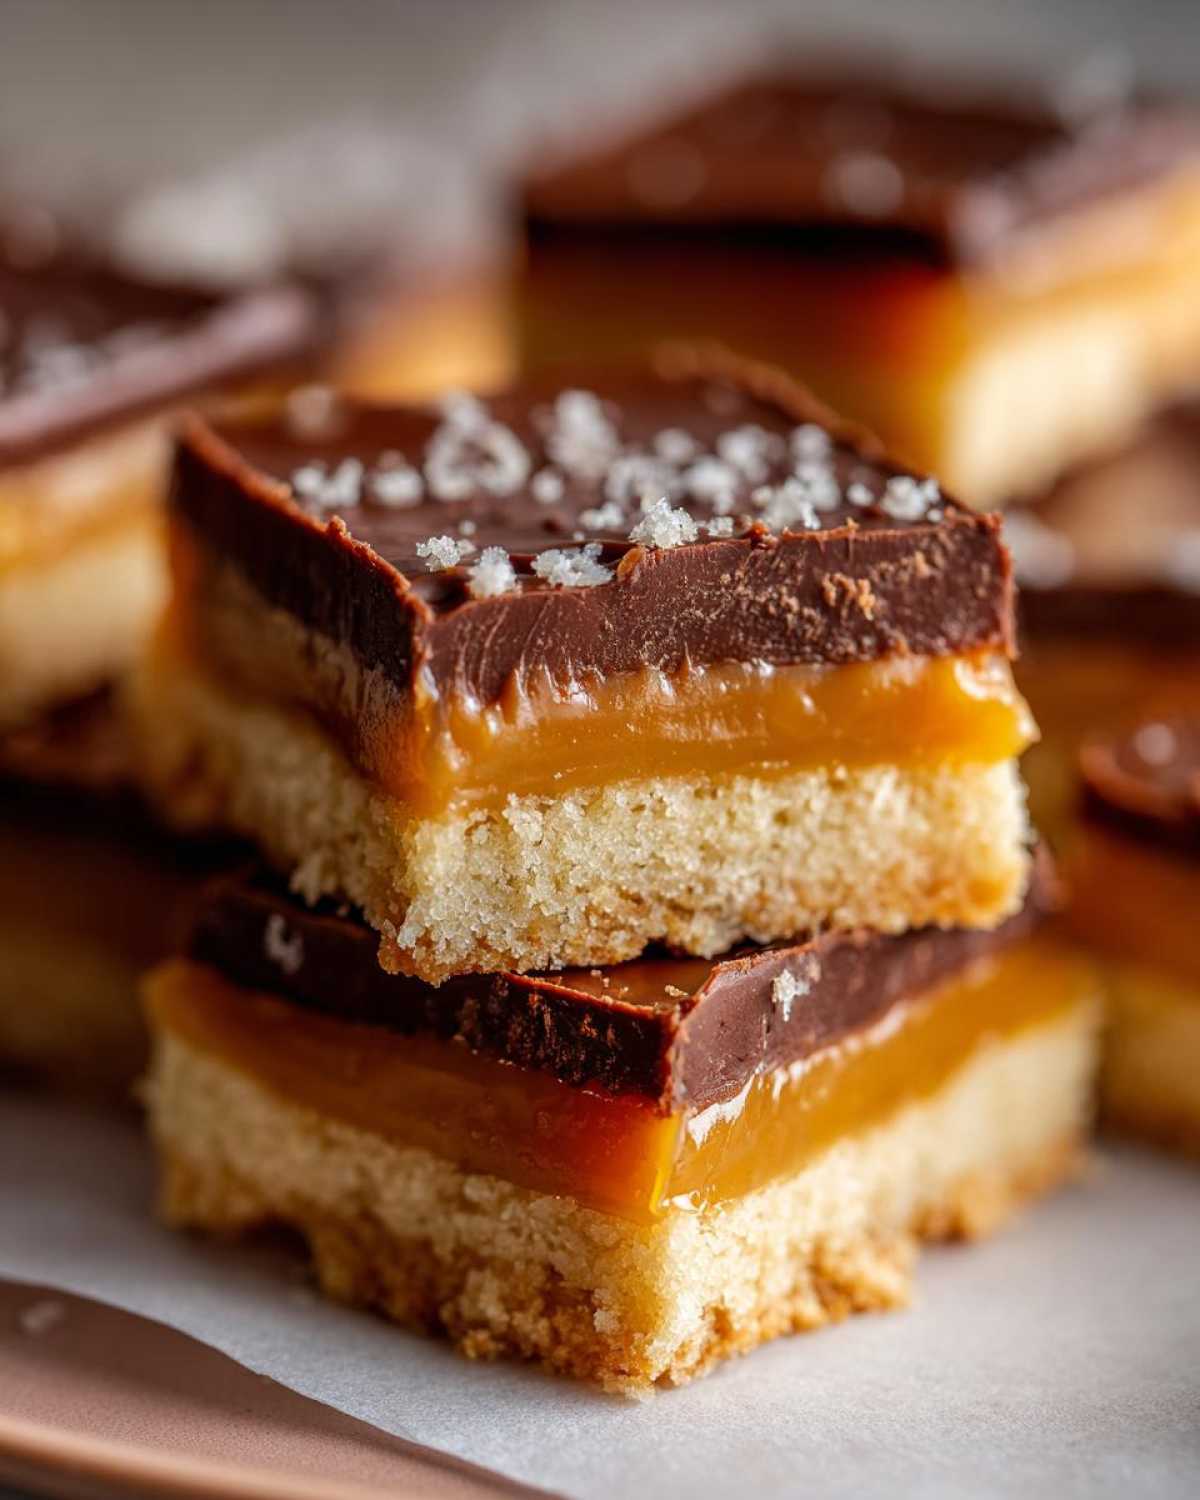
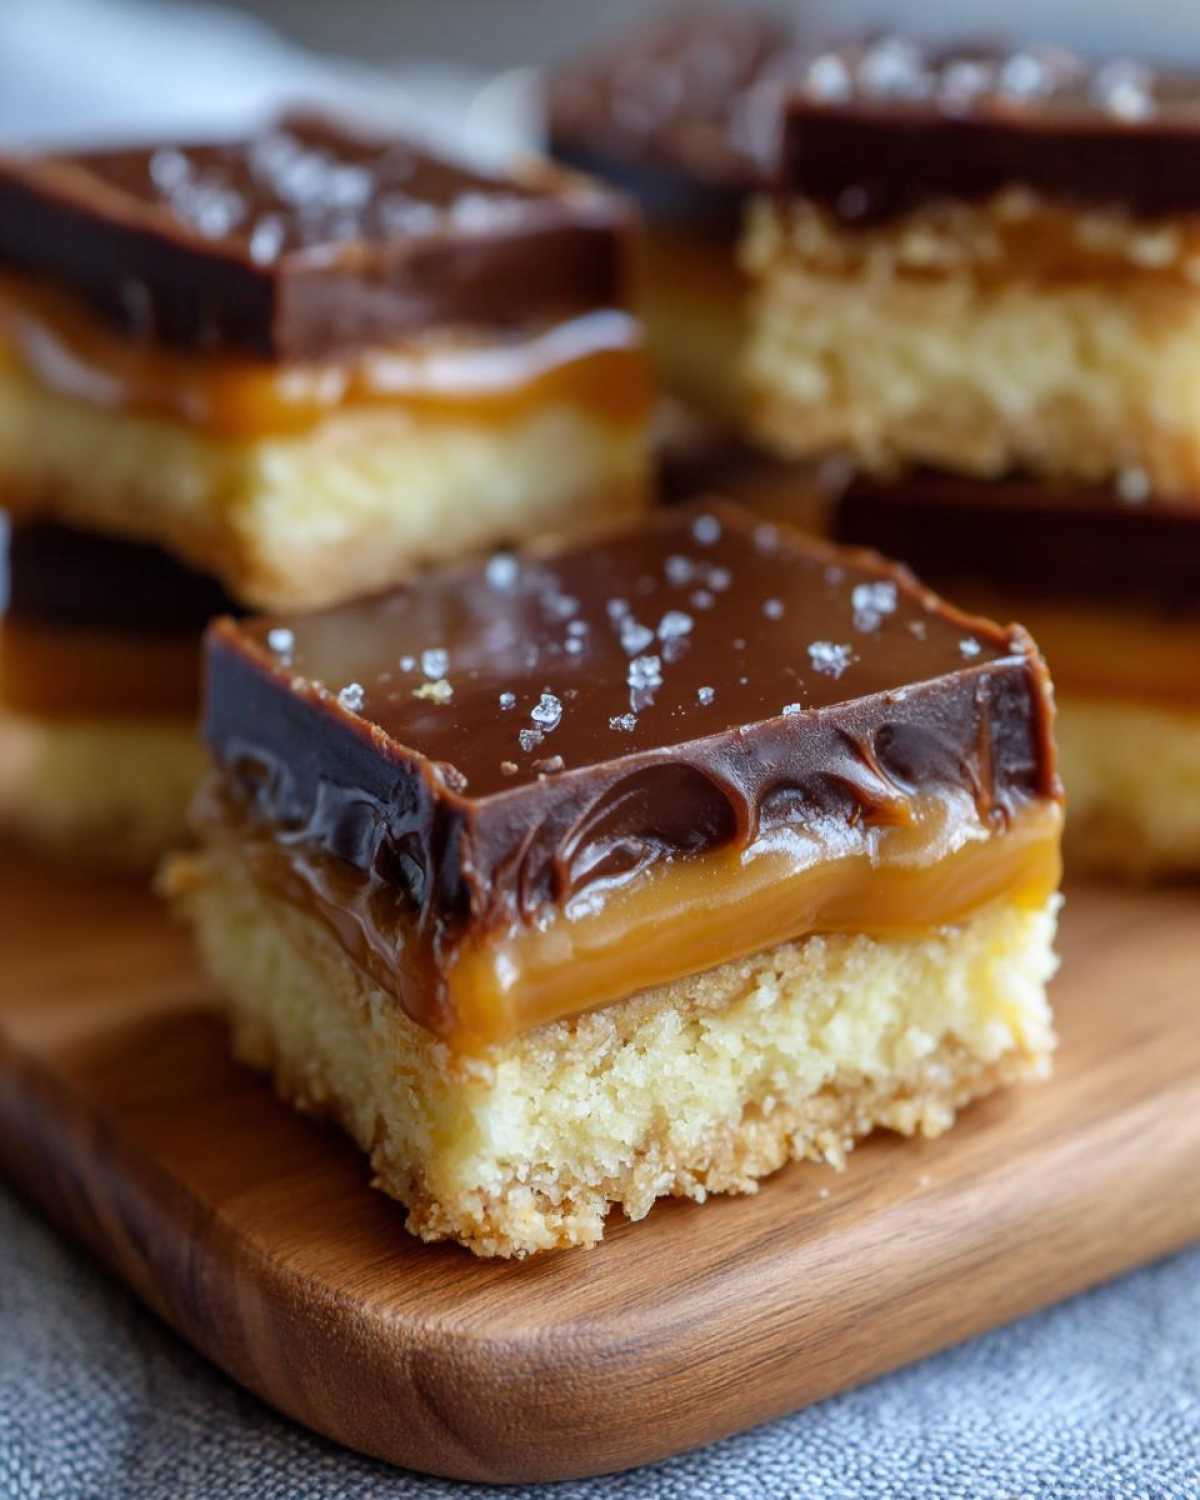
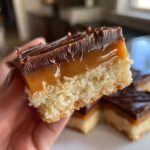
Oh, that moment when a craving hits—not just for a cookie, but for that specific candy bar crunch, that sweet, sweet chew? I know that feeling well! That’s why, after much testing (and happily eating!), I’ve perfected the recipe for what I proudly call the ultimate twix cookies right here in my own kitchen. Forget the wrapper; we’re making these from scratch, and trust me, they taste even better! This isn’t just a simple cookie; it’s a full experience featuring three perfect layers: that tender, buttery shortbread base, a lake of gloriously gooey caramel, and finally, a silky chocolate coat. Making something this decadent feel easy is my favorite kind of kitchen magic, and this copycat version is absolutely worth every second you spend bringing that candy bar joy home.
Why These Twix Cookies Are Your New Favorite Candy Bar Inspired Desserts
Seriously, these layered beauties hit every sweet spot. We’ve managed to copy that classic candy bar flavor profile perfectly, but with a homemade, supremely soft touch. They’re unbelievably satisfying without being fussy! I love sending these to friends because they pack so much flavor into every square. They turn standard baking into something truly special.
- The shortbread is rich and crumbly, not stiff, and it pairs like a dream with the filling.
- Plus, these are surprisingly simple! If you want to try more of my easy baking projects, you should absolutely check out my brown butter cookies—another winner!
Quick Dessert Recipes for Busy Weeks
While we do need a little time for chilling, the active prep is minimal—think 20 minutes for the base and 10 minutes for the caramel! This makes it one of the best quick dessert recipes when you need something impressive fast. It’s proof that simple dessert baking doesn’t have to mean boring desserts.
Achieving That Perfect Gooey Caramel Treats Texture
The trick is in cooking the caramel just enough on the stovetop. We stop cooking it right before it turns into hard candy. This ensures that when it sets, it’s perfectly set for slicing, but still wonderfully soft and chewy—the core of any great gooey caramel treats experience!
Gathering Ingredients for Your Twix Cookies Recipe
Okay, let’s get our station ready, because assembling these caramel chocolate cookies is almost as fun as eating them! I gathered all my ingredients before I even turned on the oven. That’s how we keep things stress-free around here. Having everything measured out means we can focus on mixing technique, not scrambling for the salt when the butter is just right. Remember, quality matters here, especially that butter!
For the Buttery Shortbread Cookies Base
This part needs to be tender, so using butter that’s truly softened—not melted!—is crucial for creating those air pockets when we cream it. Don’t skip that step! Here’s the lineup for our sturdy yet tender base:
- 1 cup (2 sticks) unsalted butter, softened
- 1/2 cup granulated sugar
- 1 teaspoon vanilla extract
- 2 cups all-purpose flour
- 1/4 teaspoon salt
Creating the Gooey Caramel Layer
This is where the magic starts to happen! We use the classic combo of condensed milk and brown sugar to get that rich, pull-apart texture. If you’re looking for inspiration on other rich recipes, you might love my brown butter raspberry cookies!
- 1 (14 ounce) can sweetened condensed milk
- 1/2 cup packed light brown sugar
- 1/4 cup (1/2 stick) unsalted butter
- 1 teaspoon salt
For the Smooth Chocolate Topping
We need a good topping for those layered dessert cookies! I always add just a little bit of shortening or coconut oil to the chocolate chips. Why? Because it guarantees that your final chocolate layer stays beautiful and smooth—it helps prevent that dry, cracking look, giving you a gorgeous drizzle or a solid sheet of chocolate that sets perfectly.
- 1 cup semi-sweet chocolate chips
- 1 tablespoon vegetable shortening or coconut oil
Step-by-Step Instructions for Easy Homemade Twix Cookies
Alright, time to put on the apron and let’s build these amazing layers! Honestly, watching this come together in a pan is half the fun. I always start by getting the oven humming at 350°F (175°C) and prepping an 8×8 pan with parchment paper—remember to leave an overhang! That overhang is your best friend later when lifting the whole batch out. You’ve got this!
Baking the Buttery Shortbread Cookies Layer
First up, we need that perfect, tender base. Cream your softened butter with the granulated sugar until it’s fluffy—we want air in there! Add vanilla, then gently mix in your flour and salt until it *just* comes together. Don’t go overboard mixing once the flour is in; we don’t want tough shortbread! Press that lovely dough firmly and evenly into your prepared pan. Pop it in the oven for about 15 to 18 minutes, just until those edges look happy and golden. Pull it out and get ready for caramel time!
Cooking the Caramel Chocolate Cookies Filling
This is where we need your full attention for a minute! In a saucepan, combine everything for the gooey layer: sweetened condensed milk, brown sugar, the extra butter, and salt. Bring it to a boil over medium heat, and here is the crucial bit: stir constantly! You don’t want it sticking or burning on the bottom. Let it bubble and thicken for 5 to 7 minutes. Pour that hot, thick caramel right over your warm shortbread base. Back into the oven it goes for just 10 more minutes. Then, let it cool completely—I mean it, about an hour—so that caramel sets up nicely!
Finishing with the Chocolate Topping and Slicing Your **Twix Cookies**
Once the caramel is totally cool and not molten anymore, we add the chocolate top coat. Melt your chocolate chips and shortening together in the microwave, but stop every 30 seconds to stir. We don’t want scorched chocolate! Spread that smooth topping evenly over the caramel. Now comes the hard part: patience! Chill the whole thing in the fridge for at least an hour until the chocolate is firm. This chilling step is key for those clean slices we see on recipes online, like those great ones over at The Best Blog Recipes! Once firm, lift it out using the parchment overhang and slice into perfect squares or those lovely layered dessert cookies bars!
Tips for Success Making Copycat Twix Bars Cookies
Making these layered wonders is so rewarding, but like any great copycat recipe, little details make all the difference between “good” and “absolutely addictive.” Based on my trials, here are the insider secrets I stick to so that my copycat Twix bars cookies come out perfectly chewy every single time. Remember, we are aiming for that satisfying snap of chocolate, followed by the soft chew of caramel, all supported by a tender base!
Controlling the Caramel for Soft and Chewy Twix Cookies
When you’re stirring that caramel mixture on the stove, watch it closely! The recipe notes tell you not to overbake it, and I can’t stress that enough. If you cook it too long, it gets rock hard once it cools, and you lose that signature gooey pull that makes a Twix cookie a Twix cookie. I always pull mine off the heat when it looks thickened but still pours easily. It will keep cooking slightly when it’s sitting on top of that warm shortbread, keeping it perfectly soft. If you want to experiment with richer flavor, always check out my brown butter cookie recipes for inspiration on deepening flavor profiles!
Achieving Clean Slices on Your Layered Dessert Cookies
Nobody wants a messy pile of chocolate crumble when they try to cut these beautiful bars! To get those picture-perfect squares that look amazing on a plate (or on Pinterest!), you need the chocolate topping to be completely set. The recipe calls for an hour of chilling, which is usually enough, but if I’m in a rush or serving them right away, I take it one step further.
Pop the whole pan into the freezer for about 15 minutes *after* the chocolate is firm but before you slice. This hardens the chocolate just enough so your knife glides through cleanly without dragging the caramel layer underneath. It makes cutting those neat little layered dessert cookies so much easier!
Variations on the Classic **Twix Cookies** Format
I absolutely love that we made this recipe in a bar format because it’s so easy to slice and serve, but sometimes you want something a little more individual, right? You know I always want you to feel like you can play in the kitchen! If you’re looking for different ways to present these amazing caramel chocolate cookies, we can totally adapt this recipe. It’s all about having fun with the shortbread base, which is so versatile.
Making **Twix Cookie Cups**
If you’re prepping for a party or just want serving sizes that are fun to grab, cookie cups are where it’s at! For this version, you just treat the shortbread dough like you would for a peanut butter cookie. Roll it into balls—slightly smaller than a golf ball—and press them right into the bottom and up the sides of a standard muffin tin. You can even use cupcake liners if you want super fast cleanup! Bake that base following the recipe instructions, let it cool a touch, and then lovingly spoon the caramel and chocolate on top instead of spreading it across a big pan. If you want some extra inspiration on how folks make these individual treats, check out this great guide on homemade Twix cookie cups!
Creating **Twix Thumbprint Cookies**
Oh boy, if you love presentation, the Twix thumbprint cookies are adorable! You’ll make your shortbread dough balls just like we talked about for the cups, but instead of pressing them into the tin, you’ll use your thumb (or a small spoon handle) to make a nice deep well right in the center of the dough ball before you bake it. Bake the base as directed for the cookies!
Once they are cooled, instead of pouring the caramel, you’ll use a small spoon to gently fill that little thumbprint indentation with the gooey caramel. Once the caramel settles a bit, you just dip the top into your melted chocolate, or use a fork to drizzle it over artfully. It results in such a charming look for your gourmet cookie plate!
Serving Suggestions for **Caramel Chocolate Cookies**
These caramel chocolate cookies are rich, decadent, and just begging to be paired with something perfect. Since they have that deep, buttery richness, I always look for a contrasting flavor or a cool, creamy drink to balance it out. They are definitely show stoppers, whether you have them on a platter for a party or just grab one after a long day!
If you’re serving these up for a dessert spread, a little sprinkle of flaky sea salt right over the chocolate before it sets just elevates everything—it really makes the caramel flavor pop! But if you need a beverage pairing, I can’t recommend anything more than a cool, slightly bitter coffee drink to cut through all that sweetness. You have to try these cookies alongside my super refreshing iced brown sugar latte. Oh, trust me, that combination is pure bliss!
They’re also fantastic served slightly warm (if you can wait that long!), maybe with just a tiny scoop of really good vanilla bean ice cream melting right next to the base layer. That contrast of warm cookie and cold ice cream? Perfection!
Storage and Reheating Instructions for Your **Twix Cookies**
Now, the hard part is over—you’ve made the best twix cookies ever! But how do we keep these beauties fresh so we can enjoy that buttery shortbread and gooey caramel for days? We don’t want them going stale, that’s for sure. Luckily, because we baked these in a sturdy pan like bars, they store really well, provided you follow a couple of tiny rules about air exposure.
If you managed to keep any leftovers—which, honestly, is a miracle in my house—storage is super simple. I always keep them right on the counter first. Just make sure they are completely cool before you cover them up. Airtight is the goal here! You can store them in an airtight container at room temperature for about three to four days. The shortbread stays fairly crisp, and the caramel holds its soft texture beautifully.
Now, if you’re thinking ahead and want to make these for the holidays or a big party stash, they freeze like a dream! You need to slice them into individual squares *before* you freeze them, because trying to cut through a solid frozen block is just asking for snapped chocolate. Wrap those squares tightly in plastic wrap first—this prevents the cold air from getting in and changing that lovely shortbread texture. Then, pop those wrapped packages into a sturdy freezer bag. They hold up great in the freezer for up to three months. No reheating needed!
If you decide to thaw them, just pull the amount you need out of the freezer and let them sit on the counter, still wrapped, for about an hour. Once they come to room temperature, unwrap them and they are ready to go. If you prefer them slightly softer, I sometimes let mine sit for an extra 30 minutes so that caramel gets just a *tiny* bit melty. Enjoy those candy bar inspired desserts all week long!
Frequently Asked Questions About This Twix Cookie Recipe
I always get questions when I post a new recipe, especially one this exciting! It’s totally normal, because everyone wants their homemade Twix cookie recipe to turn out perfectly. I’ve pulled together the most common things folks ask me about these three-layer wonders. For more inspiration using similar flavor profiles, check out my brown butter cookies! Hopefully, this helps you get that perfect square on the first try!
Can I substitute the butter in the shortbread base?
Oh, that’s a big question! For this specific recipe, I really, really urge you not to swap out the butter for margarine or substitutes in the shortbread layer. The whole appeal of these buttery shortbread cookies is that incredible flavor and texture that only real butter brings when it creams with the sugar. If you must substitute, something like shortening works for texture in a pinch, but you’ll lose that wonderful, melt-in-your-mouth buttery flavor that makes this base work so beautifully under the caramel. Save the butter swaps for simpler recipes!
How long do these soft and chewy Twix cookies stay fresh?
When they are stored correctly—and remember, that means airtight!—these soft and chewy Twix cookies will stay fresh at room temperature for about 3 to 4 days. Because the caramel layer is so moist, they generally don’t dry out fast, which is fantastic. If you refrigerate them, they’ll last closer to a week! Just let them warm up for about 15 minutes before you dig in if they come straight from the fridge; the caramel gets a little firmer when cold.
Is this recipe suitable for a holiday cookie exchange ideas?
Absolutely, yes! In fact, these are my favorite go-to for any gathering, because honestly, who doesn’t love getting a candy bar copycat in their box? They travel well since they are bars—no delicate crumbs here—and they look so impressive lined up next to smaller treats. They disappear fast, so if you’re heading to a big holiday cookie exchange ideas event, I’d suggest making an extra batch because everyone will want the recipe! If you love fun variations, you might enjoy the Twix thumbprint cookies idea, too!
Share Your Sunday Flavor Creations
Whew! That is it—you’ve made it through the layers, and now you have one of the best, most addictive candy bar inspired desserts sitting right in your kitchen! Trust me, making these amazing twix cookies truly brings that spark of Sunday joy into whatever day you happen to catch this craving.
I pour my heart and soul into making sure these recipes come across clearly, but the absolute best part of running Sunday Flavor is hearing from you all! When you bake something and it just sings, you have to tell someone, right?
- If you tried these layered bars and they brought a huge smile to your face, please leave a quick star rating right below this text! It helps me know what recipes I should be featuring more often.
- Even better, if you snap a picture of your beautifully sliced caramel chocolate cookies, tag me on social media! Seeing your kitchen creations makes my day and reminds me why I traded in those concrete canyons for the joy of sharing good food. You can find all my adventures on my About Me page!
Happy baking, everyone. I can’t wait to see how you enjoyed your homemade Twix magic!
PrintEasy Homemade Twix Cookies with Gooey Caramel and Chocolate Layers
You can make your favorite candy bar at home! These easy Twix cookies feature a buttery shortbread base, a layer of gooey caramel, and a smooth chocolate topping. They taste just like the classic treat and are perfect for satisfying your sweet tooth.
- Prep Time: 20 min
- Cook Time: 35 min
- Total Time: 1 hour 55 min
- Yield: 16 servings
- Category: Dessert
- Method: Baking
- Cuisine: American
- Diet: Vegetarian
Ingredients
- 1 cup (2 sticks) unsalted butter, softened
- 1/2 cup granulated sugar
- 1 teaspoon vanilla extract
- 2 cups all-purpose flour
- 1/4 teaspoon salt
- 1 (14 ounce) can sweetened condensed milk
- 1/2 cup packed light brown sugar
- 1/4 cup (1/2 stick) unsalted butter
- 1 teaspoon salt
- 1 cup semi-sweet chocolate chips
- 1 tablespoon vegetable shortening or coconut oil
Instructions
- Prepare the shortbread base: Preheat your oven to 350°F (175°C). Line an 8×8 inch baking pan with parchment paper, leaving an overhang for easy removal.
- In a large bowl, cream together the softened butter and granulated sugar until light and fluffy. Beat in the vanilla extract.
- Gradually add the flour and salt. Mix until just combined to form a crumbly dough.
- Press the dough evenly into the bottom of the prepared baking pan. Bake for 15 to 18 minutes, or until the edges are lightly golden. Remove from the oven and let it cool slightly while you prepare the caramel.
- Make the gooey caramel layer: In a medium saucepan over medium heat, combine the sweetened condensed milk, brown sugar, 1/4 cup butter, and 1 teaspoon salt.
- Stir constantly until the mixture comes to a boil. Reduce the heat to low and continue stirring for 5 to 7 minutes until the caramel thickens slightly. Be careful not to burn it.
- Pour the hot caramel evenly over the warm shortbread base. Return the pan to the oven and bake for another 10 minutes.
- Remove from the oven and let the caramel cool completely, about 1 hour, until it is set but still soft.
- Prepare the chocolate topping: In a microwave-safe bowl, combine the chocolate chips and shortening (or coconut oil). Microwave in 30-second intervals, stirring well after each, until the chocolate is smooth and fully melted.
- Pour the melted chocolate over the cooled caramel layer. Spread it into an even layer.
- Chill the pan in the refrigerator for at least 1 hour, or until the chocolate is firm.
- Lift the cookies out of the pan using the parchment paper overhang. Slice into squares or bars.
Notes
- For the best gooey texture, do not overbake the caramel layer. It should still be slightly soft when you add the chocolate.
- If you prefer a cleaner cut, place the pan in the freezer for 15 minutes after the chocolate sets before slicing.
- You can substitute milk chocolate chips for dark chocolate chips if you like a richer flavor.
Nutrition
- Serving Size: 1 square
- Calories: 280
- Sugar: 25
- Sodium: 110
- Fat: 16
- Saturated Fat: 9
- Unsaturated Fat: 7
- Trans Fat: 0
- Carbohydrates: 33
- Fiber: 1
- Protein: 3
- Cholesterol: 35
Comments are closed.