


Oh my goodness, is there anything more comforting on a cold night than diving into a huge bowl of creamy soup, only to realize the best part is eating the container itself? That’s what I live for! Forget those flimsy things you get at the store; making sturdy, crusty bread bowls from scratch is so much easier than you think. Seriously, this is my go-to recipe for the best homemade bread bowls recipe you’ll ever try. They have that perfect crackly exterior that stands up to chili, but the inside is just soft enough to soak up every last drop. I started making these because store-bought ones always fell apart before the halfway point. Not anymore!
Why You Will Love These Homemade bread bowls recipe
I really can’t stress enough how much better these taste versus anything store-bought. When you bake bread bowls from scratch, you control the magic. Every single time I pull these out of the oven, the smell just takes over my kitchen. You’re going to love them because:
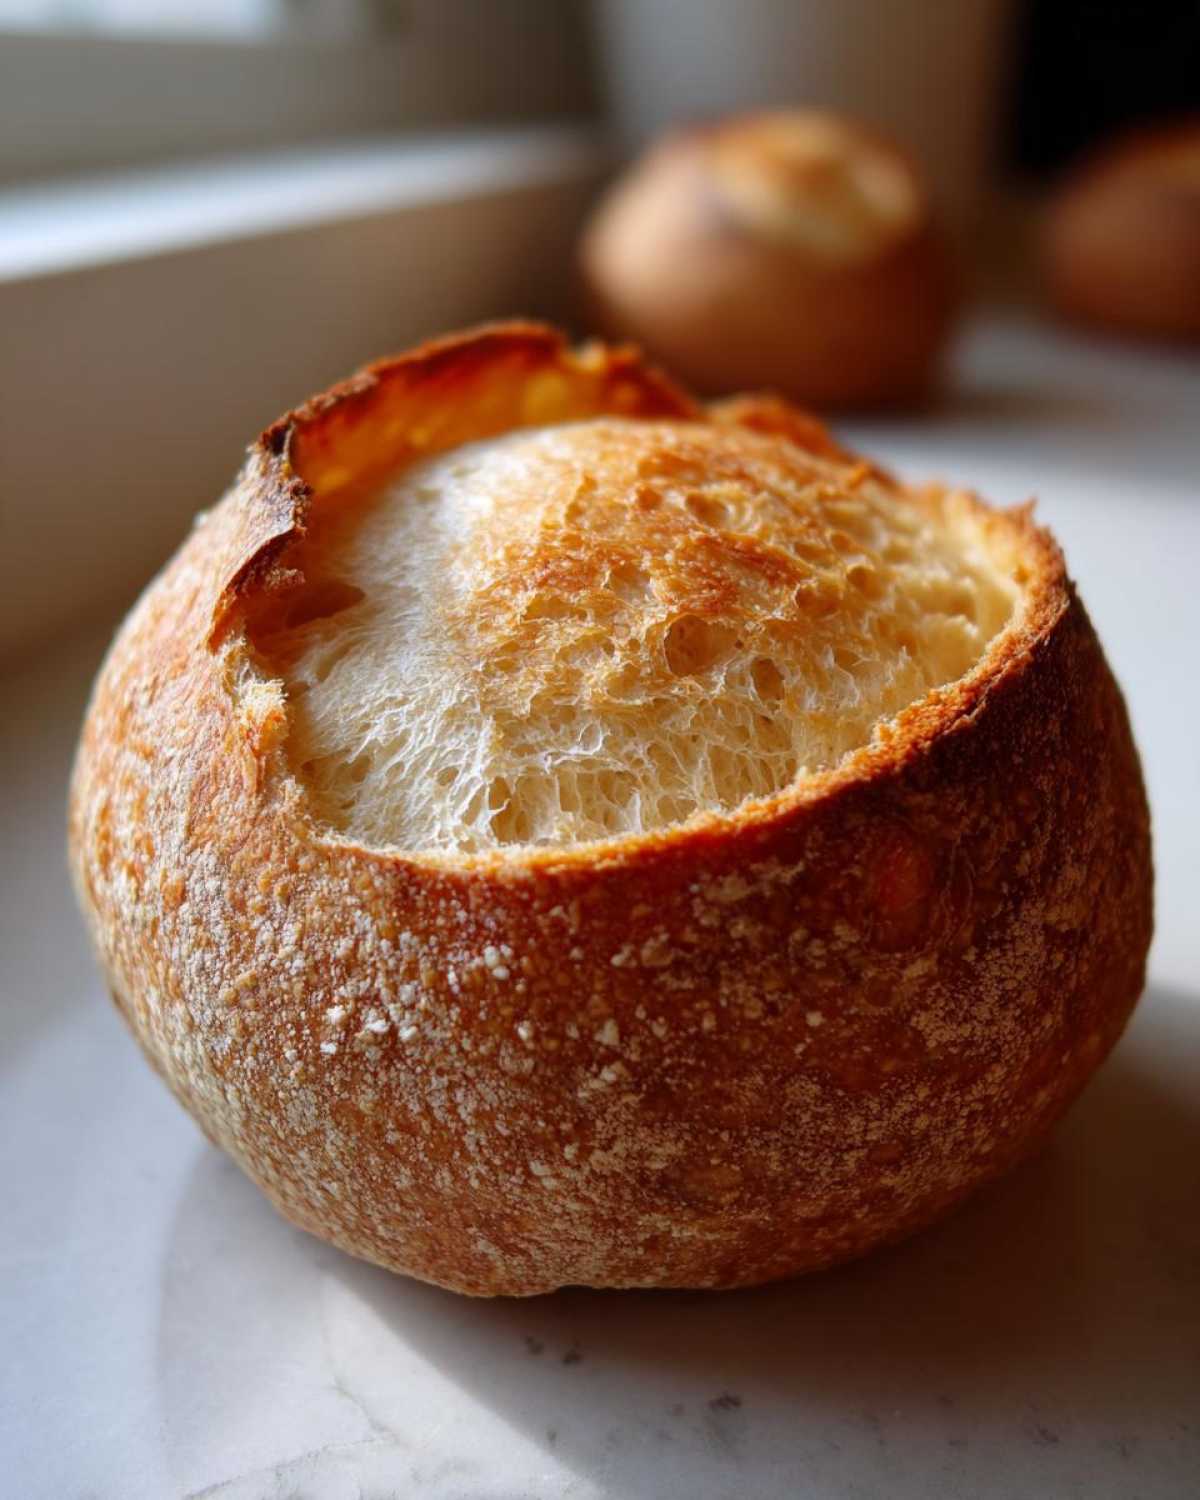
- They achieve that *restaurant style bread bowls* exterior—deeply golden and crackly, perfect for diving into.
- The interior crumb is wonderfully soft and porous, ideal for soaking up thick stews or chowders without immediately dissolving.
- The Homemade bread bowls recipe uses basic pantry ingredients; no fancy stuff required, honestly!
- You get four perfect loaves from one batch, making them excellent for dinner parties or big family meals.
- They bake up beautifully uniform, ready to be turned into the most amazing edible bowls for chili or soup.
- We talk about structure here! They are sturdy enough to hold liquid for a good long while.
Essential Ingredients for Perfect bread bowls
Okay, let’s talk about what you need to gather. This recipe is straightforward, but precision matters, especially when dealing with yeast! You don’t need weird, expensive stuff, which is what I love about this simple foundation. Remember, every measurement counts when you’re aiming for that perfect bread bowl consistency.
Here is what you need to get ready before you start mixing:
- One packet of active dry yeast—that’s exactly 2 1/4 teaspoons, so don’t eyeball it if you’re using bulk yeast!
- One cup of warm water. Listen, this is crucial: it needs to be between 105 to 115°F. If it’s too cold, the yeast won’t wake up, and if it’s too hot, you’ll kill it dead. I usually just dip my pinky in; it should feel warm, not hot.
- One teaspoon of sugar. This is the yeast’s breakfast!
- Two and three-quarters cups of all-purpose flour, plus extra for dusting your countertop later—you’ll need it!
- One and a half teaspoons of salt. Flavor town awaits!
- One tablespoon of olive oil. This helps keep things flexible.
- And finally, one egg white, beaten really well. We use this as a wash later to give our crusty bread bowls for soup that shiny, deep golden color. If you need to reach out for substitutions or have questions about my process, you can always contact me here!
Step-by-Step bread bowl baking instructions
You’re looking at the gold standard for easy bread bowl baking instructions right here. Making these from scratch follows a predictable, easy rhythm once you know the steps. Pay attention to the timing on the rising stages, and you’ll nail the step by step bread bowl making process every time. This recipe is designed to give you great results without needing a stand mixer!
Activating Yeast and Mixing the Dough
First things first, get that yeast happy! Dissolve your teaspoon of sugar right into that 105 to 115°F warm water. Sprinkle the yeast on top—don’t stir it in, just let it sit there. You must wait about 5 to 10 minutes until it looks foamy, like a weird little beer head. That foam tells you the yeast is alive and ready to work its magic!
Once you have foam, toss in your flour and salt, followed by that tablespoon of olive oil. Mix it with a sturdy wooden spoon until everything comes together into what I call a ‘shaggy dough.’ It won’t look pretty yet; that’s totally normal!
Kneading and the First Rise for your bread bowls
Now comes the arm workout! Turn that shaggy mess out onto a lightly floured surface. You need to knead this dough for a solid 6 to 8 minutes. My expert tip? Keep pushing down and folding until the dough feels smooth and it snaps back gently when you poke it—that’s elastic! You want the air structure just right for your final bread bowls.
Oil a clean bowl lightly, toss the dough in there, and turn it around to coat. Cover it up tight and find the warmest, draft-free spot in your kitchen. It needs a good 1 to 1.5 hours to chill out and double in size. Don’t rush this first rise! You can find my recipe for easy corn soup that pairs perfectly with these when they’re done!
Shaping and Final Proofing
When it’s doubled, gently punch the air out (it’s satisfying, trust me). Divide that dough into exactly 4 equal piles. You need to make each one into a really tight, smooth, round ball. Tightly shaping it is key to keeping the shape during baking, so pull the edges under until the top is taut.
Place these four balls on a baking sheet covered with parchment paper, making sure they have plenty of space—at least 3 inches—between them so they don’t merge. Cover them loosely again and let them proof for another 30 to 45 minutes. They should look puffy and pillowy before they bake.
Baking the Crusty bread bowls for soup
Time to preheat that oven to 400°F (200°C). Before they go in, brush the tops lightly with that beaten egg white. This is what seals the deal on that shiny, gorgeous exterior. Bake them for 20 to 25 minutes. You are looking for a deep, rich golden brown color—not pale! Once they hit that color, pull them out and put them straight onto a wire rack to cool completely. If you want an extra crisp crust, try putting a pan of water in the oven while it preheats; that steam does wonders for your crusty bread bowls for soup!
Tips for Achieving Perfect bread bowl consistency
Getting that ideal bread bowl structure—super sturdy outside, gorgeously soft inside—is genuinely the difference between a meal and a moment. So many people struggle with bowls that collapse the second hot liquid hits them, but that’s where a few insider tricks really shine through. We’re aiming for the perfect bread bowl consistency here, not a floppy dinner roll!
Remember when I mentioned the water pan in the baking section? That’s humidity magic! Placing a shallow pan of hot water on the bottom rack while you preheat and bake creates steam. This steam keeps the outer surface of the dough softer for longer during the initial bake, allowing the bread to expand fully before the crust sets hard. This results in those wonderful, thin, crackly shells we’re looking for.
The other big consistency concern is hollowing them out. Please, please, please let them cool completely first! If you slice into them when they are warm, you’ll just mash the soft interior and tear your nice sturdy walls. Once they’re fully cooled, take a sharp serrated knife and cut a circle right in the top—don’t slice straight down; use a gentle sawing motion. Pull that top piece off.
Now, for the wall thickness: I aim for about a 3/4 inch thick wall all the way around. Use your fingers to gently pull out the soft bread inside. Don’t be aggressive! Just scoop it out carefully. And don’t you dare throw away that soft middle part! That’s your dipping material for the soup, or you can toast it up with some garlic powder for instant croutons—which is perfect for pairing with my homemade roasted tomato basil soup!
Ingredient Notes and Substitutions for bread bowls
Since this basic recipe is so pure, sometimes people ask me what happens if they’re missing one little thing. Don’t panic if you’re in a pinch! While I am a firm believer in sticking to the original measurements for the perfect bread bowl consistency, I know life happens. We just have to make smart swaps!
Let’s talk yeast first. I wrote this recipe for active dry yeast because it’s the most common one people have in their pantry, and the foaming step is a great way to test if it’s still good. If you look in your cupboard and only find instant yeast? You’re in luck! Instant yeast doesn’t need that proofing step in the warm water. You can mix it right in with the flour and salt. Just make sure your water isn’t *too* hot when you add it later, because instant yeast is a little more sensitive to temperature shock.
What about flour? All-purpose flour works magically here because we’re relying on the kneading to develop the structure, and the final product is meant to be somewhat soft inside anyway. But if you want a slightly chewier loaf or just have bread flour on hand, go for it! Just watch the dough while you knead. Bread flour has higher protein, so it absorbs liquid a bit faster. You might need a splash more water—maybe a teaspoon or two—to get that smooth, elastic feel we talked about.
One question I get a lot is about omitting the egg white wash. If you have an allergy or just don’t want that super shiny exterior, skip the wash! The bread won’t be quite as glossy, but it will still bake up beautifully golden brown. Alternatively, you can brush with a little melted butter right when it comes out of the oven for a softer, slightly matte crust instead, though it won’t hold up quite as well to condensation.
Variations: Beyond Basic bread bowls
Once you master that first batch of simple, sturdy bread bowls, you’ll realize how easy it is to dress them up! This basic yeast dough is like a blank canvas screaming for some extra flavor. Honestly, once you see how reliable this recipe is, you’ll start thinking of ways to make them fit every single soup or dip you serve.
There are so many ways to turn these into showstoppers! You don’t need a whole new recipe; just a quick mix-in right before the first rise. I always recommend sticking to additions that are less than 1/2 cup total for this four-loaf recipe so you don’t throw off the hydration or the rise too much.
Here are a few ideas to get your creative juices flowing:
- Herbed Delight: Mix 2 tablespoons of dried Italian herbs (or fresh, chopped rosemary and thyme) right in with your flour mixture *before* you add the water. This makes an amazing base for something a little lighter than chili, like a creamy tomato bisque.
- Cheesy bread bowl ideas: Who doesn’t want cheese baked right into their edible bowl? Fold in 1 cup of finely shredded sharp Cheddar or Monterey Jack right after kneading, just before the first rise. If you love cheesy garlic flavors, you’re halfway to my cheesy garlic bread recipe—just shape them into balls instead of loaves!
- Garlic bread bowl recipe: For the ultimate richness, mix 1/4 cup of melted garlic butter (made with fresh garlic and salt) into the dough instead of the plain olive oil listed in the main recipe. This gives you amazing flavor right from the foundation, perfect for serving with Italian wedding soup.
The real trick across all these variations is timing. Do NOT add your cheese or herbs when you activate the yeast. Wait until that flour and salt go in, or you risk dulling the yeast’s effectiveness. Keep it simple, and you’ll have the most flavorful vessel for your winter meals!
Serving Suggestions for your bread bowls
Honestly, once you have these sturdy, warm containers, your serving game changes completely! These are the ultimate comfort food bread bowls for a reason. I always pair them with something thick and hearty—think beef stew, creamy clam chowder, or my favorite, spicy chili. The bread soaks everything up without turning mushy!
And please, don’t forget the pieces you hollowed out! Those soft centers are perfect for dunking. They are far too good to waste!
Storage and Reheating Instructions for bread bowls
So, what happens when you somehow manage to have bread *left over* after serving dinner? That rarely happens at my house, but when it does, I have a couple of tricks to keep them fresh for the next day. We definitely don’t want these beauties going stale quickly after all that work!
Once your bread bowls have cooled completely—and I mean completely, otherwise you steam them and make them soggy—you store them just like any other crusty loaf. Toss them into a paper bag first, and then place that paper bag inside an airtight container or a large Ziploc bag. Keeping them at room temperature is usually best for up to two days. Stuffing them in the fridge tends to dry out the crust faster, and we worked hard for that crust!
If you were smart and saved the soft insides you scooped out? Treat those like high-value leftovers! Keep them in a small airtight container. They are fantastic plain the next morning for breakfast, or you can quickly toss them in a skillet with a dab of butter to make quick croutons for your next salad.
How to Refresh a Leftover Loaf
If your bread has been sitting out for a day or two and the crust has softened up a tiny bit, don’t worry. We can bring it right back to life, no problem. This only takes about five minutes, so don’t even think about tossing it!
Preheat your oven—no higher than 350°F (175°C). You don’t want to scorch the outside trying to re-crisp it. If you baked them with soup recently, your oven might still be warm enough! Take the loaf (or the remaining shell) and place it directly on the oven rack. Let it heat up for about 3 to 5 minutes. You’ll notice the crust stiffening up again almost immediately. It’ll smell like you just baked it all over again!
Freezing for Later
If you know you won’t get to eating them within three days, freezing is the way to go. The best time to freeze them is after they are fully cooled but *before* you hollow them out. The whole, intact loaf freezes better than the shells do.
Wrap each loaf tightly first in plastic wrap, trying to get it as airtight as possible, and then wrap that bundle again in aluminum foil. This double-wrapping protects them from freezer burn. Stored this way, they are good for about three months. When you want to use one, just thaw it on the counter overnight and then follow the reheating instructions above—don’t forget that quick blast in a warm oven to crisp up that shell!
Frequently Asked Questions about bake bread bowls from scratch
I know sometimes the little details can feel confusing when you try to bake bread bowls from scratch for the very first time. Don’t worry, I’ve compiled the questions I get asked the most, hopefully saving you some guesswork!
Can I use instant yeast instead of active dry yeast in this recipe?
Absolutely, you can! Honestly, sometimes I use instant yeast just because I was too impatient to wait for the warm water to cool down just right. If you use instant yeast, skip step 1 entirely. You don’t need to dissolve the sugar and wait for it to foam. Just whisk the instant yeast right in with your flour and salt, and then add the water and oil when you mix the wet ingredients together. It saves about ten minutes!
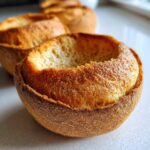
How thick should the walls be when hollowing out my bread bowls?
This is crucial for turning these into the perfect comfort food bread bowls that hold up! You want about a 3/4-inch thick wall all the way around. Use a serrated knife to cut the top circle, and then use your fingers—gently!—to pull the soft center out. Try to keep the base intact and avoid going too thin on the sides where the liquid pressure will be highest. You want a sturdy vessel, not a crusty bowl liner!
What is the secret to making these bowls taste like restaurant style bread bowls?
It comes down to two things: the steam bath during baking and the crust wash. Make sure you use that beaten egg white (or even a quick brush of milk) to get that deep golden sheen. But the real secret for that crisp, almost brittle exterior that mimics those great restaurant style bread bowls? That’s the shallow pan of hot water you place on the bottom rack during baking. It injects humidity into the oven, which keeps the crust from setting too early, allowing the loaf to get its maximum oven spring before the shell hardens.
Is it better to hollow the bread bowls before or after freezing them?
For the absolute best results, you should freeze the loaves whole, *before* you hollow them out. Whole loaves freeze more evenly and protect themselves from freezer burn better than the delicate, thin shells do. Wait until they are completely cooled, wrap them very well in two layers (plastic wrap then foil!), and freeze. When you thaw, thaw them on the counter, and then bake them slightly longer than usual until they are firm again. After cooling post-thaw, *then* you scoop out the center and fill them with your chili!
Estimated Nutritional Data for Homemade bread bowls recipe
Okay, so while I’m busy worrying about yeast activation and dough texture, I know some of you are tracking macros! I did the best I could to break down what’s in our simple, wonderful recipe. Remember, baking is science, and these numbers are based on the exact measurements listed in the recipe above, divided into four equal servings.
It’s an honest estimation, but keep in mind that flour brands, the amount of flour dust on your counter, and even how thick you cut your walls when hollowing can change these slightly. Always treat these figures as a great guideline rather than a hard scientific fact!
Here is the breakdown for one bread bowl serving:
- Calories: Around 280! Pretty excellent for something so satisfying.
- Total Fat: Roughly 3 grams. Most of that comes from that little bit of olive oil we used.
- Saturated Fat: Less than 1 gram, which is great news!
- Cholesterol: Zero, because we aren’t adding any eggs to the main dough.
- Carbohydrates: About 55 grams. That’s what fuels you up for dipping!
- Fiber: About 2 grams.
- Protein: A solid 8 grams to keep you feeling full.
- Sodium: Around 350mg. Salt is important for flavor, so it’s a little higher than some low-sodium breads.
- Sugar: Only 2 grams because we only use 1 teaspoon total for the whole batch!
I always like to remind everyone that these figures don’t account for what you put *inside* the bowl—and if you’re filling it with my hearty chipotle cheddar chowder, the numbers go up significantly! I’ve linked my standard disclaimer page here, just so you know exactly how I calculate my nutrition estimates for everything on the site.
PrintEasy Homemade Yeast Bread Bowls
A straightforward recipe for baking crusty bread bowls with soft interiors, perfect for holding soup or stew.
- Prep Time: 20 min
- Cook Time: 25 min
- Total Time: 145 min
- Yield: 4 servings
- Category: Baking
- Method: Baking
- Cuisine: American
- Diet: Vegetarian
Ingredients
- 1 packet active dry yeast (2 1/4 teaspoons)
- 1 cup warm water (105-115°F)
- 1 teaspoon sugar
- 2 3/4 cups all-purpose flour, plus more for dusting
- 1 1/2 teaspoons salt
- 1 tablespoon olive oil
- 1 egg white, beaten (for wash)
Instructions
- Activate the yeast: In a large bowl, dissolve the sugar in the warm water. Sprinkle the yeast over the top and let it stand for 5 to 10 minutes until foamy.
- Mix the dough: Add the flour, salt, and olive oil to the yeast mixture. Mix with a wooden spoon until a shaggy dough forms.
- Knead: Turn the dough out onto a lightly floured surface. Knead for 6 to 8 minutes until the dough is smooth and elastic.
- First rise: Place the dough in a lightly oiled bowl, turning to coat. Cover the bowl with plastic wrap or a clean towel and let it rise in a warm place for 1 to 1.5 hours, or until doubled in size.
- Shape the bowls: Gently punch down the dough. Divide it into 4 equal pieces. Shape each piece into a tight, round ball. Place the balls on a baking sheet lined with parchment paper, spacing them several inches apart.
- Second rise: Cover the shaped dough loosely and let it rise for another 30 to 45 minutes.
- Preheat and prepare: Preheat your oven to 400°F (200°C). Brush the tops of the dough balls lightly with the beaten egg white for a shiny crust.
- Bake: Bake for 20 to 25 minutes, or until the crust is deep golden brown.
- Cool: Transfer the bread bowls to a wire rack to cool completely before hollowing them out.
Notes
- For a crispier crust, place a shallow pan of water on the bottom rack of the oven while preheating.
- To hollow the bowl, use a serrated knife to cut a circle in the top, then gently pull out the soft interior bread, leaving a sturdy wall about 3/4 inch thick.
- Save the removed bread pieces for dipping or croutons.
Nutrition
- Serving Size: 1 bowl
- Calories: 280
- Sugar: 2
- Sodium: 350
- Fat: 3
- Saturated Fat: 0.5
- Unsaturated Fat: 2.5
- Trans Fat: 0
- Carbohydrates: 55
- Fiber: 2
- Protein: 8
- Cholesterol: 0
Comments are closed.