


Oh, stop me right now if you’re having one of those days where only deep-dish mozzarella and crispy, saucy chicken will fix it. I totally get it! Italian comfort food just hits different, right? For years, I chased that perfect, restaurant-style texture—you know, the crust that actually CRUNCHES even under all that sauce and cheese? It felt impossible at home until I cracked the code on this chicken parmesan recipe. Trust me when I say I nearly ruined my poor stovetop testing the breading ratios (flour, egg, Panko, cheese—getting that blend just right takes practice!). But now? I’ve landed on the ultimate hybrid method that guarantees juicy, tender chicken wrapped in the crispiest armor imaginable. This is the one you want saved, guys.
Why This Is The Best Chicken Parmesan Recipe You Will Ever Make
I know there are a million recipes out there, but this one works so efficiently! We get that decadent, restaurant-style texture without spending all night hovering over the stove. The flavor payoff is huge for the time we put in. Check out what makes this method the winner:
- It’s practically a Weeknight Italian Meal—we’re looking at under 45 minutes total, start to finish!
- The secret is the hybrid cook: A quick pan-fry gives you the crunch, and the oven finish melts the cheese perfectly while keeping the meat tender.
- We use great seasoning in the breading, so even the crust tastes amazing alongside that rich marinara.
- It’s a true Family Favorite Chicken Dinner. Seriously, my picky eater cleans his plate every time.
If you are looking for something similar that pairs well with this, check out my recipe for Chicken Pesto Pasta—another quick Italian favorite!
Gathering Ingredients for Your Classic Crispy Chicken Parmesan Recipe
Okay, you can’t make a perfect Chicken Parmesan Recipe without the right lineup! I always lay everything out before I start pounding the chicken—it just makes the process so much smoother. What you need here are the essentials for four generous servings, but you can totally double this if your family loves leftovers as much as mine does.
You’ll need 4 boneless, skinless chicken breasts, aiming for about 6 ounces each. Remember, we’re pounding these babies thin, so don’t stress too much if they aren’t perfectly uniform right out of the package.
For the coating, grab 1 cup of flour, 2 lightly beaten eggs, and 1 1/2 cups of seasoned breadcrumbs mixed with 1/2 cup of grated Parmesan, oregano, garlic powder, salt, and pepper for that amazing crust!
Crucially, grab 2 cups of your favorite warmed marinara sauce (my homemade recipe is linked elsewhere, but store-bought works in a pinch!) and 8 ounces of fresh mozzarella cheese, sliced. My absolute top tip here, guys? For that gorgeous, bubbly top layer, skip the pre-shredded stuff and use a block of good quality whole-milk mozzarella. It melts way better! While you’re thinking about cheese, you should absolutely try my Prosciutto Wrapped Mozzarella Bites sometime—another fantastic cheesy appetizer!
Step-by-Step Instructions for the Perfect Chicken Parmesan Recipe
This is where the magic happens, but don’t panic! The process might seem like a lot of steps, but once you get that breading station set up, it moves fast. We are aiming for that signature golden crust you see at the best Italian spots. Getting the chicken pounded correctly is the absolute first step toward success in this chicken parmesan recipe, so don’t skip that. We want even cooking!
Preparing the Chicken and Breading Station for this Chicken Parmesan Recipe
First things first: get those chicken breasts nice and flat! Lay them between two sheets of plastic wrap—this keeps your countertop clean—and hit them gently with a meat mallet until they are about half an inch thick all the way across. You want them uniform so they cook at the same rate. No one likes a rare edge and a dry center, right?
Next, set up your breading trio. Dish one: flour. Dish two: eggs, just whisked lightly. Dish three: this is important—your seasoned breadcrumbs mixed with half of the Parmesan cheese, oregano, and spices. Once you start dipping, you have to work fast and keep moving linearly: Flour, then egg, then those glorious crumbs.
My biggest tip? When you place the chicken into that third dish, really press down on it! Don’t just toss it in there. Press those breadcrumbs firmly into the meat itself. This adherence step is the key to making sure your crust stays glued on later when we hit the hot oil. It ensures you get maximum crispiness!
Achieving Maximum Crispiness: Pan-Frying and Oven Finish for Restaurant Style Chicken Parm
Now, heat up about a quarter cup of olive oil in a large, oven-safe skillet over medium-high heat. You know the oil is ready when a tiny crumb dropped in sizzles immediately. You’ve got to work in batches here; overcrowding the pan lowers the temperature and steams the crust instead of frying it—and nobody wants steamed chicken parm! If you want another idea for crispy fried chicken without the sauce, you should absolutely check out my recipe for Chicken Karaage!
Sear the chicken for only 3 to 4 minutes per side. We aren’t trying to cook them through here; we are just looking for that gorgeous, deep golden-brown color and crunchy texture. Once you have that beautiful crust, carefully transfer the skillet right into your preheated 400-degree oven. If your skillet isn’t oven-safe, just pop the browned cutlets into a greased baking dish.
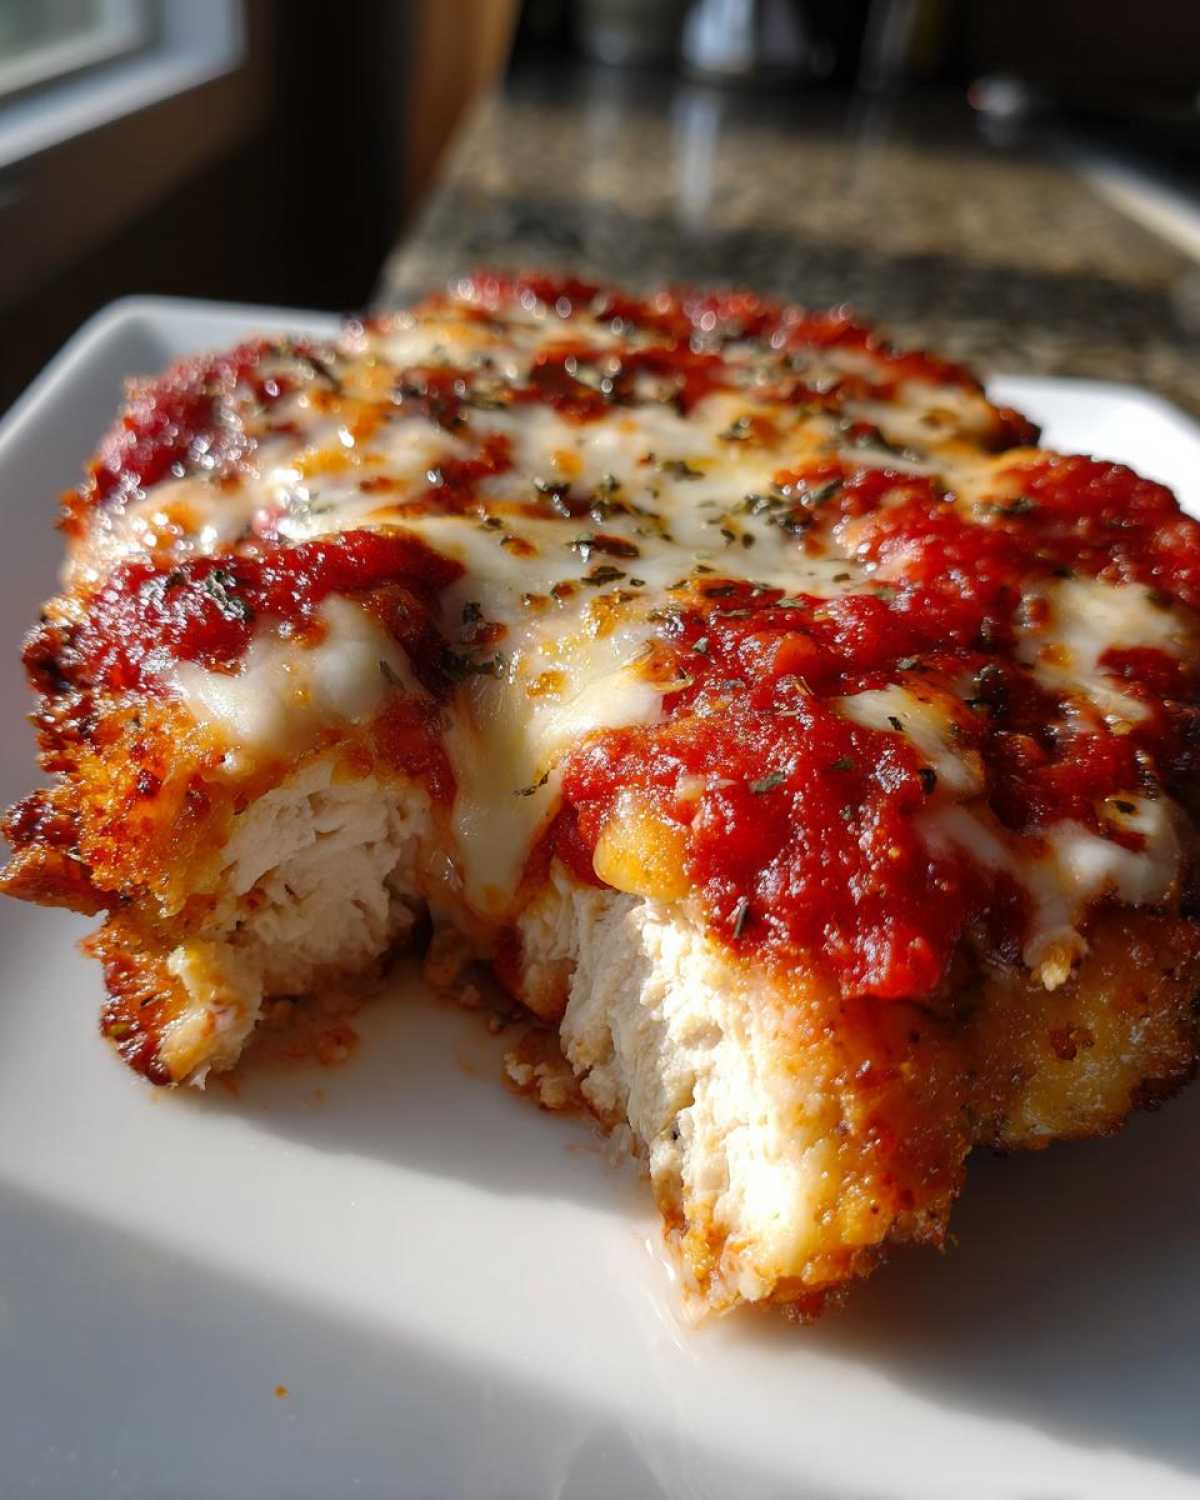
This oven finish is non-negotiable for a proper Restaurant Style Chicken Parm experience. Once they are in the oven, top each piece: a generous scoop of warm marinara sauce, lay on the fresh mozzarella slices, and then sprinkle that last bit of Parmesan on top. Bake for just another 10 to 15 minutes until that cheese is totally melted and gooey, and the chicken reaches that safe internal temp. It’s foolproof!
Tips for the Crispiest Chicken Parmesan Recipe Every Time
Okay, let’s talk texture because honestly, that’s what separates an okay chicken parm from the one you dream about. That beautiful, shattering crust is what we are chasing with this chicken parmesan recipe, and it all comes down to a few tiny tricks I learned through sheer stubbornness!
First up: ditch the regular breadcrumbs if you can. Seriously, grab a bag of Panko breadcrumbs. They are Japanese-style breadcrumbs, lighter and flakier, and they soak up way less oil while creating an unmatched structural crunch. If you’ve never tried them in your breading station, you are missing out!
Second—and this is huge—make sure your oil is hot enough before those cutlets hit the pan. I mentioned this before, but it bears repeating: if the oil isn’t sizzling enthusiastically when the chicken goes in, the crust just sits there absorbing oil instead of sealing up and crisping. That results in a sad, soggy border! Use medium-high heat and test it with a single crumb first.
Once the chicken is golden brown and comes out of the fryer, do not skip this draining step! Lay those beauties on a wire rack set over a plate or baking sheet. Draining them on paper towels seems great, but the bottom tends to steam itself soggy against the paper. A rack lets air circulate underneath, freezing that crispiness in place until it heads into the oven for the cheesy finale.
If you enjoy making crispy things that aren’t chicken, I highly recommend giving my Crispy Baked Zucchini Fries a try next time you need a snack. Same principle: maximum crunch through smart draining techniques!
Healthy Baked Chicken Parmesan Alternative Instructions
Okay, I know that pan-frying gives us that incredible crunch, but sometimes you just need something lighter, or maybe you’re totally out of frying oil and need a quick substitution. Good news! This recipe is sturdy enough that we can easily hack it into a fantastic Baked Chicken Parmesan Recipe, and it still comes out really satisfying. It’s my go-to when I want that classic flavor without the heavy feel.
If you’re going the baked route, you can actually skip the whole pan-frying step we talked about earlier. We need to treat the breading a bit differently so it doesn’t just fall off the chicken in the oven. Instead of frying, you’re going to place those fully breaded cutlets on a wire rack. Yes, a wire rack! Make sure that rack is sitting over a sturdy baking sheet—this is critical.
Why the rack? Because we need air circulating underneath the chicken breast! If you just lay it on the pan, the bottom steams and gets soggy, defeating the whole purpose of trying to make it crispy. Once the chicken is sitting pretty on the rack, take your cooking spray—I use olive oil spray here—and give the tops of the chicken a good, solid spray until the crumbs look lightly damp, almost like they’ve been kissed by fine mist.
Bake these bad boys at 400 degrees Fahrenheit to start. You’ll bake them plain for about 15 minutes. This is when they are setting up and drying out just enough to firm up that crust. Once that timer goes off, *then* you move onto the cheesy part. Top them just like we did before: sauce, mozzarella, and a sprinkle of Parmesan. They go back in for another 10 to 15 minutes until that cheese is bubbly and the chicken is cooked through.
It’s a fantastic, low-fat way to get that cheesy, comforting flavor! If you like easy one-pan dinners like this, you absolutely have to try my One-Pan Herb Butter Chicken with Zucchini and Rice next week. It’s just as simple and flavorful!
Serving Suggestions for Your Italian Dinner
Whew! Once your chicken parmesan recipe is out of the oven looking all golden and gloriously cheesy, you have to serve it right away. It’s a hearty dish, so you don’t need a million sides, thankfully!
The classic pairing, of course, is a big pile of spaghetti tossed lightly in olive oil and maybe a little salt. Don’t drown the chicken in sauce, though—we want that crust to shine! If pasta isn’t your thing tonight, a thick slice of garlic bread is non-negotiable for soaking up any extra sauce.
To keep things balanced, I always toss together a simple side salad with crisp romaine, maybe some cucumber, and a light vinaigrette. It cuts through the richness perfectly. And speaking of garlic bread, you absolutely have to try my recipe for Cheesy Garlic Bread in the Air Fryer—it’s so quick!
Storage and Reheating Instructions
I rarely have leftovers because my family dives in, but when I do, proper storage is key to keeping that crust happy! Make sure any leftover chicken parmesan cools down before you store it. You really need to get it into an airtight container and into the fridge within two hours of coming out of the oven.
When you’re ready to reheat those beauties, please, for the love of crispy coating, skip the microwave! The microwave makes everything soft and sad. The best way to revive that crunch is by using an oven or an air fryer. Pop it on a baking sheet at about 375 degrees Fahrenheit until heated through. It only takes about 8 to 10 minutes, and you’ll have that gorgeous cheesy top and crispy chicken back again!
Frequently Asked Questions About Chicken Parmesan
I always get so many questions when people try this recipe for the first time, which is a great sign! People want to know how to nail that texture and how flexible this classic dish can be. Here are the most common things folks ask about making the Best Chicken Parmesan Recipe at home.
Can I make this chicken parmesan recipe entirely ahead of time?
You certainly can prep ahead, but I definitely wouldn’t do the whole thing! You can set up your breading station and coat all the chicken breasts, even pressing that delicious coating on, and store them on a tray in the fridge for up to 24 hours. Just cover them well. But please, don’t fry them until you are ready to cook them that day. That fried crust gets soggy sitting in the fridge, and you really want that initial crispness when you start the baking process!
What is the best way to ensure a juicy breaded chicken result?
Juiciness comes down to two things we heavily emphasized in the main instructions! First, you HAVE to pound those breasts thinner—aiming for that even half-inch thickness means the whole thing cooks through perfectly without drying out. Second, never overcook it in the oven. If you pre-brown it well on the stovetop, the oven time is just for melting cheese and finishing it off. Once that internal temp hits 165°F, pull it out immediately!
If you’re looking for an even easier method that uses less active cooking time, I’ve got a killer recipe for a Chicken Parmesan Casserole that bakes up cheesy and bubbly. It’s a bit different from this classic crusty version, but fantastic for feeding a crowd!
Nutritional Estimates for This Chicken Parmesan Recipe
Alright, because information is important—even when we’re talking about pure comfort food heaven—here are the approximate nutritional details for one serving of this amazing dish. Remember, this is based on the recipe as written, using standard ingredient measurements for the chicken breast, oil, sauce, and cheese amounts listed.
I always tell my friends that nutrition facts are tricky because every brand of marinara or type of mozzarella is slightly different. So, please take these numbers as a great baseline guide, but know that your personal sodium or fat count might drift a little depending on what you grab at the store. If you want the full rundown on how I approach recipes like this on my site, you can read my full recipe disclaimer here.
- Serving Size: 1 breast
- Calories: 580
- Protein: 45g
- Fat: 32g (14g Saturated Fat)
- Carbohydrates: 30g
- Sugar: 8g
- Sodium: 850mg
See? Not bad at all for a meal that tastes like it took you hours in the kitchen! That protein count is huge, which is from using four good-sized chicken breasts. It makes it such a satisfying meal. Enjoy every cheesy, crispy bite!
PrintClassic Crispy Chicken Parmesan

A recipe for pan-fried chicken breasts coated in seasoned breadcrumbs, topped with marinara sauce and melted cheese, finished in the oven for a restaurant-quality texture.
- Prep Time: 20 min
- Cook Time: 25 min
- Total Time: 45 min
- Yield: 4 servings
- Category: Dinner
- Method: Pan-Frying and Baking
- Cuisine: Italian-American
- Diet: Low Fat
Ingredients
- 4 boneless, skinless chicken breasts (about 6 oz each)
- 1 cup all-purpose flour
- 2 large eggs, lightly beaten
- 1 1/2 cups seasoned breadcrumbs
- 1/2 cup grated Parmesan cheese, plus more for topping
- 1 teaspoon dried oregano
- 1/2 teaspoon garlic powder
- 1/2 teaspoon salt
- 1/4 teaspoon black pepper
- 1/4 cup olive oil, for frying
- 2 cups marinara sauce, warmed
- 8 ounces fresh mozzarella cheese, sliced
- Fresh basil leaves, for garnish
Instructions
- Preheat your oven to 400 degrees Fahrenheit (200 degrees Celsius). Lightly grease a baking dish.
- Place each chicken breast between two sheets of plastic wrap. Pound the chicken to an even 1/2-inch thickness using a meat mallet.
- Set up a standard breading station: Place flour in one shallow dish. Whisk eggs in a second dish. Combine breadcrumbs, 1/2 cup Parmesan, oregano, garlic powder, salt, and pepper in a third dish.
- Dredge each pounded chicken breast first in flour, shaking off excess. Dip it into the egg mixture, allowing excess to drip off. Finally, press the chicken firmly into the breadcrumb mixture to coat both sides completely.
- Heat the olive oil in a large, oven-safe skillet over medium-high heat. Carefully place the breaded chicken into the hot oil, working in batches if necessary to avoid overcrowding.
- Pan-fry for 3 to 4 minutes per side until the crust is golden brown and crispy. The chicken will not be fully cooked at this stage.
- Transfer the skillet (or arrange the chicken in the prepared baking dish) and top each piece with about 1/2 cup of warm marinara sauce.
- Layer the mozzarella slices over the sauce, then sprinkle with extra grated Parmesan cheese.
- Bake for 10 to 15 minutes, or until the cheese is melted and bubbly and the internal temperature of the chicken reaches 165 degrees Fahrenheit (74 degrees Celsius).
- Garnish with fresh basil before serving. Serve immediately over pasta or with garlic bread.
Notes
- For a baked, healthier alternative: Skip the pan-frying step. Place the breaded chicken on a wire rack set over a baking sheet. Spray the tops lightly with cooking spray. Bake at 400 degrees Fahrenheit for 15 minutes, then top with sauce and cheese and bake for another 10-15 minutes until done.
- Use Panko breadcrumbs instead of standard breadcrumbs for an extra crispy texture.
- You can make this a casserole by layering the cooked chicken, sauce, and cheese in a 9×13 inch dish and baking until melted.
Nutrition
- Serving Size: 1 breast
- Calories: 580
- Sugar: 8
- Sodium: 850
- Fat: 32
- Saturated Fat: 14
- Unsaturated Fat: 18
- Trans Fat: 0
- Carbohydrates: 30
- Fiber: 3
- Protein: 45
- Cholesterol: 140


Comments are closed.