


Oh, my friends, can we just talk for a minute about those nights when you need something truly decadent, but the thought of turning on the oven makes you sweat? I totally get it! That’s why I am absolutely obsessed with bringing some of that vibrant “Sunday Flavor” into my frantic weekdays, and nothing shouts indulgence and ease quite like these cookie butter cheesecake cups. Trust me when I say that these are the ultimate no-bake cheesecake cups. They are creamy, they are perfectly portioned, and they rely on that magical cookie butter—Hello, Biscoff! If you crave a rich, easy individual dessert that looks like you spent all day on it, you have absolutely come to the right place.
Why These No Bake Cookie Butter Cheesecake Cups Are Your New Favorite Sweet Treat
Honestly, these cookie butter cheesecake cups tick every single box for me, especially when I’m running low on Sunday time but still need that dessert wow-factor. They are incredibly rich, which satisfies any sweet craving instantly, but because we skip the oven entirely, the entire process is just pure enjoyment rather than stressful baking. This seriously makes them a total crowd-pleaser dessert idea for any last-minute get-together!
Perfect Individual Dessert Portions
I love that these are already portioned out! Gone are the days of trying to slice a whole cheesecake evenly. Serving these up is a dream; just grab a cup! They’re incredible for picnics or potlucks because they are totally self-contained. These are my go-to party desserts individual serving staple now.
The Ultimate No Oven Cheesecake Experience
The best part, in my book, is that this is a true no oven cheesecake situation. No preheating, no worrying about cracking in the oven, and no sweating over a hot stove in the summer! If you need a quick cheesecake dessert that tastes gourmet, this is the method you want to adopt immediately.
Gathering Ingredients for Your Cookie Butter Cheesecake Cups
Alright, for these beautiful, creamy dessert cups, we need to get our ducks in a row with the ingredients list. Since this is a ‘no-bake’ recipe, the quality and the temperature of what goes in really matters for texture. Don’t worry, it’s all pretty straightforward, but precision here means we get those perfect simple cheesecake bites!
For the Cookie Butter Crust Recipe
The base is super important, and you have a choice here! I usually lean into the Biscoff flavor profile completely, but graham crackers work if that’s what you have on hand. You’ll need:
- 1 1/2 cups graham cracker crumbs (or Biscoff cookie crumbs for double the flavor!)
- 1/4 cup granulated sugar
- 6 tablespoons unsalted butter, melted—make sure it’s fully liquid!
For the Rich Cheesecake Filling
Now for the star of the show—that gorgeous, light-as-air filling. Remember, room temperature for the cheese, cold for the cream!
- 16 ounces cream cheese, make sure it’s fully softened; this is key for smoothness!
- 1 cup powdered sugar
- 1 teaspoon vanilla extract
- 1/2 cup cookie butter (like Biscoff spread), plus some extra for drizzling later
- 1 cup heavy whipping cream, very cold
- 1/4 cup powdered sugar (this reserved portion is just for whipping the cream!)
Step-by-Step Instructions for No Bake Cheesecake Cups
Here’s where the magic happens, friends! This is where we turn those simple ingredients into stunning simple cheesecake bites that look way more complicated than they actually are. Patience is key during the chilling stages, so pour yourself a coffee and let the fridge do the heavy lifting!
Creating the Cookie Butter Crust Base
First things first, we tackle the base. In a nice bowl—nothing fancy required, honestly—you’re going to combine your crumbs, that 1/4 cup of sugar, and the 6 tablespoons of melted butter. Mix it all up until it looks like wet sand. You want that perfect consistency where it sticks together when you squeeze a bit in your palm.
Now, grab your 12 dessert cups. Spoon about a tablespoon of that crumb mixture into the bottom of each cup. You have to press this down really firmly! Use the back of a spoon or even the flat bottom of a small glass to compact it. Pop those guys into the fridge immediately while we work on the filling. That chill time helps them set up nicely.
Assembling the Creamy Dessert Cups Filling
Grab your softened cream cheese—remember, room temp is vital for smooth mixing! Beat it until it’s silky with your mixer. Then, slowly add in the 1 cup of powdered sugar and the vanilla until it’s all blended and looking smooth. Next, gently mix in that half-cup of cookie butter. I mean *gently*—we don’t want to overwork it here!
The real texture secret comes next! In a separate bowl, whip your very cold heavy cream with the extra 1/4 cup of powdered sugar until you get stiff peaks. This gives us that airy lift. Now, you must fold that whipped cream into the cookie butter mixture. Don’t stir! Folding slowly keeps all those lovely little air pockets in there, creating that gorgeous, light texture for your creamy dessert cups.

Chilling and Finishing Your Cookie Butter Cheesecake Cups
Once everything is folded, spoon or pipe that fluffy filling over your chilled crusts in the cups. Smooth the top off gently. This is the hardest part: you need to let these chill in the refrigerator for a solid four hours. Seriously, don’t peek! If you rush it, they won’t set firm enough to hold that beautiful shape.
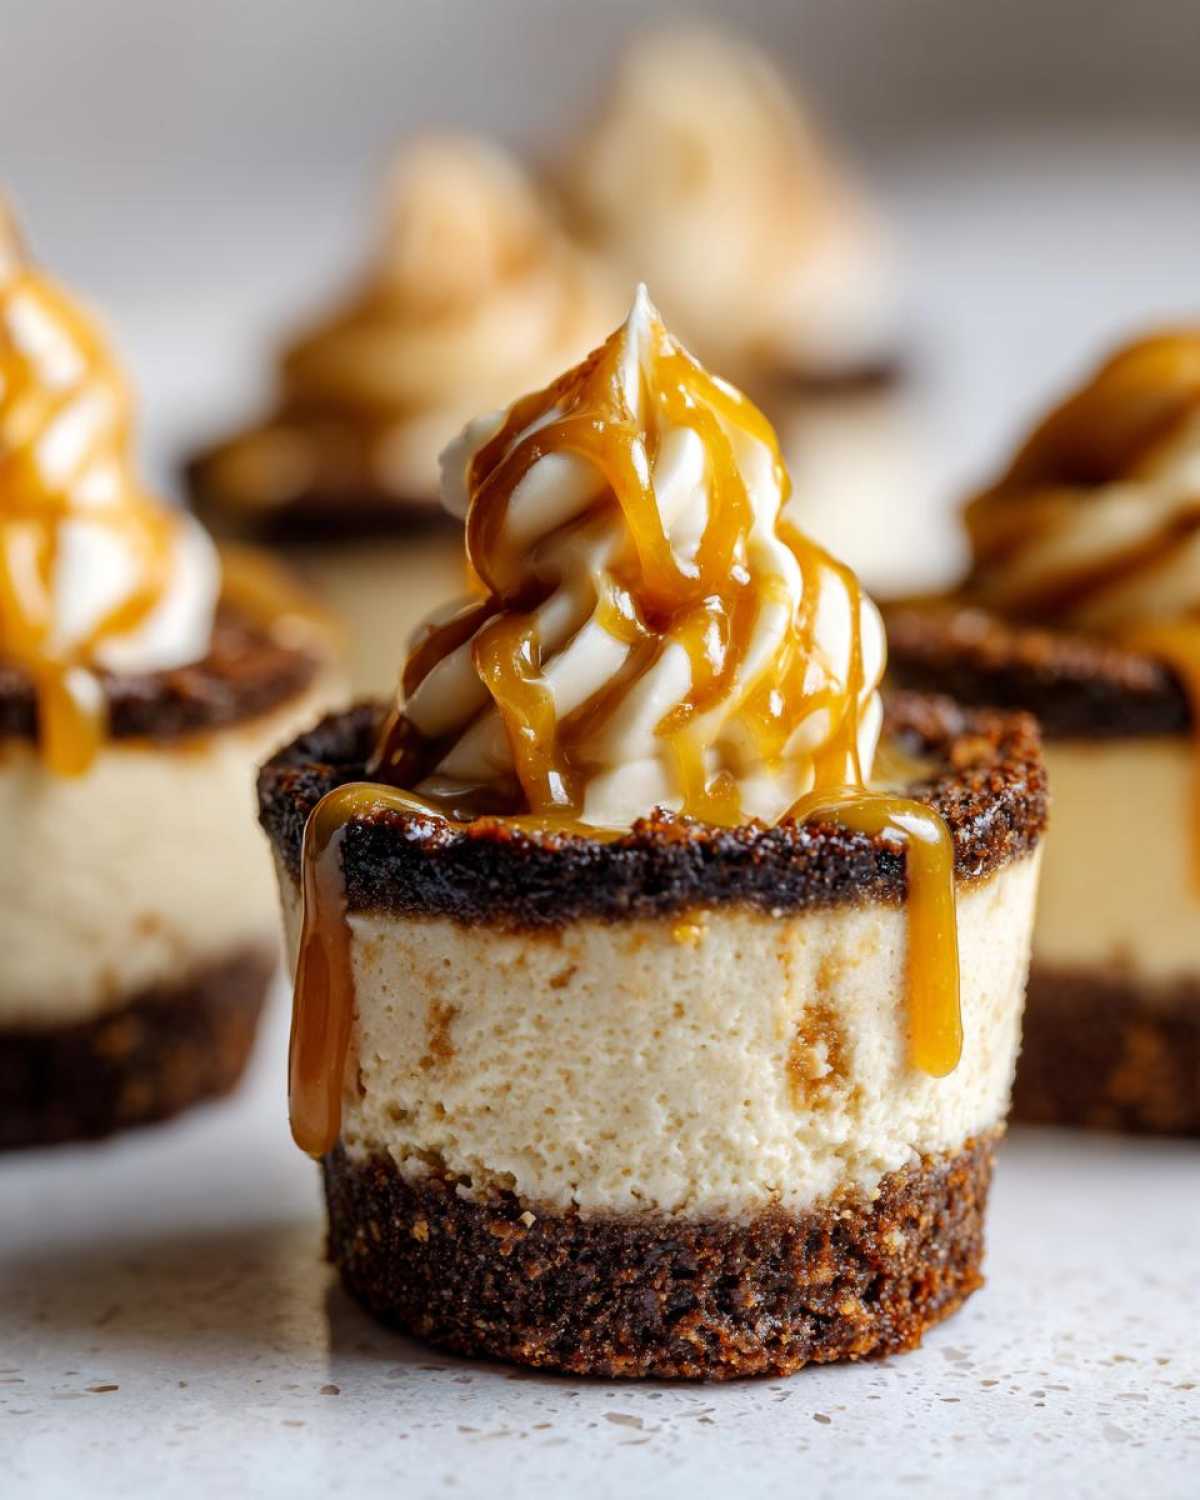
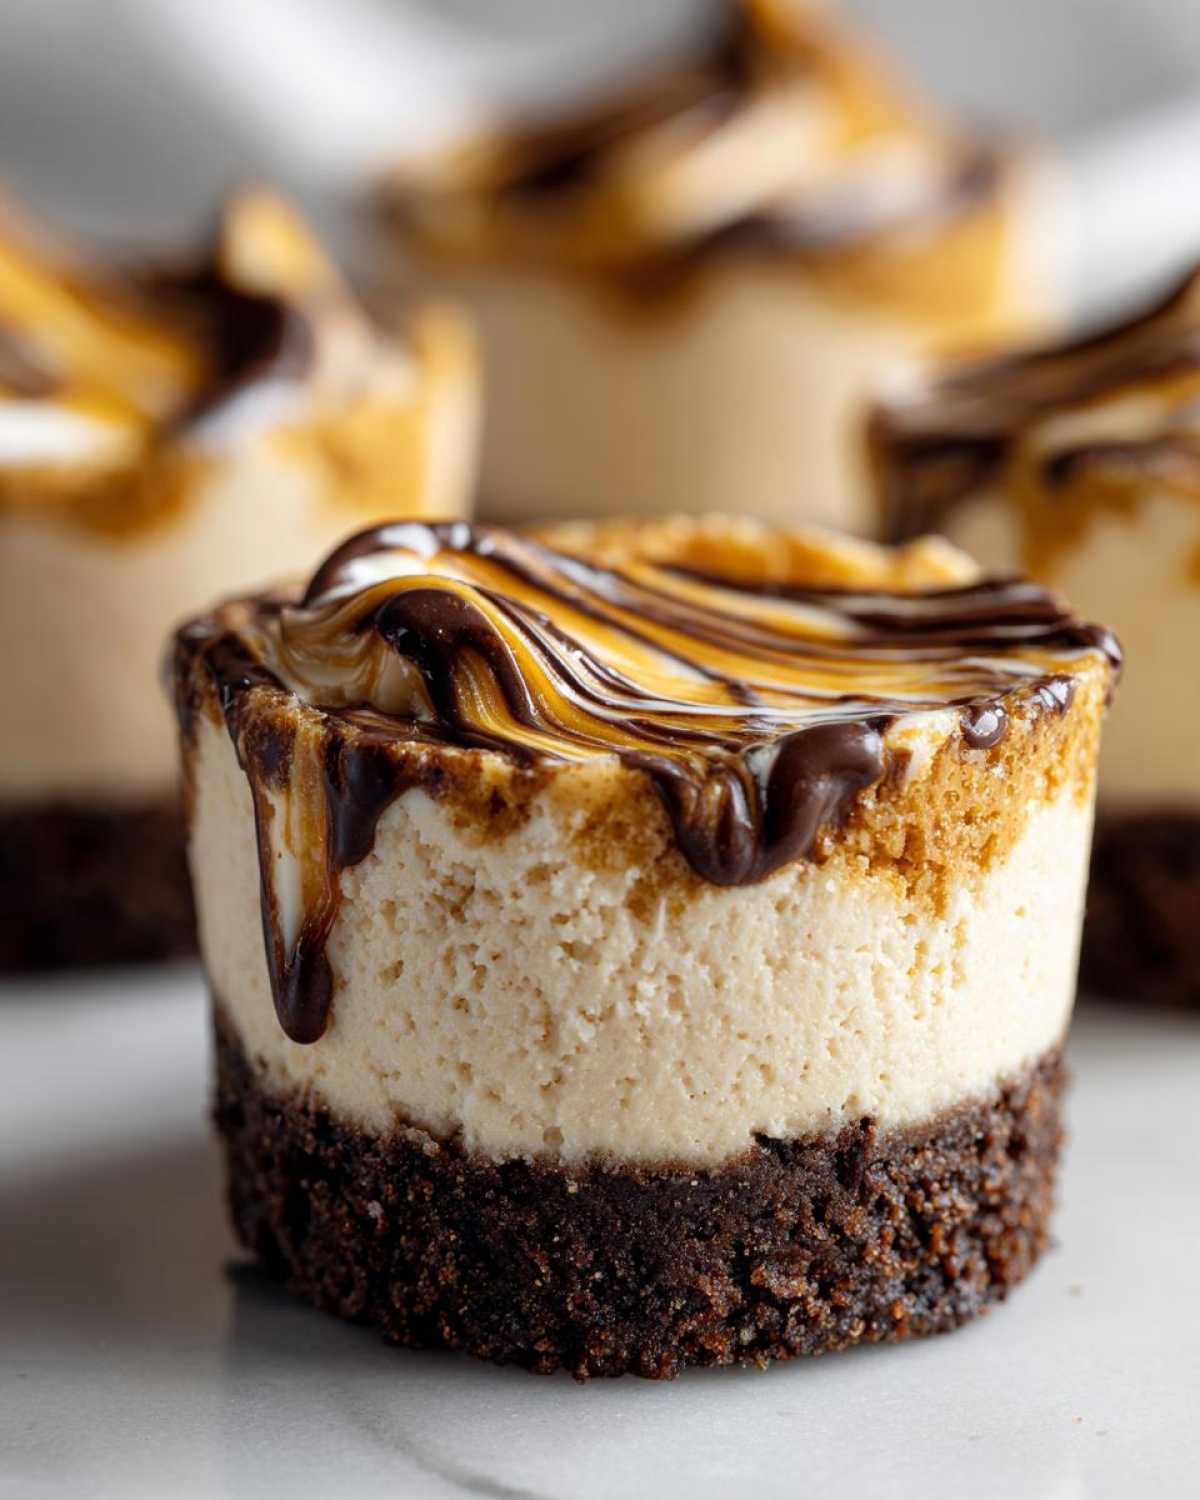
When they are finally firm, take a tiny bit of that extra cookie butter—just 10 seconds in the microwave makes it drizzle-ready—and drizzle it right over the top of each cup. That final swirl makes them look absolutely stunning!
Tips for Perfect Cookie Butter Cheesecake Cups Every Time
You’ve made the cups, they are chilling beautifully, but if you want to ensure these make ahead dessert cups become an instant classic, there are a few little secrets I live by. Achieving that creamy texture that makes people hunt down the recipe? It all comes down to how you handle your ingredients and how you finish the job. If you follow these checks, you’ll have the best cookie butter recipe on the block!
Ingredient Preparation Secrets for Creamy Dessert Cups
Listen, if your cream cheese feels cold straight from the fridge, you’re setting yourself up for lumps! It HAS to be soft, guys—think soft enough to leave an easy fingerprint mark. That guarantees that smooth, no-struggle base. Also, when you mix in that glorious cookie butter half-cup, stop mixing the second it disappears. Overmixing the filling at this stage deflates the air we worked so hard to whip into the cream, leading to a dense texture instead of the light, rich cheesecake filling we want.
Presentation Tips for Simple Cheesecake Bites
I know we are making these easy simple cheesecake bites, but they deserve a nice dressing up! If you want them to look like they came from a fancy bakery, skip the spoon for the filling and use a piping bag fitted with a large star tip. It takes literally 30 extra seconds, but that swirl on top is what gets people asking, “Wait, you *made* these?” Remember to warm that topping drizzle just slightly so it flows beautifully over the cold, firm cheesecake top!

Make Ahead Dessert Cups: Storage and Serving
This is one of the best things about these make ahead dessert cups—they are fantastic for party prep! You can absolutely whip these up the day before or even two days before your event. Just make sure they are in the fridge, covered loosely with plastic wrap, so they don’t pick up any funky fridge smells.
When they are chilling, the filling firms up perfectly, making them incredibly stable for transport or sitting out for a little while. They hold up beautifully for about three days in the refrigerator, though honestly, I doubt any will last that long! Just remember to add that gorgeous drizzle of warmed cookie butter right before you serve them so it looks shiny and delicious.
Variations on Classic Cookie Butter Cheesecake Cups
Part of finding your own “Sunday Flavor” is playing around with the classics! While I absolutely adore these rich cheesecake cups exactly as they are, sometimes you want to switch things up a little for a new take on cookie butter dessert ideas. Even tiny tweaks can make the dessert feel brand new!
Swapping the Crust for Texture Contrast
If you’re feeling adventurous and want to change up the crunch factor, go ahead and swap out the Biscoff crumbs or graham crackers! Crushed vanilla wafers work fantastically well, giving a sweeter, milder base. Or, try crushing some plain shortbread cookies—they bake up buttery and delicate. It’s a simple switch that completely changes the crust experience.
Adding Flavor to Your Rich Cheesecake Filling
The filling is already luscious, but if you want to lean into the spice, try adding just a tiny pinch of ground cinnamon right along with the powdered sugar when you beat the cream cheese. A little goes a long way! I also love adding just one drop—and I mean *one*—of almond extract along with the vanilla. It deepens the sweetness beautifully.
Frequently Asked Questions About Cookie Butter Cheesecake Cups
I know you might have a few little questions swirling around before you dive into making these beauties! It’s totally normal when you’re working with a new favorite like these cookie butter cheesecake cups. Here are the common things I hear from folks trying this recipe for the first time.
Can I use a different cookie butter brand besides Biscoff in these cookie butter cheesecake cups?
Yes, absolutely! While Biscoff (or Lotus) is what gives that signature, classic spice note, most creamy cookie butters will work just fine in the filling. Just make sure whatever you choose is creamy and well-stirred before you scoop it in. The flavor will be *similar* but uniquely yours!
How long do these No Bake Cheesecake Cups need to set?
Sweetie, the biggest test of patience happens right now! You need a minimum of four hours in the refrigerator for these no bake cheesecake cups to firm up properly. If you can wait overnight? Even better! Longer chilling just helps those mini cheesecakes no bake set up beautifully and give you that perfect slice.
Can I freeze these dessert in a cup recipes?
You sure can! These are fantastic dessert in a cup recipes to make ahead and freeze. Pop them in the freezer, making sure to cover them well so they don’t dry out. The only thing to note is that when you thaw them, the texture of the whipped cream filling might be just a touch softer than when it was fresh. But honestly, they are still delicious!
Nutritional Estimates for Cookie Butter Cheesecake Cups
Okay, look, these are pure indulgence, and they are meant to be enjoyed as a special treat! We aren’t aiming for a low-sugar count here, that’s for sure. But, since so many of you ask about tracking or just having a general idea, here are the estimates based on standard ingredients for one of these delightful little cups. Just remember, this is a guide, not gospel, since brands can change things up on us!
- Serving Size: 1 cup
- Calories: 350
- Fat: 22g
- Carbohydrates: 34g
- Sugar: 28g
- Protein: 5g
Since we are using cream cheese and butter, the fat content is certainly there, but look at that sugar—it’s nestled nicely within the fats and the carbs. These are rich treats, so keep that in mind when you’re diving into a few! Enjoy them guilt-free because you absolutely deserve this deliciousness!
Share Your Sunday Flavor Creations
I truly hope you loved whipping up these easy cookie butter cheesecake cups as much as I do! If you make these creamy beauties, please come back and leave a star rating—it helps other bakers find their Sunday Flavor, too! And definitely tag me on Instagram; seeing your individual dessert portions brings me so much joy!
PrintEasy No-Bake Cookie Butter Cheesecake Cups

Make these simple, creamy, no-bake cheesecake cups layered with delicious cookie butter. They are perfect individual desserts for parties or a quick sweet treat.
- Prep Time: 20 min
- Cook Time: 0 min
- Total Time: 4 hr 20 min
- Yield: 12 servings
- Category: Dessert
- Method: No Bake
- Cuisine: American
- Diet: Vegetarian
Ingredients
- 1 1/2 cups graham cracker crumbs (or Biscoff cookie crumbs)
- 1/4 cup granulated sugar
- 6 tablespoons unsalted butter, melted
- 16 ounces cream cheese, softened
- 1 cup powdered sugar
- 1 teaspoon vanilla extract
- 1/2 cup cookie butter (like Biscoff spread), plus extra for topping
- 1 cup heavy whipping cream
- 1/4 cup powdered sugar (for whipped cream)
Instructions
- Prepare the crust: In a medium bowl, mix the graham cracker crumbs, 1/4 cup granulated sugar, and melted butter until combined.
- Press about 1 tablespoon of the crumb mixture firmly into the bottom of 12 small dessert cups or liners. Place the cups in the refrigerator while you prepare the filling.
- Make the cheesecake filling: In a large bowl, beat the softened cream cheese with an electric mixer until smooth.
- Add the 1 cup powdered sugar and vanilla extract to the cream cheese mixture and beat until fully combined and creamy.
- Gently mix in the 1/2 cup of cookie butter until just incorporated. Do not overmix.
- In a separate bowl, whip the heavy whipping cream and the remaining 1/4 cup powdered sugar until stiff peaks form.
- Fold the whipped cream into the cookie butter cream cheese mixture until no streaks remain. This creates your rich cheesecake filling.
- Spoon or pipe the cheesecake filling evenly over the crusts in the 12 cups.
- Chill the cups in the refrigerator for at least 4 hours, or until firm.
- Before serving, warm a small amount of extra cookie butter slightly (about 10 seconds in the microwave) and drizzle it over the top of each cheesecake cup.
Notes
- For a Biscoff crust, substitute Biscoff cookies for graham crackers.
- You can use a piping bag with a large star tip to make the filling look professional in the cups.
- These are excellent make-ahead dessert cups; they hold well in the fridge for up to 3 days.
Nutrition
- Serving Size: 1 cup
- Calories: 350
- Sugar: 28
- Sodium: 210
- Fat: 22
- Saturated Fat: 13
- Unsaturated Fat: 9
- Trans Fat: 0
- Carbohydrates: 34
- Fiber: 1
- Protein: 5
- Cholesterol: 65

Comments are closed.