


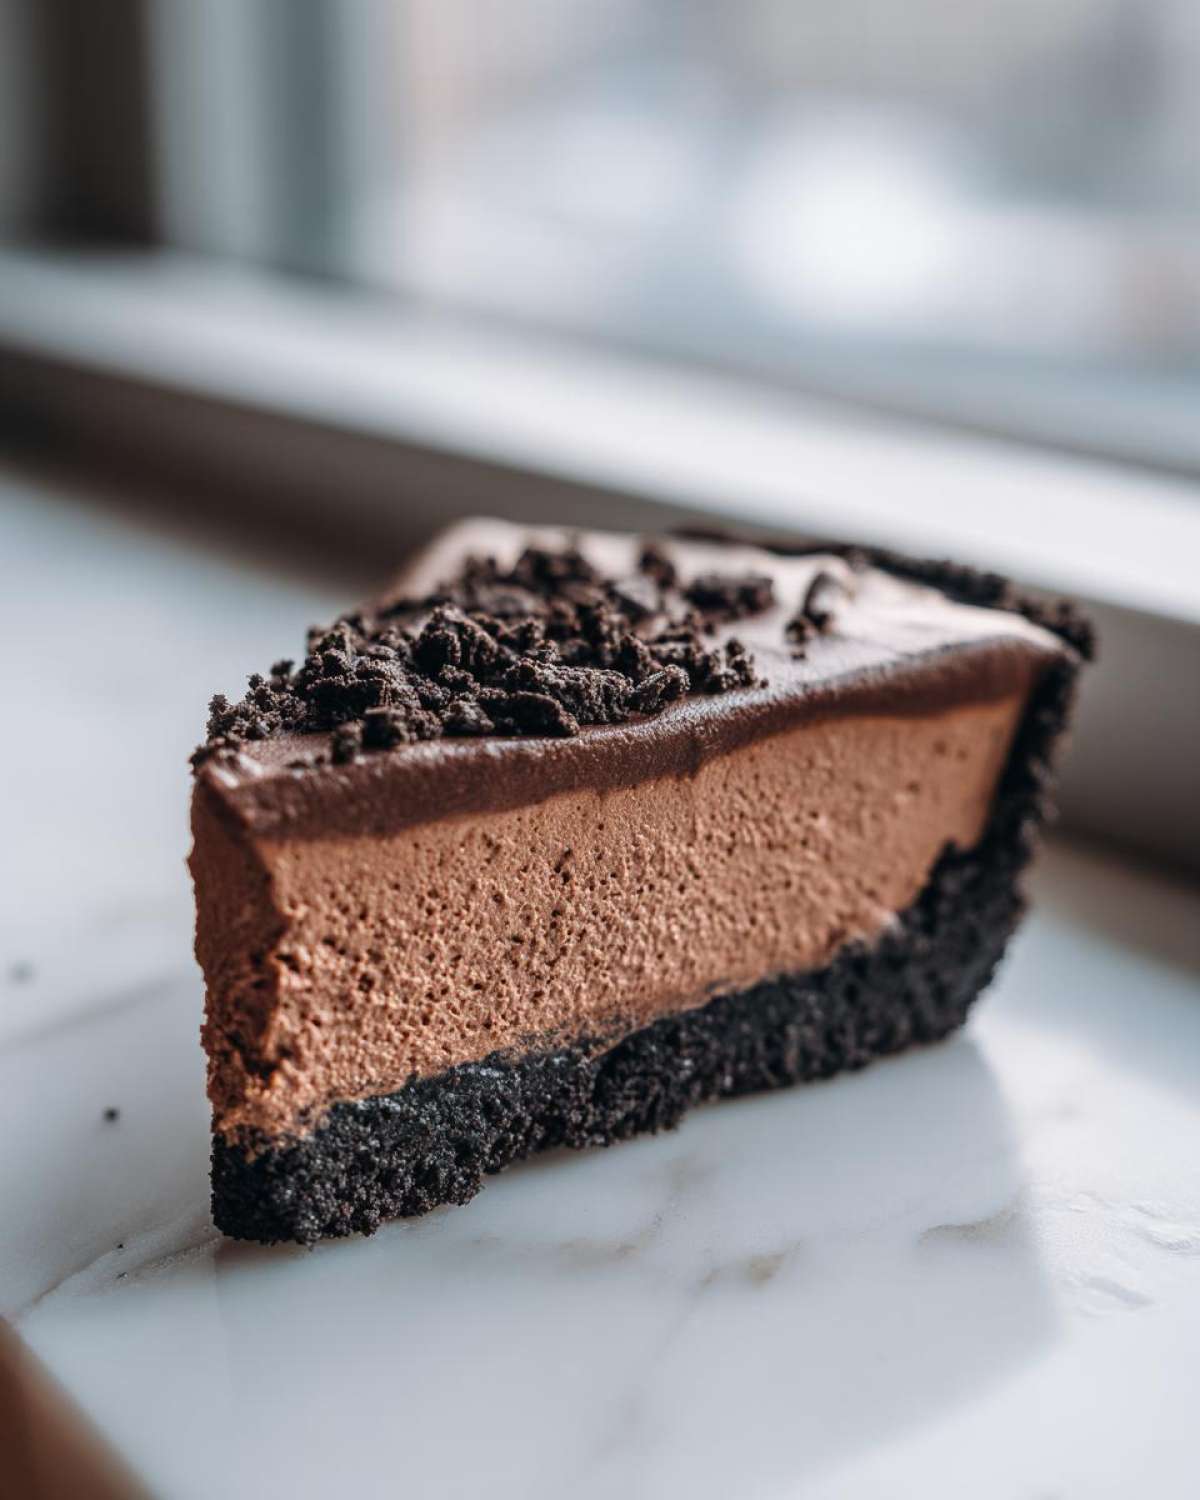
Okay, are you ready to see the dessert that genuinely stops traffic? Forget those heavy, dense chocolate nightmares you sometimes get. I finally nailed the ultimate showstopper dessert, and you won’t even need to argue with your oven about it. I’m talking about my chocolate mousse pie, and honestly, this version changed my life because it’s completely no-bake! I spent ages trying to get that perfect creamy texture—you know, where it melts on your tongue but still holds its shape? I finally got that balance when I stopped trying to mimic French silk and focused on making the filling absolutely light and airy. When I served this at my neighbor’s anniversary party, people were fighting over the last slice. Trust me, this easy recipe is about to become your go-to special occasion dessert. If you want to learn more about a similar creamy concept, check out my guide on a creamy chocolate mousse recipe.
Why This Easy No-Bake Chocolate Mousse Pie Recipe Works (E-E-A-T)
You might read ‘no bake’ and think the texture is going to suffer, but this recipe is the real deal. Honestly, I think I love it more than baked cakes sometimes because of how foolproof it is. It hits all those markers people are looking for when they search for the perfect indulgent treat. It’s my secret weapon for those hot summer days when the kitchen is already too warm!
Here’s the breakdown of why this specific chocolate mousse pie stands head and shoulders above the rest:
- It’s truly easy! No preheating, no fiddling with oven temperatures, and definitely no worries about cracks forming while it cools down.
- The texture is spot on—it’s rich, yes, but oh my gosh, it’s so light and airy, just like an authentic mousse should be. Definitely a decadent mousse dessert.
- We use just a tiny bit of gelatin, which is my trade secret for stability. It makes sure your beautiful, light dessert holds its shape perfectly when you cut into it. If you love easy, make-ahead desserts, you should also check out my guide on no-bake cheesecake for more ideas!
Gathering Ingredients for Your Chocolate Mousse Pie
Okay, gathering is the easy part since we aren’t boiling water for a massive cake base! Since this is a no-bake situation, the quality of what you put in really shines through, especially when we are aiming for a decadent mousse dessert. My biggest piece of advice for anyone trying to make a truly rich dark chocolate pie is to splurge a little on the chocolate itself. Don’t use chips if you can help it; you need good quality baking bars that chop up nicely! If you are obsessed with rich chocolate like I am, you might also want to check out my dark chocolate avocado mousse recipe for another easy fix.
We have three small groups of ingredients we need. Make sure everything that needs to be cold—like the heavy cream for whipping—is straight from the fridge. That makes all the difference in achieving that perfect light and airy dessert texture we are aiming for in this chocolate mousse pie recipe.
Crust Ingredients: The Foundation of Your Oreo Crust Pie
We are skipping the pastry dough shenanigans and going straight for that crunchy, no-fuss base. If you want the absolute best flavor, use real Oreos, crushing them up with the cream filling still inside. It makes the Oreo crust pie so much richer!
- 1 1/2 cups chocolate wafer cookie crumbs (that’s about 30 regular cookies mashed up! If you use Oreos, just make sure you get that volume.)
- 1/4 cup unsalted butter, melted
Homemade Chocolate Mousse Filling Components
This is where the magic happens. Making your own homemade chocolate mousse filling is way better than anything you can scoop out of a tub. Using high-quality chocolate here is non-negotiable if you want that deep, satisfying flavor profile.
- 8 ounces semi-sweet chocolate, finely chopped
- 1/2 cup heavy cream (this is for gently melting the chocolate, not the whipping cream!)
- 1 teaspoon vanilla extract
- 1/4 teaspoon salt
- 1 1/2 cups cold heavy cream (keep this separate and super cold—you’ll need this for whipping!)
- 1/2 cup powdered sugar
- 1 teaspoon unflavored gelatin powder
- 2 tablespoons cold water (for blooming the gelatin)
- 1/4 cup boiling water
For the Whipped Cream Topping Pie Finish
You absolutely must use cold heavy cream here. If it’s even a tiny bit warm, it won’t whip up to the stiff peaks we need to crown our masterpiece. A stand mixer or a good handheld electric mixer makes this final step a breeze.
- Optional: Extra whipped cream for topping
- Optional: Chocolate shavings for that fancy garnish
Step-by-Step Instructions for the No Bake Chocolate Pie
This is where you turn those great ingredients into something truly spectacular! Since this is an easy chocolate dessert, we’re keeping the steps really clear. Seriously, the hardest part is waiting for the pie to finish chilling. We combine melting, whipping, and folding—it’s almost meditative! Just stick to the process, and I guarantee you’ll have the creamiest chocolate mousse pie you’ve ever dreamed of. We’re aiming for that perfect light and airy dessert texture, so pay close attention when we start folding everything together. For more inspiration on saving time with dessert prep, check out my tips on the best make ahead pie recipes.
Creating and Chilling the Oreo Crust Pie Base
First things first, we need a solid foundation for our rich dark chocolate pie. Take those cookie crumbs you mixed with the melted butter and get them into your 9-inch pie plate. You really need to press this mixture down firmly—use the bottom of a glass or measuring cup if your fingers get tired! You want zero gaps, especially around the edges, to avoid any crumbly disaster later. Once it’s packed tight, stick that crust into the freezer for a solid 15 minutes. That quick chill firms up the fat in the butter, giving us a fantastic, sturdy Oreo crust pie base to hold the filling.
Preparing the Chocolate Base and Stabilizing the Filling
Time to handle the dairy and the chips! Heat that small amount of heavy cream until it’s just starting to simmer, then dump it right over your finely chopped chocolate. Seriously, let it sit there for five full minutes without touching it. That simmering cream is going to melt the chocolate into this gorgeously smooth sauce. After stirring it silky smooth—don’t forget the vanilla and salt—you have to let this chocolate base cool down completely. This is super important: If you mix warm chocolate into cool whipped cream, it will seize up on you and you’ll end up with chocolate chips instead of mousse! Separately, bloom your gelatin in the cold water, then dissolve it completely in the boiling water. Whisk that warm, clear gelatin right into your now room-temperature chocolate mixture. This is what keeps our mousse firm!
Achieving Light and Airy Dessert Mousse Texture
This step is where we make it a true mousse! Start whipping your 1 1/2 cups of *cold* heavy cream with the powdered sugar until you get stiff peaks. You want peaks that stand straight up when you lift the whisk. Now, take about a third of that whipped cream and gently fold it into your cooled chocolate base. This step is called ‘lightening the batter,’ and it stops the heavy chocolate from deflating all the air you just worked so hard to create! Once that first third is incorporated, gently fold the lighter chocolate mixture into the remaining whipped cream. Use a big spatula and cut down the middle, then scoop up the side—don’t stir or beat it! We are preserving every single air bubble to ensure this is the light and airy dessert we crave.
Final Assembly and Setting the Chocolate Mousse Pie
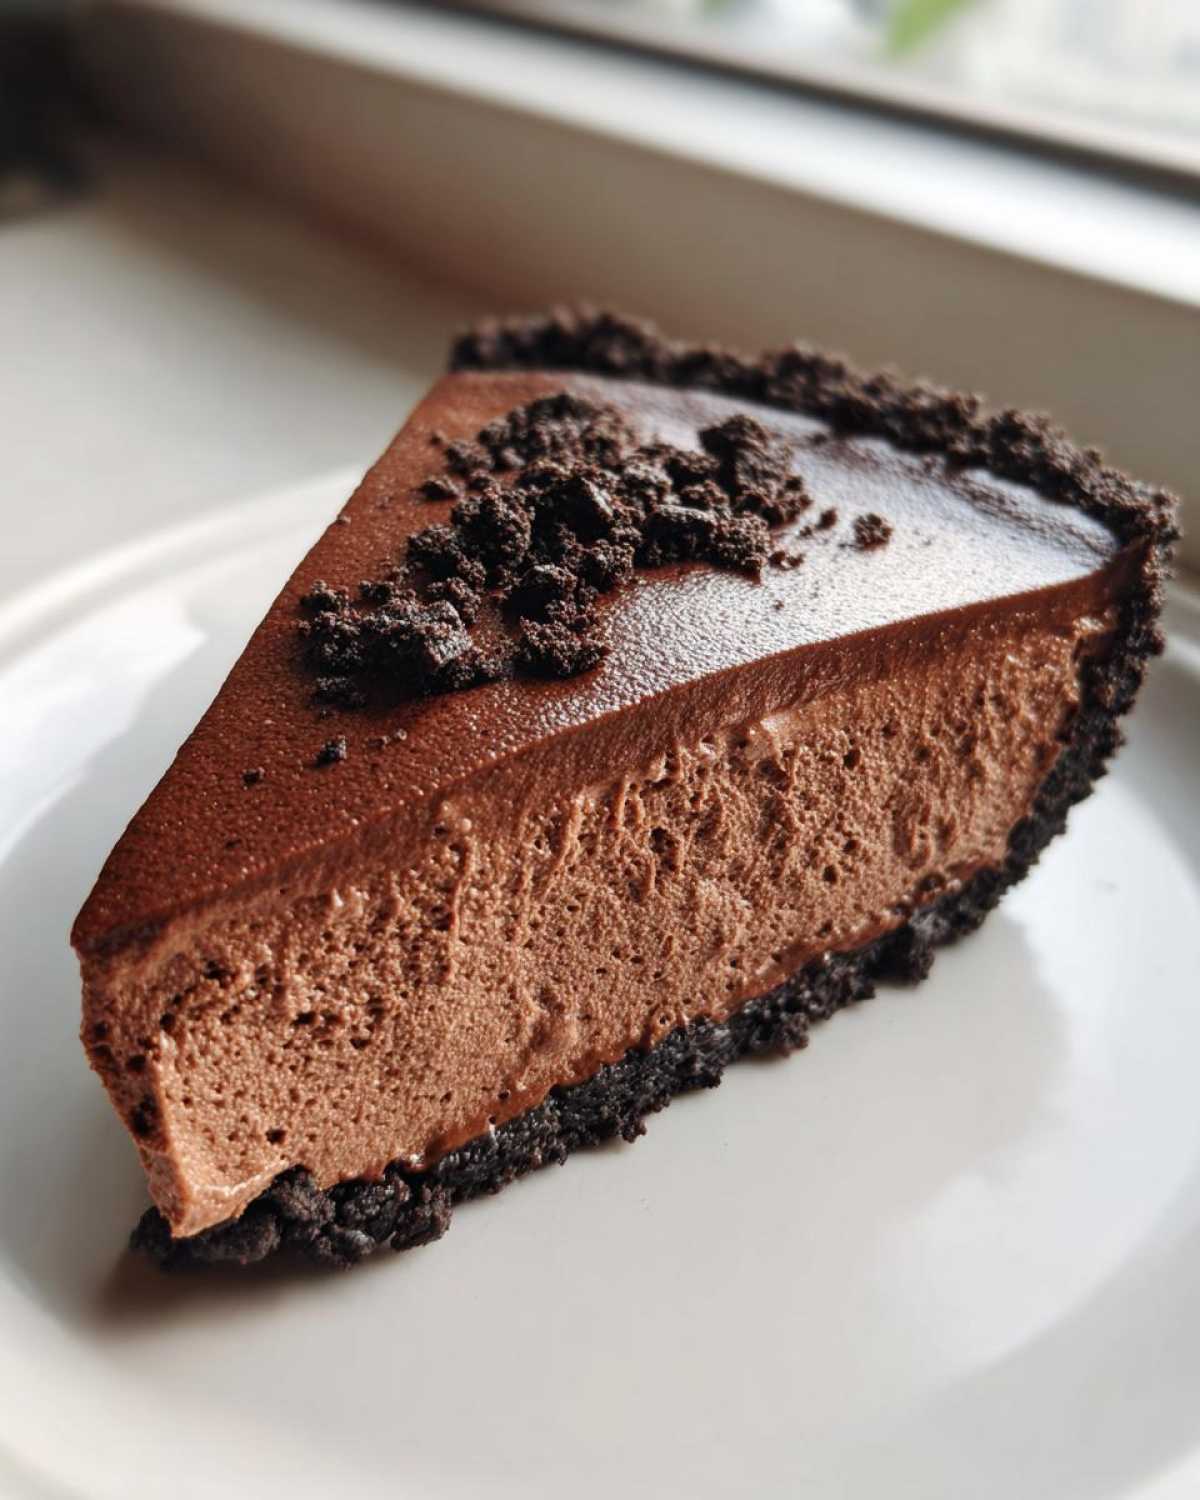
The fun part! Carefully pour all of that beautiful, fluffy homemade chocolate mousse filling into your chilled Oreo crust. Try to get the top as level as you can with your spatula; we want this to look stunning when it comes out of the fridge. Cover it loosely—don’t let the plastic wrap touch the surface, or it will stick! Now, you need patience. This creamy chocolate pie requires at least six hours in the refrigerator. Honestly, I always make it the night before because overnight chilling guarantees that thick, perfect texture that holds up beautifully for slicing. Resist the urge to peek early!

Tips for Success Making the Ultimate Chocolate Dessert
If you want this chocolate mousse pie to transition from ‘really good’ to ‘famous at every holiday party,’ you need a couple of tricks up your sleeve. Remember how I said you could use Oreos instead of just chocolate wafers? That’s my top suggestion for an even richer crust foundation. Don’t bother trying to scrape out the cream filling; just crush them whole! It adds a great textural element to the base.
Also, when it comes to the final topping, don’t just slap on plain whipped cream unless you’re serving it immediately. To ensure your whipped cream topping pie finish looks perfect all evening, whip an extra tablespoon of powdered sugar into your topping cream. This little bit of extra sugar helps stabilize those peaks so they don’t deflate while you’re showing off your stunning special occasion desserts. If you need ideas for another showstopper, you must try my swirl brownies—they are incredible! You can find the recipe here.
Finally, remember that gelatin takes time. It’s not hard, but you can’t rush the chill time. Seriously, plan to make this pie the day before you need it!
Ingredient Notes and Substitutions for Your Chocolate Mousse Pie Recipe
I get asked all the time if you can cheat on the ingredients, and while this recipe does better when you follow it, a few little swaps are perfectly fine. Remember how I raved about Oreos over plain chocolate wafers for the crust? Definitely use those if you want maximum flavor payoff in your Oreo crust pie. That slight sweetness mixes perfectly with the rich filling!
Also, when it comes to chocolate intensity, you have control! If you want a deeper, moodier flavor profile for your chocolate mousse pie recipe, swap out four ounces of the semi-sweet chocolate for bittersweet chocolate. You could even check out my crepe recipe if you are looking for other ways to use up bittersweet chocolate!
And that topping cream? If you’re worried about it wilting before you serve, absolutely use my little trick: whip in a bit more powdered sugar when you beat the cream. It keeps everything looking fabulous!
Serving Suggestions for This Rich Dark Chocolate Pie
Now that you’ve made the ultimate chocolate dessert, how do you present it? This rich dark chocolate pie is impressive enough on its own, but a few simple additions make it truly gourmet. I always serve mine with a side of strong, slightly bitter coffee—the way my iced latte cuts through the richness is just heavenly.
If you need contrast, fresh raspberries are the way to go; their tartness is the perfect foil for the creamy chocolate mousse filling. For a simpler look, just dust the whole top with high-quality unsweetened cocoa powder before serving. It gives this special occasion dessert such a professional finish!

Storage and Make Ahead Pie Recipes Instructions
This is officially one of the best make ahead pie recipes you’ll ever make. You absolutely *must* chill your chocolate mousse pie for a minimum of six hours, but honestly, overnight is where the true magic happens. That long rest lets the gelatin work its magic and creates that firm, sliceable, creamy chocolate pie texture we worked so hard for!
Since this has so much fresh cream in it, it doesn’t exactly keep forever, but it’s usually good in the fridge for up to three days. Just keep it covered tightly—I use foil but make sure it doesn’t touch the filling!
And please, don’t even think about reheating this lovely dessert! It’s a cold treat through and through. If it starts to soften even a little on the counter, just pop it back in the fridge to firm up again. This recipe is fantastic because you can prepare the whole thing a day ahead, making serving your special occasion desserts so stress-free. For more tips on prepping ahead, you can always check out my full guide on make ahead pie recipes!
Frequently Asked Questions About Chocolate Mousse Pie
I know you’ve got questions! When you’re making something this decadent and amazing, you want to get it right the first time. Because this is a no-bake recipe, there are a few things we need to confirm to make sure you get that perfect melt-in-your-mouth texture every single time. I’ve gathered the most common worries people have when making this chocolate mousse pie recipe. If you’re looking for even more mousse magic, you should definitely check out my recipe for chocolate mousse cups!
Can I make this chocolate mousse pie recipe without gelatin?
Well, you *can*, but I really, really wouldn’t recommend it if you want the best result for your **creamy chocolate pie**. The gelatin is what steps in when we don’t use the oven to set the filling. Without it, you’re basically making chocolate pudding that sits in a crust. The gelatin is absolutely essential to stabilize that beautiful, light and airy dessert filling so it doesn’t turn into soup when you cut into it. It’s the secret to keeping that mousse texture.
What is the best way to ensure my homemade chocolate mousse filling is light and airy?
This comes down to two things we talked about, so pay attention! First, you have to wait for the chocolate mixture to cool down completely before you even think about adding it to the whipped cream. If it’s warm, it melts the air right out of your carefully whipped cream. Second, and this is crucial for that light and airy dessert: you must fold, not stir! Using gentle folding motions is what preserves all those wonderful air bubbles we created when whipping the cream. If you stir aggressively, you’ll deflate everything, and suddenly you’re stuck with a heavy, dense texture instead of a beautiful **homemade chocolate mousse filling**.
I have a few more tips below if you want to dive deeper into making this the **ultimate chocolate dessert**!
- What’s the best crust substitute? If you run out of chocolate wafers, you can use Oreos (laving the filling in!) or even Nilla Wafers, though the flavor won’t be as deep as the chocolate version.
- Can this be an easy chocolate dessert for a crowd? Yes! It’s perfect because it’s one of our best make ahead pie recipes, setting up nicely in the fridge overnight.
- How do I make it extra glossy? For an extra-shiny finish on your **rich dark chocolate pie**, brush the top lightly with melted, tempered chocolate right before chilling.
Share Your Decadent Mousse Dessert Experience
Now that you have the recipe for what I truly believe is the best chocolate mousse pie in existence—so light, so creamy, and absolutely no oven required!—I really want to hear about your experience!
Did you make this for a holiday? Did you manage to keep your hands out of the filling while it was chilling? Tell me everything! Drop a comment below and let me know how it turned out. Did you decorate it exactly like the picture, or did you get creative with your whipped cream topping pie finish?
Seriously, seeing your results makes my day. If you snap a picture of your finished decadent mousse dessert, tag me on social media so I can squeal over how amazing it looks. If you have any last-minute genius tips that made your experience even better, share them in the comments too! We’re all in this together, trying to make the most amazing, easy chocolate dessert possible. If you ever need to get in touch with me directly with questions or praise (ha!), you can always use my contact page right here!
PrintEasy No-Bake Chocolate Mousse Pie with Oreo Crust
Make a rich, creamy, and light chocolate mousse pie without turning on your oven. This recipe uses a simple Oreo crust and a decadent homemade mousse filling.
- Prep Time: 30 min
- Cook Time: 0 min
- Total Time: 6 hours 30 min
- Yield: 8 servings
- Category: Dessert
- Method: No-Bake
- Cuisine: American
- Diet: Vegetarian
Ingredients
- 1 1/2 cups chocolate wafer cookie crumbs (about 30 cookies)
- 1/4 cup unsalted butter, melted
- 8 ounces semi-sweet chocolate, finely chopped
- 1/2 cup heavy cream (for melting chocolate)
- 1 teaspoon vanilla extract
- 1/4 teaspoon salt
- 1 1/2 cups cold heavy cream (for whipping)
- 1/2 cup powdered sugar
- 1 teaspoon unflavored gelatin powder
- 2 tablespoons cold water
- 1/4 cup boiling water
- Optional: Whipped cream and chocolate shavings for topping
Instructions
- Prepare the crust: Combine the chocolate wafer crumbs and melted butter in a bowl. Press the mixture firmly into the bottom and up the sides of a 9-inch pie plate. Chill the crust in the freezer for 15 minutes.
- Melt the chocolate: Place the chopped chocolate in a heatproof bowl. Heat 1/2 cup of heavy cream until simmering, then pour it over the chocolate. Let it sit for 5 minutes, then stir until completely smooth. Stir in vanilla extract and salt. Let this mixture cool to room temperature.
- Bloom the gelatin: In a small bowl, sprinkle the gelatin powder over 2 tablespoons of cold water. Let it sit for 5 minutes to absorb the water. Pour 1/4 cup of boiling water over the gelatin mixture and stir until the gelatin is fully dissolved and clear. Whisk this warm gelatin solution into the cooled chocolate mixture.
- Whip the cream: In a separate large bowl, beat 1 1/2 cups of cold heavy cream and powdered sugar with an electric mixer until stiff peaks form.
- Fold the mousse: Gently fold about one-third of the whipped cream into the chocolate mixture to lighten it. Then, gently fold the lightened chocolate mixture into the remaining whipped cream until just combined and no streaks remain. Do not overmix.
- Fill and chill: Pour the mousse filling into the chilled Oreo crust. Smooth the top with a spatula. Cover the pie loosely with plastic wrap and refrigerate for at least 6 hours, or preferably overnight, until the mousse is firm.
- Serve: Before serving, top the pie with additional whipped cream and chocolate shavings, if desired. Cut into slices and serve cold.
Notes
- For a richer crust flavor, use Oreo cookies instead of chocolate wafers, leaving the cream filling intact when crushing.
- Stabilize the topping whipped cream by adding 1 teaspoon of powdered sugar and 1/2 teaspoon of vanilla extract before whipping to stiff peaks.
- If you prefer a darker chocolate flavor, substitute 4 ounces of semi-sweet chocolate with 4 ounces of bittersweet chocolate.
Nutrition
- Serving Size: 1 slice
- Calories: 450
- Sugar: 35
- Sodium: 250
- Fat: 32
- Saturated Fat: 18
- Unsaturated Fat: 14
- Trans Fat: 0
- Carbohydrates: 38
- Fiber: 2
- Protein: 5
- Cholesterol: 95


Comments are closed.