


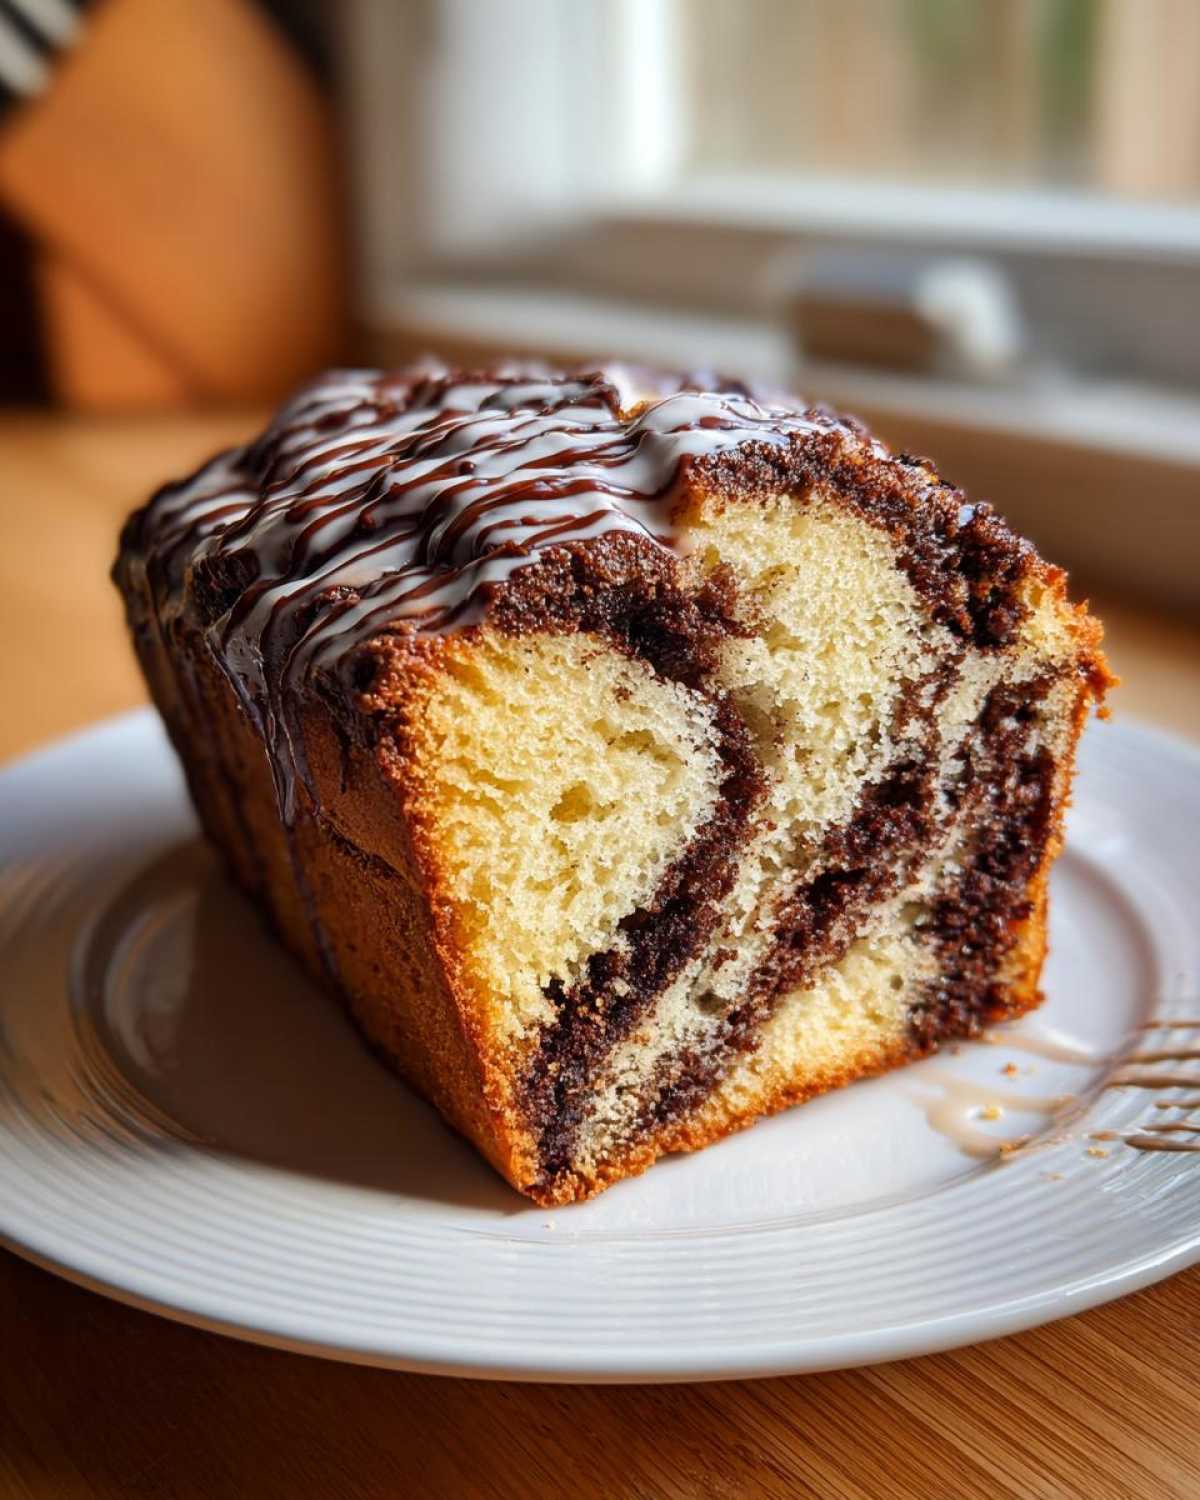
I used to think that that incredible, perfectly swirled, impossibly soft chocolate babka you get from the fancy bakeries was completely out of my league. Honestly, yeast bread used to terrify me! I’d look at the dough and picture hours of failure. But I finally cracked the code, friends, and I am so excited to share the recipe that changed everything for me. This isn’t just any bread; this is the one that gives you those deep, gorgeous chocolate layers encased in a buttery, almost brioche-like tenderness. Seriously, once you master the braiding, you’ll see why this specific chocolate babka is now a non-negotiable part of our holiday baking lineup.
Why This is the Best Chocolate Babka Recipe for Home Bakers
I know what you’re thinking: yeast dough is hard. But trust me when I say that this recipe feels more like making a very rich cookie dough than a fussy loaf! That’s because we add the butter in those crucial separate steps, which keeps things manageable. We aren’t trying for a puffy dinner roll here; we want that dense, ultra-moist structure. If you’ve ever wanted to make your own copycat bakery treat, this is where you start. It’s the key to making that bakery magic happen right on your counter. Check out my dressing recipe if you want another reliable classic, though that’s a different kind of savory baking project!
What you get is a proper soft swirled sweet bread that screams luxury. It’s designed to be decadent and slightly heavy, which means it holds up beautifully to slicing and serving. If you’ve struggled with dry breads before, this blend of high-fat ingredients creates a truly tender yeast bread recipe that stays wonderfully soft for days.
Achieving the Perfect Tender Yeast Bread Recipe Texture
The secret to that cloud-like, almost brioche babka recipe feel is really the ratio of fat to flour, plus those room-temperature eggs. When you incorporate that full cup of butter slowly, you coat the flour particles, which prevents too much gluten from developing too quickly. This means you get structure without toughness. It’s the key differentiator between a good babka and one that melts in your mouth!
Gathering Ingredients for Your Decadent Chocolate Babka
Okay, before we get into the magic of the braid, we have to talk about ingredients. With a yeast dough, especially one this rich, precision really matters! Don’t try to eyeball the liquids or the flour—it’ll throw off the whole balance. You want that perfect dough elasticity that leads to great swirls, and that starts right here at the measuring cups. Getting these foundational items ready and at the right temperature is probably my favorite easy step for ensuring this turns into the classic chocolate babka loaf we dream about.
Dough Ingredients: Building the Buttery Braided Bread Base
- 1 cup whole milk, warmed to 105-115°F (Make sure it’s not too hot, or you’ll kill your yeast!)
- 2 1/4 teaspoons active dry yeast
- 1/2 cup granulated sugar, plus 1 teaspoon for yeast
- 4 large eggs, room temperature (This is important for mixing smoothly!)
- 1 teaspoon vanilla extract
- 1 teaspoon salt
- 4 cups all-purpose flour, plus more for dusting
- 1 cup (2 sticks) unsalted butter, softened and cut into pieces
Rich Chocolate Filling and Simple Syrup Components
This is where we get that deep, decadent flavor hitting every bite. For the filling butter, you absolutely need it softened—like hummus consistency—but definitely not melted or oily. That makes a huge difference!
- 1 cup powdered sugar (for simple syrup)
- 1/4 cup water (for simple syrup)
- 1 cup unsalted butter, softened (for filling)
- 1 1/2 cups granulated sugar (for filling)
- 3/4 cup unsweetened cocoa powder
- 1 teaspoon salt (for filling)
- 2 large eggs, beaten (for egg wash—don’t skip this for that gorgeous golden top!)
How to Make Chocolate Babka: A Step-by-Step Guide
Alright, deep breaths! This is the main event—the part where we turn those basic ingredients into a stunning chocolate babka step by step. I promise you, it looks way more intimidating than it actually is. The process feels like a little baking ritual, and that perfectly braided loaf at the end is your stunning reward. Seriously, once you master the braiding, you’ll see why this specific chocolate babka is now a non-negotiable part of our holiday baking lineup. If you like reliable recipes that produce amazing results, check out how I approach my dressing recipes, it’s all about getting the fundamentals right!
Mixing and Kneading the Tender Yeast Bread Recipe Dough
First things first, we have to wake up those little yeast guys. That’s Step 1—sprinkle the yeast over the warm milk (remember, 105 to 115°F—too hot and they die, too cold and they sleep!). Give it five or ten minutes until it looks frothy; that foam means you’re good to go. If it doesn’t foam, dump it and try again with warmer milk!
Next, get everything else into the mixer bowl: the rest of the sugar, eggs, vanilla, and salt. Mix it up slowly until it starts to come together. Then, here’s the fun part: add the softened butter, piece by piece. Don’t rush this! Once all the butter is incorporated, you knead! For about 8 to 10 minutes on medium-low speed, you should be watching that dough transform from shaggy mess to a true beauty. If you’re kneading by hand (like my grandmother used to!), plan on digging in for a solid 15 minutes until it’s smooth and passes the windowpane test—that means you can stretch a small piece thin enough to see light through it without tearing immediately. That is the sign of a perfect tender yeast bread recipe base!
The First Rise and Preparing the Rich Chocolate Swirl Pastry Filling
Once your dough is springy and smooth, pop it into a lightly oiled bowl, cover it with plastic wrap, and forget about it for about one and a half to two hours in a warm spot. Don’t peek too much! It needs to double in size. While that’s happening, you make the filling (Step 5). This filling is just butter, sugar, cocoa powder, and salt all mixed together until it looks like the richest, darkest frosting you’ve ever seen. Smooth and spreadable is the goal here. If your butter is too cold, your filling will tear the dough later—we want that dough to drape nicely around that dense, rich chocolate swirl pastry!
Shaping and Braiding for the Classic Chocolate Babka Loaf
This is the step people worry about, so pay close attention! Once the dough has doubled (Step 6), gently punch it down and turn it out onto a lightly floured surface. Roll it out into a long 12×18 inch rectangle. Now, take that glorious chocolate filling and smear it everywhere, leaving a small border on one long edge. This clean edge is what seals the loaf!
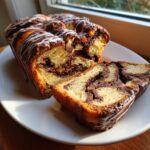
Roll that rectangle up TIGHTLY, starting from the long edge opposite the border, making a fat log. Now for the dramatic move (Step 7-9): Use a very sharp knife to slice that log right down the middle, lengthwise, exposing the layers! Open the two halves and lay them side-by-side, making sure those beautiful chocolate layers are facing UP. This is crucial! Now, gently twist them together, keeping the cut sides facing up as much as possible to expose the swirls. Pinch the ends together and carefully move your creation into your greased 9×5 loaf pan. That twisted beauty is your classic chocolate babka loaf! It takes a little practice, but it’s worth it for that bakery appeal.
Second Rise, Baking, and Applying the Simple Syrup Glaze
Next, cover the loaf loosely and let it puff up again for about 45 to 60 minutes. Somewhere around minute 30 of this rise, go ahead and preheat your oven to 350°F! When you put the egg wash on (Step 11) and slide it in the oven for 35 to 45 minutes, watch that top closely. If it gets too brown before the center is done, you absolutely must slip a piece of foil loosely over the top—it acts like a little hat to protect it. You can find lots of inspiration for other tender dough projects in my cinnamon roll guide!
The second you pull that loaf out, it needs a bath! While it was baking, you made a simple syrup—just powdered sugar and water gently heated until dissolved (Step 12). Brush this hot, sticky syrup all over that hot babka surface immediately. It seals in moisture and gives it that signature shiny finish. Let it rest in the pan for 15 minutes before transferring it to a wire rack to cool completely. This is the moment of truth leading to that incredible texture!
Tips for Success When Making Chocolate Babka
Look, this isn’t just some quick bread; it’s a layered adventure! To guarantee you get that stunning bakery style chocolate bread every time, remember our two main rules from the recipe notes. First, room temperature eggs and properly softened butter are non-negotiable for smooth mixing. If your eggs are cold, they shock the dough and can slow down the rising process!
Second, if your dough feels like it’s fighting you when you roll it out for the filling, don’t force it! It means the gluten is too tight. Just cover it back up and let it rest for 15 minutes before trying to roll again. A very quick chill in the fridge for about an hour after the first rise also makes the dough surprisingly much easier to work with for the final roll and braid. If you struggled with shaping, you can check out my guide on making cinnamon rolls—sometimes just resting the dough helps everything calm down!
Storage and Reheating Instructions for Your Soft Swirled Sweet Bread
I always hope there’s enough left over, but let’s be real—this soft swirled sweet bread is hard to save! If you manage to stop eating it immediately, storage is pretty straightforward, though. If you have leftovers, do not store this in the refrigerator. I know, I know, it seems like a good idea for yeast bread, but it actually dries it out faster!
Keep your babka tightly wrapped in plastic wrap or tucked into an airtight container on the counter. It should stay perfectly fresh and soft like this for about two to three days. Honestly, if it lasts that long, you deserve an award!
Now, if you need to revive it—maybe it’s day three and you want it to taste like it just came out of the oven (with that sticky syrup reapplied)? I have two simple methods. If you just want one slice, microwave it for about 10 to 15 seconds. It heats up fast and gets that buttery softness back immediately.
For a larger piece, pop it onto a baking sheet wrapped loosely in foil and put it in a 300°F oven for just 5 to 8 minutes. This warms the butter and melts the sugars just enough to bring back that magical texture. Remember, this bread is so tender; never overheat it or you’ll lose all that beautiful work you did with the yeast!
Serving Suggestions for Chocolate Babka for Brunch
The real beauty of this chocolate babka for brunch is how amazing it tastes with very little effort on your part! Since this loaf is so rich, buttery, and decadent on its own, you don’t need to drown it in toppings. My absolute favorite way to serve it is slightly warmed, perhaps alongside a strong cup of black coffee or even a fun, chilled drink like my signature iced brown sugar latte—you can find the recipe for that right here if you need a pick-me-up!
If you’re serving it as a dessert or part of an elaborate spread, a tiny bowl of fresh raspberries or orange segments on the side cuts through the richness perfectly. It’s wonderful any time of day, but truly shines when served alongside your morning brew!
Frequently Asked Questions About Homemade Pastry Guide
I always get questions when people first try this recipe—it’s understandable, it’s a yeast dough! I put together the most common ones I’ve seen from folks trying to achieve that perfect easy homemade chocolate babka result. Don’t let these little hiccups scare you off; they are super easy to fix once you know the trick! If you’re ever curious about how I handle my site data, you can always peek at my privacy policy.
Can I make the chocolate babka dough ahead of time?
Yes, you absolutely can! This is actually a fantastic move if you’re planning a busy baking day. After you finish kneading the dough (Step 3), instead of letting it rise on the counter, lightly coat the dough ball, place it in a bowl, cover it tightly, and stick it in the fridge overnight—or up to 24 hours. When you take it out the next day, just let it sit on the counter for about an hour to warm up slightly, then proceed with the shaping and second rise as written. It actually makes the dough a little firmer and easier to handle when you roll it out for the chocolate filling!
What if my dough does not rise properly?
Oh, the dreaded flat dough! This almost always comes down to temperature. It’s usually one of two things: either your milk was too hot when you added the yeast, or your kitchen is just plain cold. Yeast creatures need warmth (ideally 75–80°F) to wake up and throw a party. If you suspect your kitchen is chilly, don’t leave the dough in a drafty spot! Try putting it in the oven *with the oven light on* but the heat turned off. That creates a perfect, cozy little microclimate for rising. If you used milk that felt too hot to the touch, you might have killed the yeast, and you’ll need to start over with new yeast.
Is there a way to simplify the braiding for an easy homemade chocolate babka?
I totally get it if the whole slicing-and-twisting thing feels like too much finesse! If you want the flavor but need an easier visual, you can skip Steps 7, 8, and 9 entirely. After you roll the dough with the filling, instead of slicing it lengthwise, just roll it up tightly like a cinnamon roll. Seal the edge very well, place it in the loaf pan, and proceed with the second rise and baking. You won’t get the dramatic vertical swirl, but you will still get those wonderful layers running horizontally through your loaf! It’s an excellent shortcut when you’re short on time, and honestly, the flavor is exactly the same.
Estimated Nutritional Data for Classic Chocolate Babka Loaf
I always get asked about the nutrition when I share a rich bread like this, and honestly, I usually just smile and say, “It’s a special occasion treat!” But because I want you to have all the facts, here is the breakdown based on the ingredients we used for this classic chocolate babka loaf.
Please keep in mind that these numbers are *estimates*—they can change depending on the specific brands of butter, flour, and cocoa powder you use. But this gives you a good benchmark!
- Serving Size: 1 slice
- Calories: 450
- Fat: 25g (with about 15g saturated)
- Carbohydrates: 50g
- Protein: 8g
- Sugar: 35g
- Sodium: 250mg
It’s certainly on the richer side because of all that glorious butter and the sweet chocolate filling, but that’s what makes it such a fantastic decadent chocolate dessert bread!
Share Your Decadent Chocolate Dessert Bread Experience
Oh, my gosh, I hope you loved this baking journey as much as I do! Seriously, seeing your results is the best part of sharing my recipes. Once you’ve pulled that gorgeous loaf out, glazed it, and let it cool down just enough, I want to know everything!
Did the braiding technique work out for you? Did you get those gorgeous vertical swirls, or did you try the easier roll-up method? Tell me about the texture! If this was the best chocolate babka recipe you’ve ever tried, please drop a quick rating. Five stars make my day, I won’t lie!
And please, please send me pictures! Tag me on social media when you share your incredible decadent chocolate dessert bread. It’s so fun to see how our kitchens connect over these wonderful, buttery pastries. If you have any lingering questions after trying this out, you can always reach out through my contact page!
PrintDecadent Chocolate Babka with Step-by-Step Braiding Guide
A recipe for a rich, soft, and tender chocolate babka featuring deep chocolate layers and a classic braided presentation.
- Prep Time: 45 min
- Cook Time: 45 min
- Total Time: 3 hr 15 min
- Yield: 1 loaf (about 10 servings)
- Category: Dessert
- Method: Baking
- Cuisine: Eastern European
- Diet: Vegetarian
Ingredients
- 1 cup whole milk, warmed to 105-115°F
- 2 1/4 teaspoons active dry yeast
- 1/2 cup granulated sugar, plus 1 teaspoon for yeast
- 4 large eggs, room temperature
- 1 teaspoon vanilla extract
- 1 teaspoon salt
- 4 cups all-purpose flour, plus more for dusting
- 1 cup (2 sticks) unsalted butter, softened and cut into pieces
- 1 cup powdered sugar (for simple syrup)
- 1/4 cup water (for simple syrup)
- 1 cup unsalted butter, softened (for filling)
- 1 1/2 cups granulated sugar (for filling)
- 3/4 cup unsweetened cocoa powder
- 1 teaspoon salt (for filling)
- 2 large eggs, beaten (for egg wash)
Instructions
- Activate the yeast: In a small bowl, combine the warm milk, 1 teaspoon sugar, and yeast. Let stand for 5-10 minutes until foamy.
- Make the dough: In a large bowl or stand mixer, combine the yeast mixture, remaining sugar, eggs, vanilla, salt, and flour. Mix on low speed until a shaggy dough forms.
- Add butter: Gradually add the softened butter pieces, one at a time, mixing well after each addition. Increase speed to medium-low and knead for 8-10 minutes until the dough is smooth and elastic.
- First rise: Place the dough in a lightly oiled bowl, cover, and let rise in a warm place for 1.5 to 2 hours, or until doubled in size.
- Prepare the filling: While the dough rises, beat the softened butter, sugar, cocoa powder, and salt together until smooth and spreadable.
- Shape the dough: Punch down the risen dough. Turn it out onto a lightly floured surface and roll it into a large rectangle, about 12×18 inches.
- Spread filling: Spread the chocolate filling evenly over the entire surface of the dough, leaving a small border on one long edge.
- Roll and cut: Starting from the long edge opposite the border, tightly roll the dough into a log. Use a sharp knife to slice the log lengthwise down the center, exposing the layers.
- Braid: Lay the two halves side-by-side, cut sides facing up. Twist the two halves together, keeping the cut sides facing up as much as possible to expose the swirls. Pinch the ends together.
- Second rise: Carefully transfer the braided dough to a greased 9×5 inch loaf pan. Cover loosely and let rise for 45-60 minutes. Preheat your oven to 350°F (175°C) during the last 15 minutes of rising.
- Bake: Brush the top of the babka with the beaten egg wash. Bake for 35-45 minutes, or until deep golden brown. If the top browns too quickly, loosely tent with foil.
- Make syrup: While the babka bakes, combine powdered sugar and water in a small saucepan. Heat gently until the sugar dissolves, stirring constantly. Do not boil.
- Glaze: Immediately upon removing the babka from the oven, brush the hot simple syrup evenly over the entire loaf. Let cool in the pan for 15 minutes before transferring to a wire rack to cool completely.
Notes
- For the softest crumb, use room temperature eggs and softened, but not melted, butter.
- If you do not have a stand mixer, you can knead the dough by hand for about 15 minutes until it passes the windowpane test.
- Chilling the dough for 1 hour after the first rise makes rolling and braiding easier.
Nutrition
- Serving Size: 1 slice
- Calories: 450
- Sugar: 35g
- Sodium: 250mg
- Fat: 25g
- Saturated Fat: 15g
- Unsaturated Fat: 10g
- Trans Fat: 0g
- Carbohydrates: 50g
- Fiber: 3g
- Protein: 8g
- Cholesterol: 90mg
Comments are closed.