


Oh, the holidays! There’s just nothing like those cozy kitchen smells when you’re getting ready for guests. Forget the cookies for a minute—if you want to truly wow everyone at the Christmas or New Year’s table, you have to make a Yule Log Cake. This Bûche de Noël, with its deep chocolate flavor and that unmistakable rustic bark exterior, isn’t just a dessert; it’s the star of the show! It looks complicated, I know, but trust me, after years of practicing my rolling technique until I finally flattened the learning curve, I’ve got this traditional French pastry completely figured out for you.
Why This Classic Chocolate Yule Log Cake (Bûche de Noël) is a Must-Make
You know how some desserts look like they belong on the cover of a fancy magazine? That’s this cake! It’s built to be a real centerpiece, perfect for any of your holiday gatherings. When I first tried making one years ago, I totally cracked the sponge right down the middle. Disaster! But I patched it up with filling, and honestly, nobody even noticed beneath all that glorious chocolate bark! Now, I roll it perfectly every time.
If you’re looking for Showstopper Holiday Desserts, stop scrolling right now. This recipe delivers true satisfaction.
- It uses a buttery, dark chocolate sponge that stays delightfully moist.
- The buttercream filling is light and fluffy, balancing the rich chocolate perfectly.
- The final log appearance is incredibly rewarding—it’s true Impressive Holiday Baking!
Key Attributes of Our Yule Log Cake Recipe
What makes this roulade stand above the rest? It truly comes down to texture. We aren’t making a dry, brittle cake here. You get a tender, flexible sponge that gives way to a creamy, fluffy filling. And visually? The care we take in creating realistic bark means every slice looks like a tiny piece of wintery art! Plus, you can easily use this same technique for my amazing Chocoflan if you need a totally different showstopper later in the season!
Gathering Ingredients for Your Yule Log Cake
So, let’s talk about what you need to have ready before you even think about turning on that oven! Making this dessert is way easier than collecting all the parts, I promise. We need the basics for the sponge—four beautiful large eggs, sugar, flour, a little cocoa, and baking powder for a tiny bit of lift. Don’t skimp on that cocoa powder; this is where all that rich, traditional flavor comes from! Then we move onto the filling ingredients: butter, powdered sugar, more cocoa, heavy cream, and vanilla.
Make sure your butter for the frosting is truly softened—I leave mine out all morning. And those eggs for the cake? They need to be room temperature; it helps them beat up fluffy enough to hold all that air we need later!
Ingredient Notes and Substitutions for the Yule Log Cake
When you’re shopping, try to find a really dark, high-quality natural cocoa. It makes the finished log look more authentic, like real wood! Also, stick to unsalted butter for the buttercream. Margarine just doesn’t cream the right way, and we need that perfect richness.
If you run out of heavy cream for the frosting, a good trick is to use a small splash of whole milk mixed with a teaspoon of cornstarch stirred in first. It thickens up nicely, but honestly, the original formula with heavy cream gives the best texture. Just trust me on the butter and eggs; those two are non-negotiable for the structure!
How to Make the Perfect Chocolate Sponge for Your Yule Log Cake
Alright, this is where the magic of the Chocolate Roulade Recipe really happens! We’re starting with the eggs and sugar, and this step requires patience—don’t rush it! You have to beat them until they are pale, thick, and actually look like they’ve tripled in size. I seriously mean it; beat them for a good five to seven minutes until you can lift the whisk and the trail takes a second to disappear back into the bowl. That’s aeration, baby, and that air is going to keep your sponge from cracking later!
Once you’ve got that gorgeous, fluffy base, we move to the dry ingredients: flour, cocoa, baking powder, and salt. Before you add them, whisk them together once or twice. Then, and this is important, fold them into the egg mixture in tiny stages. Use a slow cutting motion with your spatula, just until the streaks of flour disappear. Overmixing here is how you deflate all that hard work you just put into the eggs. If you need another recipe to practice your folding skills on, try my amazing chocolate chip cookie brownies! Then, bake the batter evenly and quickly until it just springs back—no more than 12 minutes!
The Critical Rolling Technique for the Yule Log Cake Sponge
The second that cake comes out of the oven, you have maybe thirty seconds to act before it sets up firm. Prepare your powdered-sugar-dusted towel beforehand; that’s your safety net! Immediately flip that hot sponge onto the towel and peel off the parchment paper. Now, start rolling it up gently from the shortest side while it’s still piping hot. This molds the sponge so it learns the spiral shape.
Why do we do this crazy hot roll? Because a warm cake is pliable; a cool cake will snap like a dry twig! Rolling it up in the towel lets it cool down already shaped like a log. This technique builds trust with your batter and makes sure that when you fill it later, you get that beautiful, spiral slice instead of a messy pile. This is the make-or-break move for any great yule log cake, so don’t be shy—roll it up tight!
Crafting the Rich Chocolate Buttercream Filling
Once your sponge has successfully cooled (while it’s busy chilling inside its towel blanket), it’s time to whip up the filling! This buttercream is decadent but surprisingly light, acting as the perfect cushion for the rolled sponge. We start by creaming that softened unsalted butter until it’s light yellow and fluffy. Don’t rush this part; the fluffier the butter, the lighter the final texture will be!
Then, you gradually add in your sifted powdered sugar and that extra dose of cocoa powder. I always sift them twice because no one wants little lumps of sugar hiding in their beautiful filling, right? Once that looks mostly combined, we bring in the heavy cream. The cream is crucial here!
The heavy cream doesn’t just add richness; it hydrates the icing just enough so that when you spread it on the cake, it has perfect ‘spreadability’ without being greasy. Beat it all together until it’s smooth, silky, and looks like dark, velvety mud. Taste it! Seriously, grab a tiny spoon—you deserve a reward for getting this far. It should be sweet, chocolatey, and incredibly smooth. This luxurious filling makes the whole dessert worthwhile!
Assembling and Decorating Your Showstopper Yule Log Cake
Okay, the sponge is cool and the buttercream is fluffy—it’s time for the grand reveal! Gently unroll that perfectly molded cake. Resist the urge to smooth out any tiny cracks you see; we’re going for rustic charm here, not perfection! Take about two-thirds of that glorious chocolate buttercream and spread it all the way across the surface. Leave about an inch or so unfrosted on one of the long edges, which helps seal up the final roll nicely without squeezing out mountains of frosting.
Now, take a deep breath and roll it back up tight, this time without the towel. Place your finished, filled roll seam-side down right onto your serving platter! If you’re thinking about making a similar rolled treat later, remember the technique you learned here is similar to how I handle my French crepes with Nutella—it’s all about that gentle, firm roll!
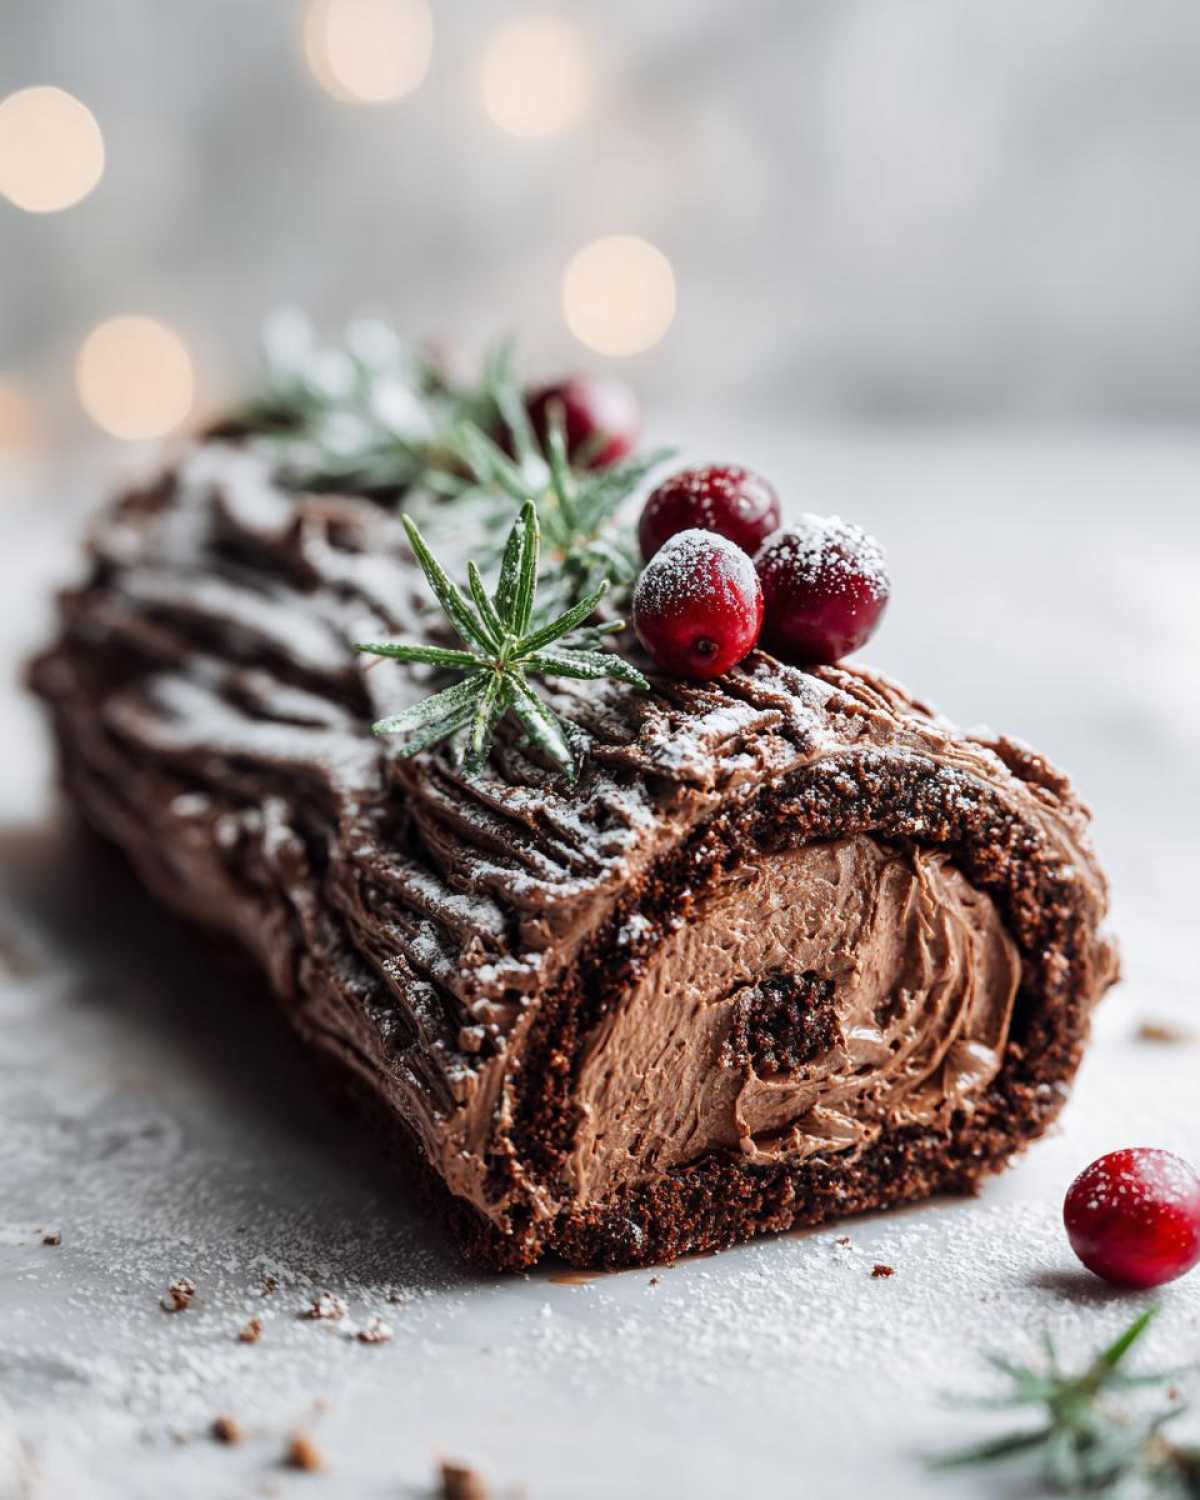
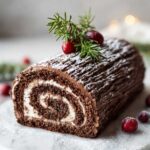
Once the log is resting, grab the remaining frosting. This is where we stop calling it a roll cake and start calling it a true yule log cake. You’ll want to coat the entire thing—top, sides, and ends—using the spatula to create a thick, earthy layer. This is your canvas for the famous Chocolate Ganache Bark Technique.
Creating the Rustic Bark Texture on the Yule Log Cake
This is the fun part, and honestly, you can’t mess it up! Take the back of a fork or maybe just the tip of a small knife, and drag it lightly across the exterior frosting. Don’t press too hard! Just soft, sweeping lines mimic the texture of real tree bark. It looks so authentic!
Once your bark is done, we add the finishing touches of winter. Trim the ends so they look like clean cuts on a branch. Then, dust the whole log LIGHTLY with powdered sugar—that’s your snow effect. Finally, arrange a few sprigs of fresh rosemary and some bright red cranberries near one end to look like tiny holly berries. Instant festive magic!
Tips for a Flawless Yule Log Cake Presentation
Listen, even the best bakers have little hiccups when dealing with a rolled cake, but that’s why we have our little tricks! If you see a crack starting while you’re unrolling the sponge (and trust me, it happens to everyone), don’t panic. Just grab some extra leftover buttercream and gently smear it into the crack before you cover the whole thing. It disappears completely under the bark!
For the easiest slicing later on—especially when cutting those little branch ends—you need cold cake. Make sure your finished yule log cake chills for at least an hour, but two hours is even better. When you go to slice it, use a long, thin knife that you’ve warmed slightly under hot water and wiped dry. That clean cut makes this Festive French Pastry look like it walked right off a bakery shelf.
Also, if your frosting seems too stiff at any point while you’re texturing the bark, just warm up your offset spatula for a few seconds under hot water. A slightly warm tool glides beautifully over that frosting, making the bark details pop! If you love making beautiful holiday centerpieces, you absolutely have to check out my recipe for the Horchata Tres Leches Cake next!
Storage and Make Ahead Options for Your Yule Log Cake
One of the best things about this dessert is that it’s fantastic when made ahead of time! If you’re juggling lots of cooking on Christmas Day, this is your lifesaver. You can finish assembling the whole log, bark and all, and then just pop it into the fridge. It holds up beautifully overnight.
For the very best slice, though, try to chill it for at least two hours after decorating. This gives the buttercream time to firm up against the sponge so you don’t get squishing when you cut it. It keeps well in the refrigerator, wrapped loosely, for about three days. If you’re looking for more brilliant freezer-friendly ideas, you have to see my list of Make Ahead Christmas Desserts. This log is definitely on that list!
Frequently Asked Questions About Making a Yule Log Cake
I know you might have a few lingering worries after tackling something as impressive as this yule log cake! It’s natural to have questions, especially when tackling a Traditional Winter Sponge Cake for the first time. Don’t worry; these are the exact things I worried about too when I started my journey into Easy Christmas Cake Baking!
Why does my sponge cake always crack when I roll it?
Ugh, cracks! That’s the nightmare, right? Nine times out of ten, it means your sponge baked a minute too long. If it gets dry, it loses that essential flexibility. The other big reason is cooling it down before rolling it. Remember, you have to invert that hot cake onto the sugared towel immediately! The heat makes the cake steam right inside the towel, keeping it soft enough to mold itself into that perfect log shape. If you see small cracks, though, just remember my earlier tip: the filling is your best friend for repairs underneath that bark!
Can I use a different filling besides chocolate buttercream?
Absolutely! While the classic version uses rich chocolate filling, this recipe is happy to accommodate whatever you’re craving. A few popular swaps I’ve tried include a light vanilla whipped cream or even a raspberry mousse—especially if you use a little less cocoa in the cake batter itself. If you try a fruit filling, just be careful to keep the layer thinner so it doesn’t ooze out when you roll it up tight. If you’re looking for other fun ways to hide things in cake, you might love the tricks in my sneaky zucchini bread!
Is it possible to make this Yule Log Cake gluten-free?
Yes, it is! Because the structure of the sponge relies so much on whipping the eggs for air volume, you need a good quality 1-to-1 gluten-free flour blend. Make sure the blend you choose has xanthan gum already included, or add about half a teaspoon yourself. The rolling technique still works perfectly, but you might need to watch the baking time very closely, as gluten-free sponges can sometimes cook faster than their wheat counterparts!
Can I freeze the finished Yule Log Cake?
You certainly can! If you want to get ahead, wrap the fully frosted log tightly in plastic wrap first, then cover it with a layer of foil. It freezes beautifully for up to a month. When you’re ready to serve, just move it to the fridge the day before to thaw completely. It tastes just as amazing!
Nutritional Estimates for This Holiday Dessert
Okay, so while this Yule Log Cake is totally designed to be a showstopper and isn’t exactly going on my ‘light eating’ plan for December, I know some of you like to keep track! I tried to put together some rough estimates based on the four large eggs and the amount of butter we use in that rich filling. Please remember, this is just a general guideline; your exact numbers will shift depending on the brands of cocoa and sugar you end up using!
You get a generous serving here, but because this is such a rich treat, a standard slice size is what I based these numbers on. If you cut it smaller, of course, it looks better on the calorie count!
- Serving Size: 1 slice
- Calories: 380
- Total Fat: 24g (Watch out for that Saturated Fat at 14g!)
- Carbohydrates: 38g
- Sugar: 35g (We use dark brown sugar, so lots of molasses goodness in there!)
- Protein: 5g
- Cholesterol: 110mg
We’ve got a tiny bit of fiber at 2g, which is nice, but let’s be honest, we are here for the luxurious chocolate experience, not the fiber content! This is definitely a ‘special occasion only’ slice, but hey, that’s what makes the holidays special, right? Don’t worry about the numbers; just enjoy wiping that powdered sugar ‘snow’ off your chin!
PrintClassic Showstopper Chocolate Yule Log Cake (Bûche de Noël)
This recipe guides you through making a traditional chocolate sponge cake rolled with a rich chocolate buttercream, decorated to resemble a rustic log for the holidays.
- Prep Time: 45 min
- Cook Time: 12 min
- Total Time: 57 min
- Yield: 10 servings
- Category: Dessert
- Method: Baking and Rolling
- Cuisine: French
- Diet: Vegetarian
Ingredients
- 4 large eggs
- 1/2 cup granulated sugar
- 1/4 cup all-purpose flour
- 1/4 cup unsweetened cocoa powder
- 1 teaspoon vanilla extract
- 1/4 teaspoon baking powder
- Pinch of salt
- 1 cup (2 sticks) unsalted butter, softened
- 2 cups powdered sugar, sifted
- 1/2 cup unsweetened cocoa powder, sifted
- 1/4 cup heavy cream
- 1 teaspoon vanilla extract
- For decoration: Powdered sugar, fresh rosemary sprigs, fresh cranberries
Instructions
- Preheat your oven to 375°F (190°C). Line a 10×15 inch jelly roll pan with parchment paper, letting the paper overhang slightly on the sides. Lightly grease the paper.
- In a large bowl, beat the eggs and granulated sugar with an electric mixer until the mixture is thick, pale, and tripled in volume, about 5 to 7 minutes.
- In a separate small bowl, whisk together the flour, 1/4 cup cocoa powder, baking powder, and salt.
- Gently fold the dry ingredients into the egg mixture in three additions, being careful not to deflate the eggs. Fold in 1 teaspoon of vanilla extract.
- Spread the batter evenly into the prepared pan. Bake for 10 to 12 minutes, or until the top springs back lightly when touched. Do not overbake.
- While the cake bakes, lay a clean kitchen towel on your counter and dust it heavily with powdered sugar.
- Immediately invert the hot cake onto the sugared towel. Peel off the parchment paper. Starting from a short end, carefully roll the cake and towel together tightly. Let the cake cool completely in this rolled position on a wire rack.
- Prepare the buttercream: Beat the softened butter until creamy. Gradually beat in the sifted powdered sugar and 1/2 cup cocoa powder until combined. Beat in the heavy cream and 1 teaspoon vanilla until the frosting is smooth and fluffy.
- Once the cake is cool, gently unroll it. Spread about two-thirds of the chocolate buttercream evenly over the surface, leaving a 1-inch border on one long edge.
- Reroll the cake tightly, without the towel, starting from the same short end. Place the rolled cake seam-side down on a serving platter.
- Use the remaining frosting to cover the entire outside of the log. Use the back of a fork or a knife tip to create bark-like texture marks all over the frosting.
- Trim the ends if necessary to make them look like cut branches. Dust lightly with powdered sugar for a snowy effect. Garnish with rosemary and cranberries to resemble holly.
- Chill the cake for at least 1 hour before slicing and serving.
Notes
- For a firmer roll, chill the cake briefly before unrolling it.
- If the cake cracks during rolling, do not worry; the frosting will cover imperfections.
- You can substitute half the butter in the frosting with softened cream cheese for a tangier filling.
Nutrition
- Serving Size: 1 slice
- Calories: 380
- Sugar: 35
- Sodium: 85
- Fat: 24
- Saturated Fat: 14
- Unsaturated Fat: 10
- Trans Fat: 0.5
- Carbohydrates: 38
- Fiber: 2
- Protein: 5
- Cholesterol: 110


Comments are closed.