


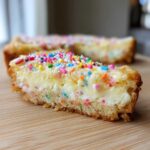
Okay, stop what you’re doing right now because I have finally cracked the code on the ultimate centerpiece for any holiday spread. Forget the fussy layer cakes; we need something that screams festive decadence! I’ve spent years perfecting my holiday baking menu, and trust me, these Festive Creamy Sugar Cookie Cheesecake Bars are the absolute showstoppers.
This dessert is the perfect collision: a wonderfully buttery cookie crust meets the creamiest vanilla cheesecake filling you’ve ever made. Seriously, this sugar cookie cheesecake fusion is so easy to serve up for a crowd, and the sprinkle topping just makes everyone giggle. You’re going to want to bake this immediately, so grab your apron!

Why This Creamy Sugar Cookie Cheesecake Recipe Works for Parties
I love this recipe because it solves so many holiday dessert headaches! If you’ve ever tried to slice and serve a traditional round cheesecake at a busy party, you know the mess it can make. Not with these bars, though!
These are designed for ease, which means less stress for you and more enjoyment for everyone else. They bake up beautifully in a 9×13 pan, making serving straightforward. Here’s why they are my go-to:
- Easy Serving: Cut them into perfect squares or rectangles ahead of time, and they hold their shape wonderfully. No delicate slicing required!
- Texture Triumphs: You get that perfect contrast—the sturdy, buttery cookie base supporting that incredibly smooth, vanilla-packed cheesecake layer. It’s satisfying without being too heavy.
- Festive Look: Honestly, throw some colorful sprinkles on top, and suddenly it screams Christmas or New Year’s! They look way fancier than the effort they actually require.
If you need more inspiration for easy-to-serve recipes, I always rely on my secret formula for small-batch party appetizers when I’m prepping for big gatherings.
Essential Ingredients for Your Sugar Cookie Cheesecake Bars
Okay, listen closely because ingredient quality matters when you’re aiming for that decadent, creamy texture. We’re using standard pantry items here, but their temperature and preparation are crucial, which is what separates a good **cheesecake recipes** result from an absolutely fantastic one. Don’t substitute the standard stuff; we want that classic sugar cookie flavor shining through!
For this batch, which yields about 24 perfect bars, here is exactly what you need to pull together:
- 1 cup unsalted butter, softened
- 1 cup granulated sugar (for the cookie base!)
- 1 large egg
- 1 teaspoon vanilla extract
- 2 cups all-purpose flour
- 1 teaspoon baking powder
- 1/4 teaspoon salt
- 16 ounces cream cheese, softened (This is the star for the filling!)
- 1 cup granulated sugar (for the filling)
- 1/2 cup sour cream
- 2 large eggs
- 1 teaspoon vanilla extract (Yes, we use it twice for maximum flavor!)
- 1/4 cup sprinkles (optional, for topping—use the bright, festive kind!)
When you’re making anything involving butter and sugar, just like my recipe for next-level chocolate chip cookies, make sure you don’t rush the softening process. Cold cream cheese equals lumpy cheesecake, and we don’t have time for lumps!
Step-by-Step Instructions for the Perfect Sugar Cookie Cheesecake
Don’t let the layers scare you—we’re breaking this down into three totally manageable chunks. Once you see how it comes together, you’ll realize this is one of the easiest, most impressive cheesecake recipes we make all year. Make sure your oven is set to 350 degrees F before you even grab the mixing bowls. Trust me, you want everything ready to go!
Making the Buttery Cookie Crust for Your Sugar Cookie Cheesecake
We start by prepping the pan—get that 9×13 nice and cozy with parchment paper, leaving long flaps on the sides. That overhang is your lifeline later for pulling those perfect bars out, so don’t skip it! Next, we tackle Step 2. Beat that softened butter and the first cup of sugar until they look pale and fluffy. Then we mix in the egg and vanilla until combined.
In a separate little bowl, whisk your dry stuff: flour, baking powder, and salt. Now, add the dry mix to the wet mix slowly—we are aiming for a soft dough here, not a workout! My biggest tip? When you divide that dough, press about two-thirds firmly and evenly into the bottom of your prepared pan. Reserve that final third because it becomes the absolute best crunchy topping!
Mixing and Assembling the Creamy Vanilla Cheesecake Filling
This is where the magic happens, and where you need to be gentle! In a clean bowl, start by beating the cream cheese and the second cup of sugar until it’s totally smooth—no lumps allowed. Now, stir in the sour cream. When you add the two eggs, only add them one at a time, mixing just until they disappear into the cream cheese goodness. If you overmix here, you’ll get cracks later, and we want a smooth top for our cookies!
Once that vanilla is stirred in, gently pour the filling right over your pressed cookie base. Now for the topping: take that reserved one-third of dough and crumble it lightly over the top of the cheesecake layer. If you’re using the festive sprinkles, now’s your moment to shower them over everything!
Baking and Chilling Your Sugar Cookie Cheesecake Bars
Slide that beautiful creation into the preheated oven. You’re baking this for about 35 to 40 minutes. You’ll know it’s ready because the edges will look set, but the middle should still have just a tiny bit of a jiggle left—don’t bake it until it’s totally firm, or it’ll be dry! It’s like when I make my easy corn soup; pulling it too soon is better than overcooking.
Once it comes out, let it cool completely on the counter. This part is non-negotiable for clean slicing: it needs a solid four hours in the refrigerator, minimum! Chilling makes these cookie dessert fusion bars firm enough to slice without destroying your beautiful layers.
Tips for Success When Making This Cookie Dessert Fusion
You know, even with a solid recipe, the little details can make or break these types of layered treats. I’ve baked this **sugar cookie cheesecake** more times than I can count, and I’ve learned a few tricks straight from the official notes that guarantee success, especially when it comes to getting those clean cuts for serving. Never skip the prep work!
First up, temperature! I cannot stress this enough: your butter and cream cheese absolutely *must* be fully softened to room temperature before you even start mixing the crust or the filling. If one ingredient is cold, you end up fighting lumps, and that ruins the whole creamy factor. I usually pull mine out the morning I plan to bake because I’ve learned the hard way that rushing the softening process is a recipe disaster.
Also, regarding the crust—if you want an extra boost of classic **sugar cookie recipes** flavor, try my little secret enhancement. You can definitely bake that bottom cookie layer for about 10 minutes before you pour on the cheesecake filling. It gives the crust a little more bite that contrasts beautifully with the filling. Just let it cool down slightly before adding the cheese mixture.
Now, about those slices! We talked about chilling, but let me give you the hot tip for slicing these perfectly. Once they are fully chilled (and I mean *firm*), grab the sharpest knife you own and dip it into a tall glass of hot water. Wipe it dry quickly, and then make your cut. Wipe the knife hot and clean between every single slice. This keeps the cheesecake layer smooth and prevents the cookie crust from tearing. It’s the method I use for all my layered bakes, like my brown butter orzo when I need clean presentation!
Remember, this recipe is worth the patience. These are supposed to be ultimate decadent cheesecake bars, and patience during the chilling phase ensures we get that fantastic final texture.
Variations on the Classic Sugar Cookie Cheesecake Concept
While I absolutely adore this classic vanilla take on the sugar cookie cheesecake bars—it’s perfect for a traditional Christmas vibe—sometimes you just need to shake things up a little! The beauty of having that fantastic buttery cookie base is that it’s such a great canvas for other flavors. Don’t feel locked into just vanilla and rainbow sprinkles, okay?
I love experimenting, especially when I’m trying to use up ingredients I already have on hand. Think about those times you want to pivot from a heavy holiday feel to something a bit brighter for a springtime party. This is where we get creative with our easy cheesecake recipes!
Here are a couple of simple ways I change up the flavor profile without messing up the fundamental structure of the bars. Remember, we keep the crust and the assembly method basically the same, but the filling gets a little personality.
Add Some Zest for Brightness
If you find your fall baking feeling a little too heavy, adding citrus zest is a game-changer. A teaspoon or two of fresh lemon zest stirred into the cream cheese filling completely wakes up the flavor. It cuts through the richness of the cream cheese beautifully and gives you that amazing cookie dessert fusion feel. It makes it feel less like a winter treat and more like a year-round favorite!
Swap the Extract for Something Fun
Vanilla is safe, sure, but almond extract is my secret weapon here. Just swap out half of the vanilla for almond extract in the filling. It gives the entire **vanilla cheesecake** a sophisticated, almost marzipan-like note that pairs unbelievably well with the sugar cookie base. If you’re feeling *really* experimental, try a half-teaspoon of peppermint extract for a holiday twist!
Color Themes for Every Season
The sprinkles are optional, but they make these festive treats so much fun to customize. For Valentine’s Day, I only use pink, red, and white sprinkles on top of the crumbled dough. For Easter, I switch to pastel candy beads. It’s the easiest way to match your **party desserts** to whatever celebration you’re hosting. You can even find different colored sanding sugars that melt perfectly into the crust, just like in my recipe for blackberry lavender sheet cake, where color is everything!
The point is, once you master that essential base and filling technique, you have an infinitely customizable dessert that always tastes homemade and looks incredible!
Serving Suggestions for Your Festive Treats
Now that you’ve poured hours of love (and chilling time!) into these sugar cookie cheesecake bars, you deserve to know the absolute best way to present them. Because these are so rich and decadent—truly one of the most satisfying party desserts I’ve ever created—they don’t need much help standing out on the dessert table.
The goal here is counter-balance. Since the bars are buttery and sweet, pairing them with something slightly acidic or refreshing really brightens up the whole experience. If you serve these after a big dinner, keep the accompaniments light!
The Best Beverage Pairings for Your Bars
Forget heavy sodas! If you’re serving these in the evening, a strong cup of coffee or a quality espresso drink cuts through the fat of the cheesecake filling beautifully. I recently started making this iced brown sugar latte, and serving a small, chilled glass alongside these bars is just heavenly. The caramel notes in the latte echo the sweetness of the cookie crust, it’s a perfect marriage!
For daytime gatherings or brunches, a slightly tart iced tea works wonders. Keep it simple; don’t add too much sugar to the drink, as the bars are plenty sweet on their own.
Simple Fruit Complements
When you’re putting these holiday baking ideas on display, a little color next to them makes them pop. Fresh berries are your best friend here. A small bowl of raspberries or bright strawberries placed right next to the serving platter adds a necessary tartness and visual appeal. The slightly acidic juice of the berries cuts right through the richness of the cream cheese, making each bite taste less heavy.
If you want to lean into the vanilla theme, a tiny dollop of freshly whipped cream on top of the bar *just* before serving is elegant, but honestly, these bars are so good they usually disappear on their own! They are truly the ideal centerpiece for any special occasion.
Storage and Reheating Instructions for Leftover Sugar Cookie Cheesecake
Okay, let’s be real—there’s rarely any leftover **sugar cookie cheesecake** in my house, but when there is, knowing how to store it properly is key to maintaining that creamy texture. Since these are cheesecake bars, not brownies, they demand a little more respect when it comes to temperature control. You want to make sure that cheesecake layer stays smooth and doesn’t develop that weird, dry texture on the edges!
The absolute most important thing to remember is that these need to stay cold. Unlike a regular cookie, this has dairy filling, so it needs refrigeration immediately after it has cooled down completely from the counter.
The Best Way to Store Your Bars in the Fridge
Once they are fully chilled—and remember, don’t even *think* about cutting them until they’ve had those four mandatory hours in the fridge—it’s time to tuck them away. You must store these in an airtight container.
If you don’t have a container big enough, wrap the entire slab (or the already-cut bars) tightly in plastic wrap first, making sure you don’t crush that lovely crumb topping. Then, stick that wrapped bundle into a large Ziploc bag or an airtight container. This double layer protection keeps out fridge smells and humidity. Stored correctly, these bars will stay absolutely delicious and creamy for a solid four to five days.
Can We Freeze This Cookie Dessert Fusion?
Yes, you absolutely can freeze individual portions, and honestly, sometimes I do this just so I have a perfectly portioned **creamy dessert** ready for an unexpected craving! But you have to be careful with the cookie crust when freezing and thawing.
I recommend freezing them *after* you’ve cut them into individual bars. Wrap each bar tightly in plastic wrap, and then stack them in a freezer-safe bag or container. This prevents them from sticking together in a giant frozen brick, which nobody wants!
When you want one, just pull it out of the freezer and let it thaw slowly in the refrigerator overnight. It’s best if you don’t rush a cheesecake thaw! It should taste nearly as good as fresh when it’s fully softened back to cold temperatures.
A Quick Note on Reheating (Spoiler: Don’t!)
This is where I have to be firm: do not reheat cheesecake bars! Seriously, don’t even try the microwave trick for a few seconds. Warming up the cheesecake filling will cause it to break down, turning that beautiful, dense texture into soup. These bars are meant to be served cold or chilled, just like any good cheesecake brownie cookie creation.
If you happen to want to bring a bar closer to room temperature before serving (maybe it’s been in the fridge for three days), just take it out onto the counter for about 15 minutes. That slight warming just takes the chill off the cream cheese so the flavor opens up a bit, but it keeps the structure perfectly intact.
Frequently Asked Questions About This Cheesecake Bars Recipe
I always get so many questions when I post a new recipe, especially one as fun as this sugar cookie cheesecake fusion! People want to know how to tweak it, how to save time, and most importantly, how to make sure it turns out perfect. I’ve gathered the top questions I always get about these cheesecake bars right here for you!
Can I make this a traditional round sugar cookie cheesecake instead of bars?
You absolutely can! If you prefer a classic, round presentation, just switch out your 9×13 pan for a 9-inch springform pan. Because the cheesecake filling will be deeper in the round pan, you might need to adjust your baking time slightly. I’d start checking it around the 40-minute mark instead of 35. You’ll still be looking for that slight jiggle in the center. Just remember, you have to cut the crust dough differently—press only about two-thirds of it into the bottom of the springform, reserving the rest for the topping, just like we do for the bars!
What is the best way to get clean cuts on these bars?
This is probably the #1 question I receive for almost all my layered desserts! The secret is always time and temperature control. Seriously, resist cutting these bars until they are fully chilled, not just slightly cool—we are talking four hours minimum, preferably overnight. If the cheesecake isn’t perfectly cold and firm, the knife will drag the filling.
Once they are rock solid from the fridge, use the hot knife trick we discussed earlier! Heat a long, sharp chef’s knife under very hot running water, wipe it completely dry so no water streaks the top, and then press straight down. Wipe the knife clean and re-heat it for every single cut. This is the trick to those super clean edges. It works wonders for any homemade cheesecake!
Can I skip the chilling time and eat them warm like a brownie?
Oh, I know the temptation is intense, especially when you smell that buttery cookie crust baking! However, for this specific creamy dessert recipe, chilling is mandatory. If you try to eat these warm, the cheesecake layer will be runny, and the whole thing will collapse into a puddle. Chilling is what sets the entire bar structure. Think of it as the final, essential baking step. If you cut them too early, you might as well have made my cheesecake brownie cookies, which are designed to be gooey!
Is there a way to make this a no-bake sugar cookie cheesecake?
You could definitely adapt the filling to be a no bake cheesecake, but it wouldn’t technically be a *sugar cookie cheesecake* recipe anymore, because the best part is that baked, crumbly topping! For the crust, you’d have to switch to a graham cracker crust mixed with melted butter, as this buttery cookie dough needs baking to set up. For the filling, you’d skip the eggs and rely on gelatin or whipped topping to set the cream cheese mixture. It results in a lighter texture, but honestly, for this particular recipe, the baked approach gives you that superior contrast!
Why is my cookie base dough so crumbly or dry?
If your cookie base dough is too crumbly when you press it into the pan, it almost always means your tablespoon of butter wasn’t quite soft enough, or you accidentally added too much flour. When mixing the dry ingredients into the wet, stop as soon as you see the flour streaks disappear. Overmixing develops gluten, which can make the base tough, or if you mix too long, it can make the butter seize up, leading to a dry, crumbly texture instead of a soft dough. Next time, try setting the butter out for an extra 30 minutes!
Nutritional Estimates for This Decadent Dessert
Now, I’m not a nutritionist, so please take all these numbers with a huge grain of salt and a glass of milk! When you’re whipping up something this gloriously rich, the calorie count isn’t exactly top of mind. We’re embracing the fact that this is a treat, a true holiday dessert meant for special occasions, not an everyday snack.
However, for those of you who like to keep track, I ran the numbers based strictly on the ingredients list provided above. These estimates are calculated assuming you cut the final baked slab into 24 even portions. These bars are dense, so they pack a punch, but they are worth every single bite of that buttery cookie crust!
If you’re interested in making lighter versions of my baked goods, I highly recommend checking out my tips on making healthier zucchini bread. Sometimes we need to balance out the indulgence!
Here is the nutritional breakdown for one single serving of these amazing sugar cookie cheesecake bars:
- Serving Size: 1 bar
- Calories: 310
- Fat: 19g
- Saturated Fat: 11g
- Carbohydrates: 31g
- Sugar: 25g
- Protein: 5g
- Cholesterol: 75mg
- Sodium: 180mg
See? Rich, sweet, and perfect for that moment when you just need a bite of pure comfort. Enjoy these magnificent sweet baked goods guilt-free—you deserve them!
Share Your Festive Baking Creations
Seriously, I’ve poured my heart into making sure this sugar cookie cheesecake recipe turns out perfect for you, and now I can’t wait to see what you create in your kitchen! Baking is always better when you share the results, right?
Once you’ve baked these bars and the hardest part—the chilling—is over, please don’t disappear without saying hello!
First things first: If you made these and they were everything you hoped for, please head back here and give them a quick 5-star rating. It helps other bakers find the best holiday baking ideas, and honestly, seeing those high ratings makes my day!
Second, and this is my favorite part, I absolutely love seeing your creations! Snap a picture of your beautifully cut bars—especially if you went wild with the festive sprinkles—and tag me so I can see how amazing your version of these festive treats turned out! I always love getting new inspiration for my next batch of party desserts from my readers.
If you ran into a snag or have a specific question that I didn’t cover in the FAQ section, please drop a comment below. I read every single one. Connecting with you all about your baking journeys, whether it’s about achieving that perfect creaminess or finding inspiration from my own kitchen adventures, is honestly the best part of running this blog.
Go bake something wonderful, and then come back and tell me all about it!
PrintFestive Creamy Sugar Cookie Cheesecake Bars
Make creamy cheesecake bars with a buttery sugar cookie crust and a festive vanilla filling. These bars are simple to serve at gatherings.
- Prep Time: 25 min
- Cook Time: 40 min
- Total Time: 65 min
- Yield: 24 bars
- Category: Dessert
- Method: Baking
- Cuisine: American
- Diet: Vegetarian
Ingredients
- 1 cup unsalted butter, softened
- 1 cup granulated sugar
- 1 large egg
- 1 teaspoon vanilla extract
- 2 cups all-purpose flour
- 1 teaspoon baking powder
- 1/4 teaspoon salt
- 16 ounces cream cheese, softened
- 1 cup granulated sugar
- 1/2 cup sour cream
- 2 large eggs
- 1 teaspoon vanilla extract
- 1/4 cup sprinkles (optional, for topping)
Instructions
- Preheat your oven to 350 degrees F. Line a 9×13 inch baking pan with parchment paper, leaving an overhang for easy removal.
- Prepare the sugar cookie base: In a large bowl, beat the softened butter and 1 cup of sugar until creamy. Beat in 1 egg and 1 teaspoon of vanilla extract.
- In a separate bowl, whisk together the flour, baking powder, and salt. Gradually add the dry ingredients to the wet ingredients, mixing until just combined to form a soft dough.
- Press two-thirds of the cookie dough evenly into the bottom of the prepared pan. Reserve the remaining one-third of the dough.
- Prepare the cheesecake filling: Beat the softened cream cheese and 1 cup of sugar until smooth. Beat in the sour cream and 2 eggs one at a time, mixing well after each addition. Stir in 1 teaspoon of vanilla extract.
- Pour the cheesecake filling over the cookie crust in the pan.
- Crumble the reserved one-third of the cookie dough evenly over the top of the cheesecake filling. Sprinkle with optional festive sprinkles.
- Bake for 35 to 40 minutes, or until the edges are set and the center has only a slight jiggle.
- Let the bars cool completely on a wire rack. Once cool, chill in the refrigerator for at least 4 hours before lifting out by the parchment overhang and cutting into bars.
Notes
- For the best texture, ensure your cream cheese and butter are fully softened to room temperature before mixing.
- If you prefer a more pronounced cookie flavor, you can bake the crust layer for 10 minutes before adding the filling.
- Chill the bars thoroughly; this makes clean slicing much easier.
Nutrition
- Serving Size: 1 bar
- Calories: 310
- Sugar: 25
- Sodium: 180
- Fat: 19
- Saturated Fat: 11
- Unsaturated Fat: 8
- Trans Fat: 0
- Carbohydrates: 31
- Fiber: 1
- Protein: 5
- Cholesterol: 75
Comments are closed.