


Oh, friends, when I think about the classics of Italian baking—the ones that taste like they’ve been passed down through three generations—my heart just sings! We’re leaving behind those dry, crumbly cookies today. I’m showing you how to make the very best ricotta cookies you’ll ever taste. Seriously, these are the softest, most wonderfully delicate melt in your mouth cookies you can imagine, bursting with bright lemon flavor. I used to rush these out every Sunday, hoping there’d be enough left over for my trip to the market the next day! If you want pillowy cookies that practically dissolve, you need this recipe. They pair just as beautifully as my famous peach ricotta layer cake! They are just sunshine in a simple, cakey cookie.
Why You Will Love These Soft Italian Ricotta Cookies
If you’re anything like me, you want treats that are easy but feel incredibly special. These Italian beauties tick every single box. Forget everything you thought you knew about stiff holiday cookies; these are pure joy! Here’s why they’re about to become your new obsession:
- They are unbelievably soft! We are talking true melt in your mouth cookies with a texture that’s more like a light, tender cake than a traditional cookie.
- The flavor profile is perfection: creamy ricotta paired with a zesty, sunny kick from the lemon zest and juice.
- This is truly an easy ricotta cookie recipe—no complicated chilling or fancy techniques needed. Mix it, drop it, bake it!
- They bake up fast! You can have homemade ricotta treats ready to go in under 45 minutes total time.
- They are incredibly versatile. They make fantastic holiday cookies, but honestly, they disappear just as fast on a random Tuesday afternoon with coffee.
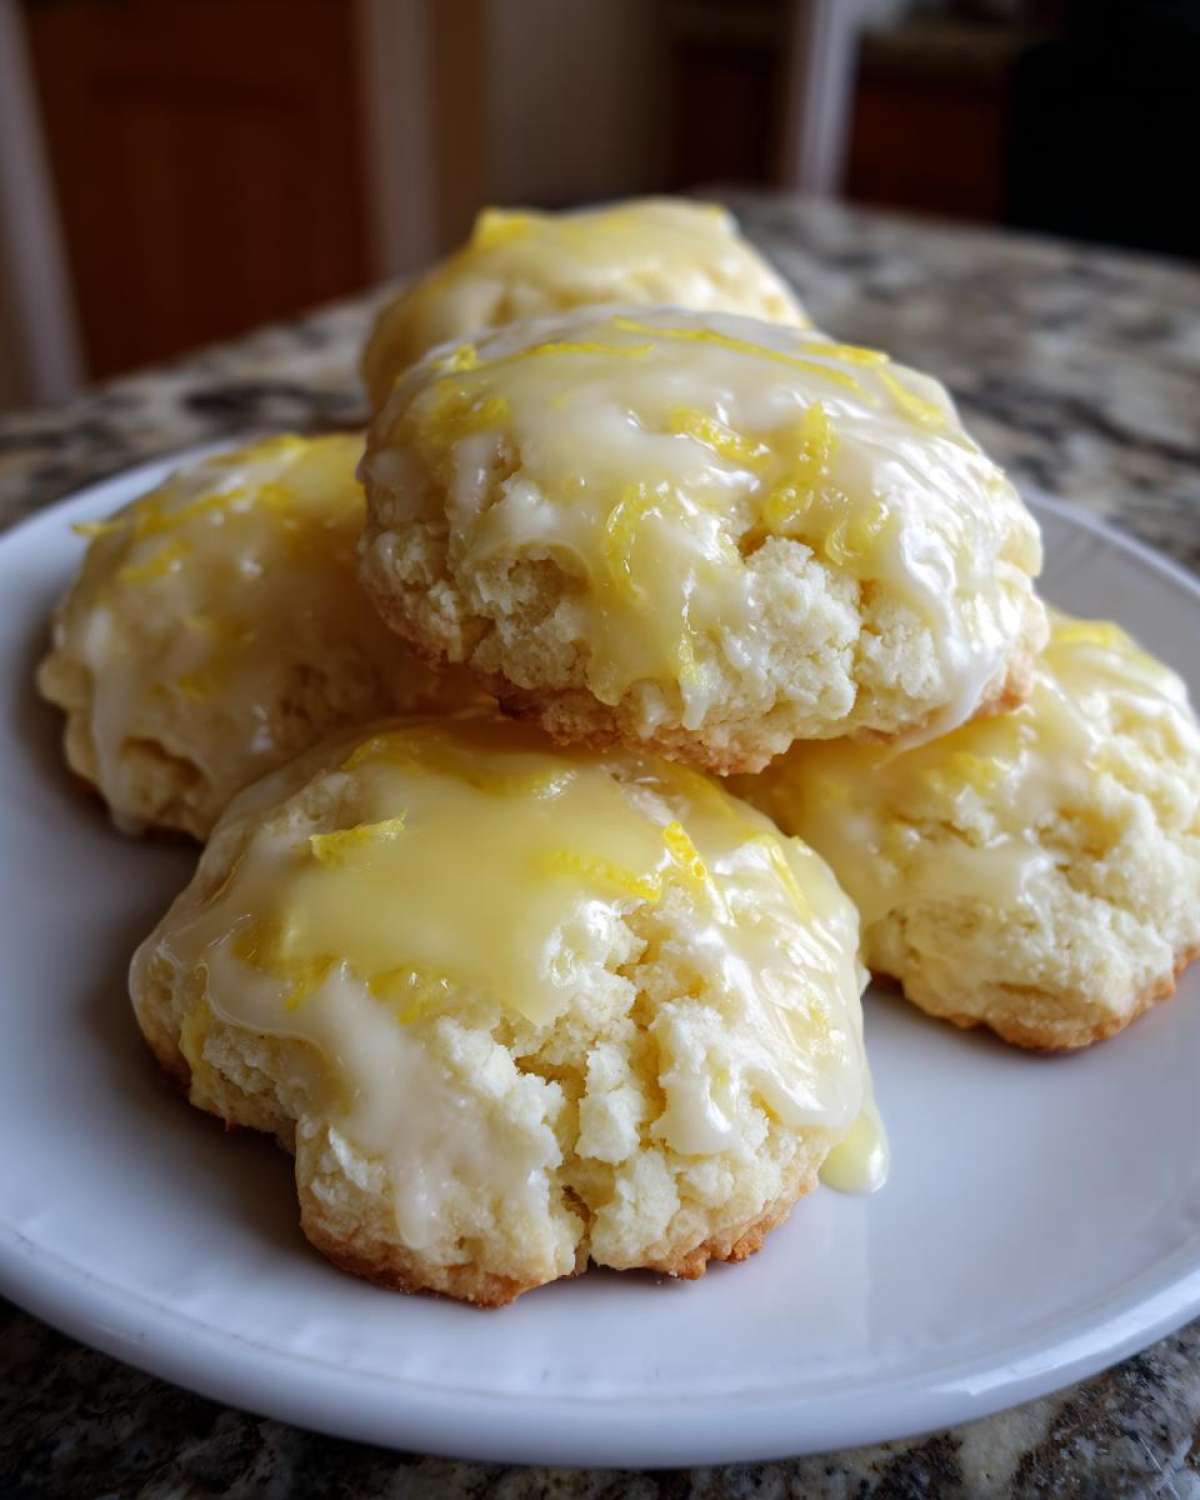
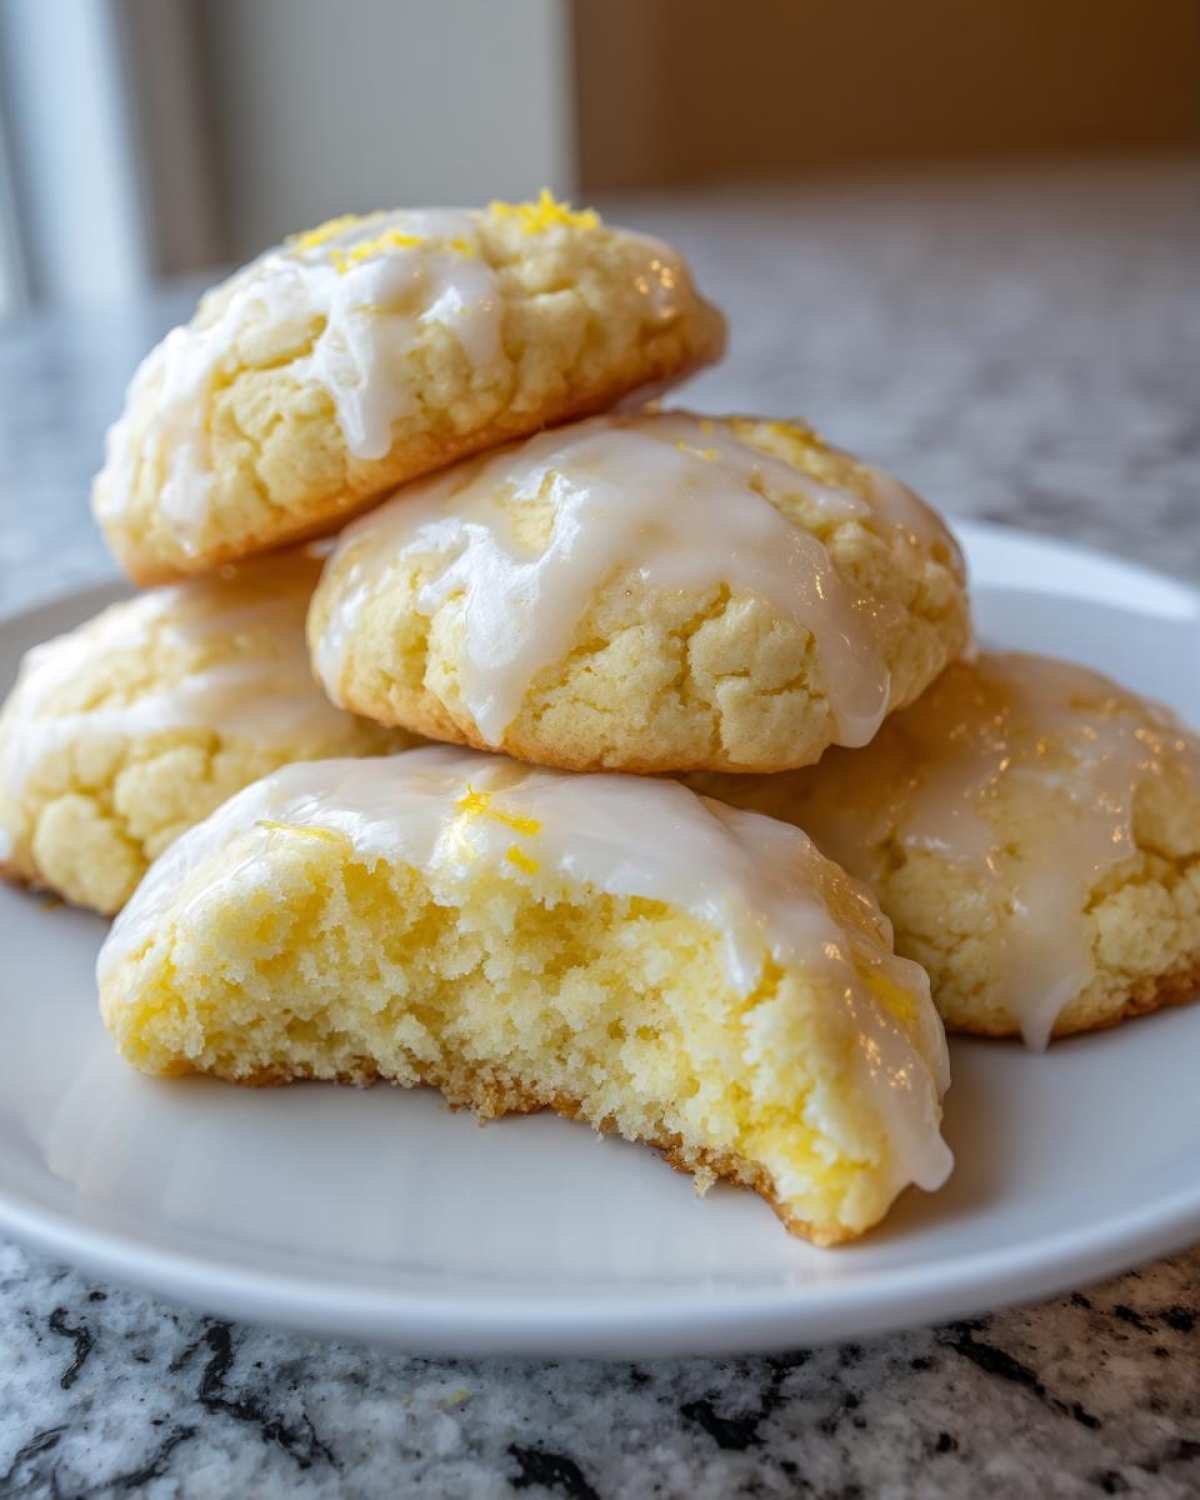
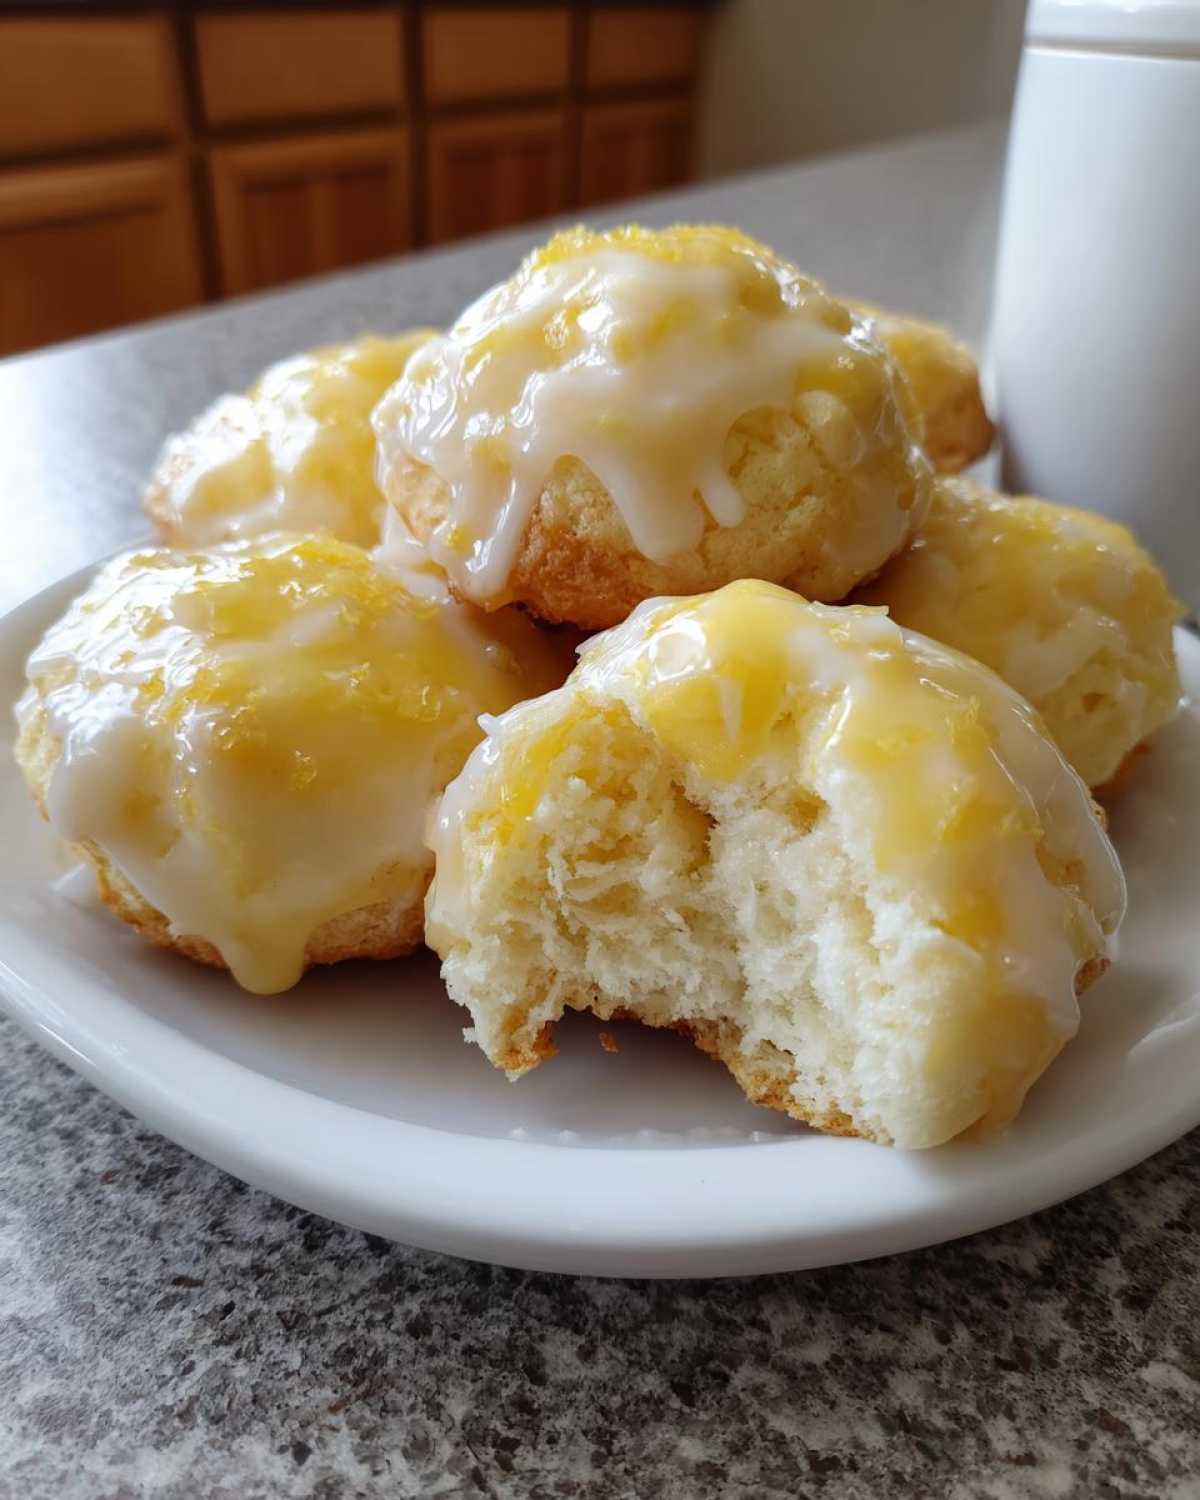
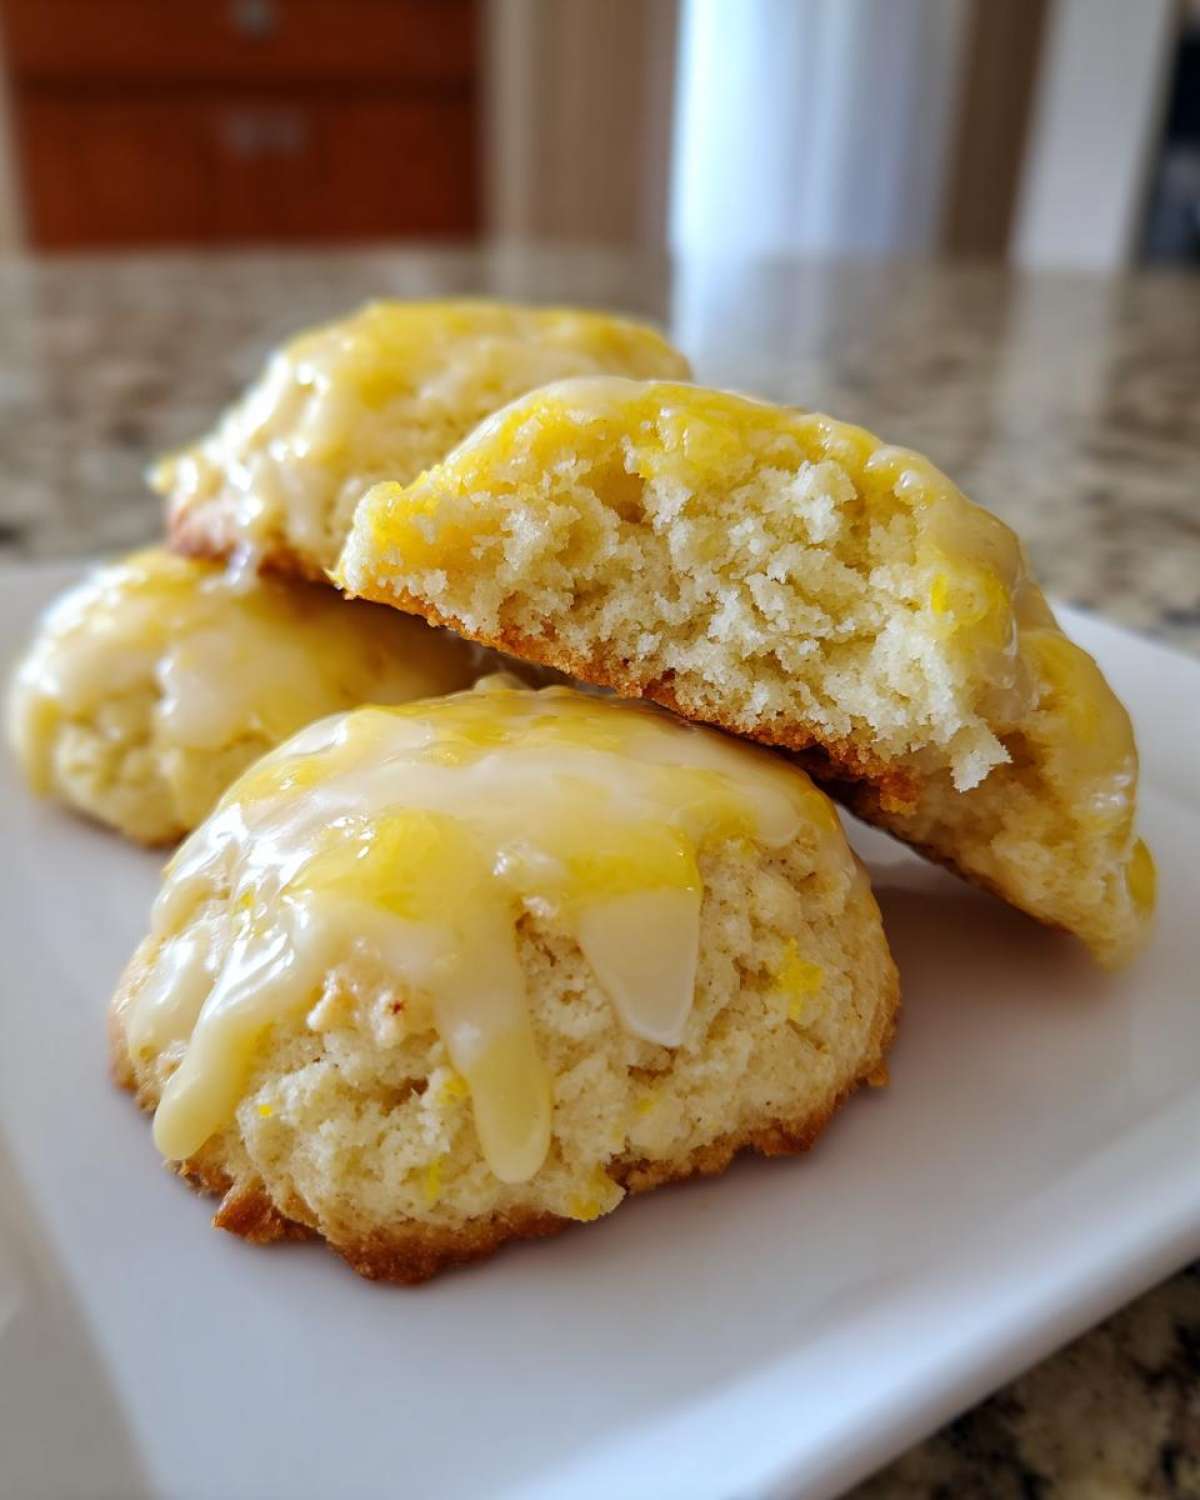
- The bright lemon glaze gives them that beautiful, bakery-fresh look, but if you skip the glaze, they are still melt-in-your-mouth heaven.
Essential Ingredients for Perfect Ricotta Cookies
Okay, let’s talk stuff. With ricotta cookies, like any great Italian dessert, the quality of your base ingredients really shines through. Luckily, the shopping list here is simple and straightforward! If you want these to truly live up to their “melt in your mouth” reputation, my biggest piece of advice—and trust me on this one—is to deal with that ricotta first. Wet ricotta equals sad, flat cookies, and we are *not* having that!
I love checking out recipes that use ricotta in other ways too, like my ricotta lemon pancakes, but for these cookies, the drying step is non-negotiable. Here are the specifics you’ll need for two dozen pillowy treats.
For the Pillowy Ricotta Cookies
- 1 cup whole milk ricotta cheese, drained well (Seriously, drain it for at least 30 minutes!
- 1 cup granulated sugar
- 2 large eggs (make sure they are room temperature if you can!)
- 1 teaspoon vanilla extract
- 1 teaspoon lemon zest (the bright part only, please—don’t dig into the bitter white pith!)
- 1/4 cup fresh lemon juice
- 2 1/2 cups all-purpose flour
- 2 teaspoons baking powder
- 1/4 teaspoon salt
For the Bright Lemon Ricotta Cookies with Glaze
This glaze is what takes them from great to absolutely stunning, especially when we use fresh lemon juice. It sets up beautifully firm but still tastes soft and tangy!
- 2 cups powdered sugar (Don’t try to substitute this; powdered sugar gives us that perfect smooth consistency.)
- 4 tablespoons fresh lemon juice
- 1/2 teaspoon lemon extract (This is optional, but it really amps up that zing!)
Remember, when you mix the glaze, if it looks stiff, add a few more dots of lemon juice until it’s easily pourable. If you accidentally make it too thin, just whisk in another tablespoon of powdered sugar until it’s the right consistency for dipping the tops!
Step-by-Step Instructions for Easy Ricotta Cookie Recipe
Now that we have our ingredients ready—and that ricotta is nice and dry, right?—let’s get these ricotta cookies into the oven! This process is fantastic because it moves so quickly. You’ll be amazed at how fast you go from a bowl of soft batter to a tray of warm, cakey cookies. I always turn my music up loud for this part. Just follow these steps, and trust me, they’ll come out perfectly pillowy every time.
Mixing the Soft The Cookies Batter
We are keeping things very simple here, which is why this is such an easy ricotta cookie recipe. First thing first: make sure your oven is preheated to 350°F (175°C) and you have those baking sheets lined with parchment paper. Trust me, parchment is your best friend for easy cleanup!
- In your biggest bowl, whisk together that beautifully drained ricotta cheese and the sugar until it looks relatively smooth. It might still have a few tiny lumps, and that’s totally fine for these Italian ricotta cookies.
- Beat in your two eggs, one at a time, making sure each one is totally mixed in before adding the next. Stir in the vanilla, lemon zest, and that fresh lemon juice. Smell that? That’s the good stuff starting to come together!
- Grab a separate bowl for your dry items. Whisk the flour, baking powder, and salt together really well. You want that baking powder evenly distributed so we get a good rise!
- Now, slowly add the dry mix into the wet mix. This is important: mix on just low speed until everything is *just* combined. The second you don’t see white streaks of flour, stop mixing! If you overmix, you develop gluten, and we want pillowy cookies, not little dense hockey pucks. The batter *should* feel very soft and almost wet—don’t panic!
Baking and Cooling Your Homemade Ricotta Treats
We want these cookies spaced out because, while they don’t spread wildly, they need room to breathe to get that perfect dome shape. This recipe is designed for drop-and-bake simplicity, just like my general guide over at simple cookie baking!
- Using two spoons or a small cookie scoop, drop rounded tablespoons of batter onto your prepared baking sheets. Make sure you leave about 2 full inches between each spoonful.
- Pop those trays into the preheated oven and bake them for 12 to 15 minutes. You are looking for the edges to be just barely lightly golden. The centers should look set, but they must look soft to the touch. If they feel hard when you gently tap them, you’ve gone too far!
- When they are done, take them out. Let them sit right there on the hot baking sheet for about 5 minutes. This little rest time helps them firm up just enough so they don’t fall apart when you move them.
- Gently transfer the homemade ricotta treats to a wire rack to cool completely. And I mean *completely* cool. If you try to glaze them warm, the icing melts right off!
Applying the Glazed Cookies Topping
This is the final flourish to make your cookies look like they came straight from a little Italian bakery! Once the cookies are totally cool—give them a good 30 minutes, maybe more—it’s time for the finishing touch.
- Make sure your glaze mixture is whisked smooth. If it seems too thick to easily drizzle or dip, add just a tiny bit more lemon juice until it moves like slow syrup. If it’s too runny, add a little more powdered sugar, spoonful by spoonful.
- For a professional look, you can dip the top half of each cookie directly into the bowl of glaze and pull it out quickly. For a more relaxed look, grab a fork and generously drizzle the glaze back and forth across all the cookies.
- Set them back on the cooling rack (with parchment underneath, just in case of drips!) and let that beautiful lemon glaze set up fully before stacking them. That’s it! Pure magic!
Expert Tips for Making the Best Ricotta Cookies
I’ve made batches and batches of these gorgeous Italian ricotta cookies over the years, and there are a few tiny tricks that separate a good batch from a truly sensational one. Since we want these to be the best ricotta cookies out there, taking these extra steps is totally worth it. They build so much confidence when you know your recipe can’t fail!
My number one, cannot-stress-this-enough tip revolves around the drainage. If your ricotta looks wet, it *is* wet, and we need it drier than dry sand. I always drain mine right when I start prepping everything else—about 30 minutes in a fine-mesh sieve set right over a bowl in the fridge. This simple step is the secret weapon to getting that glorious soft the cookies texture.
Now, let’s talk presentation, because we eat with our eyes first, right? For any festive occasion, especially around Christmas, don’t skip the sprinkles! Wait until the glaze is wet, then quickly dust them with some colourful nonpareils or sanding sugar. It makes them look so professional. You can find some great ideas for decorating alongside my tips for brown butter raspberry chocolate chip cookies.
If lemon isn’t your absolute favourite (though, honestly, it should be!), here’s a tasty way to switch the flavor profile up: Use the almond glaze alternative! Substitute the lemon juice in the glaze with milk and add about half a teaspoon of pure almond extract instead of the lemon extract. That gives you a lovely, subtle Almond Glaze Cookies finish that is just divine with the soft ricotta base, leaning into classic homemade ricotta treats vibes.
Finally, remember that overmixing thing we talked about? That is the enemy of pillowy cookies. Once the flour is in, you just want to mix until the streaks disappear. Stop! Even if it looks a little lumpy, that gentle mixing keeps the structure light and airy. It’s the key to maintaining that delicate, melt in your mouth cookies consistency every single time you bake!
Variations for Italian Ricotta Cookies
I truly believe the best recipes are the ones you make your own! While this bright lemon version is my go-to for a perfect easy ricotta cookie recipe, these Italian ricotta cookies are incredibly adaptable. They have such a mild, creamy base thanks to that lovely ricotta cheese, which means they are just begging for you to play around with the flavors!
The easiest way to change things up, of course, is with citrus. If you’re not feeling the bright tartness of lemon this time around, try swapping out the lemon zest and juice in the cookie batter itself. Orange zest is divine here—it gives you a softer, sweeter citrus note that still feels very Italian! You can use orange juice instead of lemon juice in the batter, too, but just watch your wet/dry ratio, okay? If you see the batter looking a little looser than usual, toss in maybe one extra tablespoon of flour.
For a really unique flavor twist, especially around the holidays, try swapping the lemon zest for finely chopped candied ginger. It gives the cookies just a little hit of spice without overwhelming that delicate, cakey cookies texture. You won’t glaze those, though; those are beautiful just dusted with a tiny bit of powdered sugar!
And speaking of the glaze—we already touched on the almond option earlier, which is a classic move for creating lovely glazed cookies that echo traditional Italian bakeries. But you can use any extract you love! A little bit of peppermint extract added to a simple powdered sugar glaze makes these unexpected and really fun for Christmas cookie exchanges. Just remember, a little extract goes a long way, since they are already so flavorful inside. This flexibility is why these homemade ricotta treats are a staple in my kitchen year-round!
Serving Suggestions for These Cakey Cookies
Honestly, these cakey cookies are perfect just sitting on a pretty platter by themselves—they don’t need much fuss! But since we’re bringing that wonderful Italian flair into our home, let’s think about how to make the presentation really shine, especially when serving them alongside other Italian Dessert Recipes.
Because of that light, bright lemon zest, these cookies are amazing with something warm and slightly robust to cut through the sweetness. My first recommendation? A perfect strong coffee. I often pair them with a homemade shaken espresso, like my recipe for the iced brown sugar latte shaken espresso. The sweetness of the brown sugar glaze mixes perfectly with the coffee without being overwhelming.
If you’re serving these during a holiday party or after dinner, try arranging them on a simple white serving dish. They look beautiful stacked slightly, almost like little snowdrifts because of that white glaze. If you went heavy on the colorful sprinkles when the glaze was wet? Even better! They catch the light so nicely.
They are surprisingly lovely with a hot cup of plain black tea in the afternoon, too. The heat melts the glaze just a tiny bit more, making them feel even more melt-in-your-mouth at that moment. They are small, so you can serve a few per person easily. Enjoy that moment—you totally earned it!
Storage & Reheating Instructions for Ricotta Cookies with Glaze
Okay, now for the big question: how do we keep these incredible little bundles of joy soft until we want to eat them? Since these are made with ricotta, they are naturally more delicate than your average sugar cookie. The goal is always to protect that gorgeous, pillowy texture we worked so hard for!
My golden rule for these ricotta cookies with glaze is simple: air is the enemy. Once that glaze has fully set—and I mean *fully* set, otherwise you end up with sticky cookie towers—you need to get them into a sealed environment, fast.
I always store my fully cooled and glazed cookies in a good quality, airtight container. You can use Tupperware, a cookie tin with a tight lid, or even a heavy-duty zip-top bag if you press out all the air.
How long do they last at room temperature?
Because of the fat content from the ricotta cheese and eggs, these cookies are actually best kept right on the counter at room temperature. Seriously, resist the temptation to stick them in the fridge! Refrigeration tends to dry out baked goods quickly, and we absolutely do not want that to happen to our melt in your mouth cookies.
If stored properly in that airtight container, they stay beautifully soft and fresh for a solid 3 to 4 days. If you hide them deep in the pantry where no one can find them, they might stretch to 5 days, but trust me, they won’t last that long.
Can I freeze my Homemade Ricotta Treats?
Yes, you absolutely can freeze them, but there’s a catch, and you know I have to be honest about the potential pitfalls! Freezing them glazed runs the risk of the glaze cracking or getting damp when they thaw. It’s not pretty.
If you plan ahead, I highly recommend freezing the cookies *before* you add the glaze. Once baked and fully cooled, stack them with wax or parchment paper squares between each cookie. Wrap that stack tightly in plastic wrap, then foil, and pop them in the freezer. They do great there for up to two months.
When you want to serve them, just pull out the amount you need and let them thaw slowly on the counter for about an hour. Then, whip up a quick batch of that bright ricotta cookies with glaze topping while they thaw, and when they are room temperature, you glaze away! They taste exactly as fresh as the day you baked them.
Reheating Ricotta Cookies
Honestly, I don’t usually reheat these because they are designed to be soft at room temperature. If you are serving them around the holidays and they just came out of deep storage, a quick zap might be tempting, but please be careful!
If you must warm one up—maybe you just want that extra hit of lemon scent—place a single cookie on a microwave-safe plate for about 5 to 8 seconds, no more. Anything longer, and you risk turning that beautiful cakey cookie texture into something a little spongy. But usually, straight from the airtight container is the way to go for true perfection!
Frequently Asked Questions About Ricotta Cookies
I know you all have questions pop up when you get into the kitchen, and that’s totally normal! When you bake something that relies on one main ingredient like ricotta, you want to make sure you get the texture just right. These wonderful ricotta cookies are worth a little discussion upfront, especially if you’re planning your big holiday cookies spread!
How do I make sure my ricotta cookies are truly soft and cakey?
This is the million-dollar question, isn’t it? Softness comes from two major steps, and if you nail these, you win the entire batch! First, you absolutely, positively must drain your ricotta cheese. I can’t stress this enough; wet ricotta melts into the butter and gives you a flat, dense mess. Sieve it for at least 30 minutes beforehand. Second, remember the rule for any cakey cookies: do NOT overmix the flour! Mix only until the streaks disappear. Overmixing activates the gluten, and that turns your velvety batter into something tough. Keep it gentle, keep it light, and they will stay perfectly soft!
Can I make these Italian Ricotta Cookies ahead of time for holidays?
Yes, you totally can get a head start on these fantastic Italian ricotta cookies, which is a lifesaver when the holidays roll around. The cookies themselves bake quickly, but you need to bake them completely, let them cool fully, and then apply the glaze. I recommend waiting until the day before your big event to do the glazing.
The cookies themselves are great stored airtight at room temperature for three days before glazing. Once you apply the glaze—whether it’s lemon or that lovely almond one—give them at least four hours for the sugar to set firms before stacking them. Once set, they still last beautifully for another two days!
What is the best way to store these Melt In Your Mouth Cookies?
To keep that magical melt in your mouth cookies quality intact, storage is all about keeping the air out. Since these cookies have a good moisture content from the cheese, they don’t really like the dry environment of the fridge. Keep them at room temperature in a container that seals tightly. This stops them from drying out and keeps them tasting fresh for days.
If you happen to be looking for other ways to preserve baked goods, you might find some helpful tips over at this lemon ricotta cookies resource about keeping things fresh. But honestly, for these, simple airtight storage on the counter is the winner!
Nutritional Information for These Simple Cookie Baking Treats
Look, I am a baker (and a very enthusiastic food lover!), not a dietitian, so take these numbers as a fun guide rather than gospel, okay? These simple cookie baking treats are made with real ingredients—full-fat ricotta, sugar, butter—so they definitely spoil us a little! But hey, we’re eating them for joy, right? This information is based on using the recipe exactly as written, yielding about two dozen cookies.
If you’re looking at healthier swaps, you might want to check out how I adapt my ingredients over on my healthy zucchini bread recipe post. For these delicate homemade ricotta treats, however, these values reflect the classic preparation for maximum flavor!
Here’s the general estimate per cookie:
- Serving Size: 1 cookie
- Calories: 180
- Sugar: 18g (Yep, that’s the glaze working its magic!)
- Fat: 5g (Mostly from the creamy ricotta!)
- Saturated Fat: 3g
- Carbohydrates: 31g
- Protein: 4g
- Cholesterol: 35mg
Keep in mind that if you use extra-thick, Greek-style ricotta, or maybe you go a little heavy-handed with that sweet lemon glaze, the numbers will shift slightly. But overall, these are a wonderfully light way to enjoy a rich, authentic Italian dessert!
PrintSoft Italian Ricotta Cookies with Bright Lemon Glaze

Bake these soft Italian Ricotta Cookies that melt in your mouth. This easy recipe yields pillowy, cakey treats perfect for holidays or any day you want a taste of Italy.
- Prep Time: 20 min
- Cook Time: 15 min
- Total Time: 35 min
- Yield: About 2 dozen cookies
- Category: Dessert
- Method: Baking
- Cuisine: Italian
- Diet: Vegetarian
Ingredients
- 1 cup whole milk ricotta cheese, drained well
- 1 cup granulated sugar
- 2 large eggs
- 1 teaspoon vanilla extract
- 1 teaspoon lemon zest
- 1/4 cup fresh lemon juice
- 2 1/2 cups all-purpose flour
- 2 teaspoons baking powder
- 1/4 teaspoon salt
- For the Glaze: 2 cups powdered sugar
- For the Glaze: 4 tablespoons fresh lemon juice
- For the Glaze: 1/2 teaspoon lemon extract (optional)
Instructions
- Preheat your oven to 350°F (175°C). Line baking sheets with parchment paper.
- In a large bowl, whisk together the drained ricotta cheese and granulated sugar until smooth.
- Beat in the eggs one at a time, mixing well after each addition. Stir in the vanilla extract, lemon zest, and lemon juice.
- In a separate medium bowl, whisk together the flour, baking powder, and salt.
- Gradually add the dry ingredients to the wet ingredients, mixing on low speed until just combined. Do not overmix; the batter will be soft.
- Drop rounded tablespoons of dough onto the prepared baking sheets, leaving about 2 inches between each cookie. They will spread slightly.
- Bake for 12 to 15 minutes, or until the edges are lightly golden and the centers are set. They should remain soft.
- Let the cookies cool on the baking sheets for 5 minutes before transferring them to a wire rack to cool completely.
- While the cookies cool, prepare the glaze: Whisk together the powdered sugar, lemon juice, and lemon extract (if using) until smooth and pourable. Add more powdered sugar for a thicker glaze or more juice for a thinner one.
- Once cookies are completely cool, dip the tops into the glaze or drizzle generously over them. Let the glaze set before serving.
Notes
- Drain your ricotta cheese for at least 30 minutes in a fine-mesh sieve to prevent overly wet dough, which helps achieve that perfect soft, cakey texture.
- For a festive look, add colorful sprinkles to the wet glaze immediately after dipping or drizzling.
- If you prefer an almond flavor, substitute the lemon juice in the glaze with milk and add 1/2 teaspoon of almond extract.
Nutrition
- Serving Size: 1 cookie
- Calories: 180
- Sugar: 18g
- Sodium: 110mg
- Fat: 5g
- Saturated Fat: 3g
- Unsaturated Fat: 2g
- Trans Fat: 0g
- Carbohydrates: 31g
- Fiber: 0g
- Protein: 4g
- Cholesterol: 35mg


Comments are closed.