


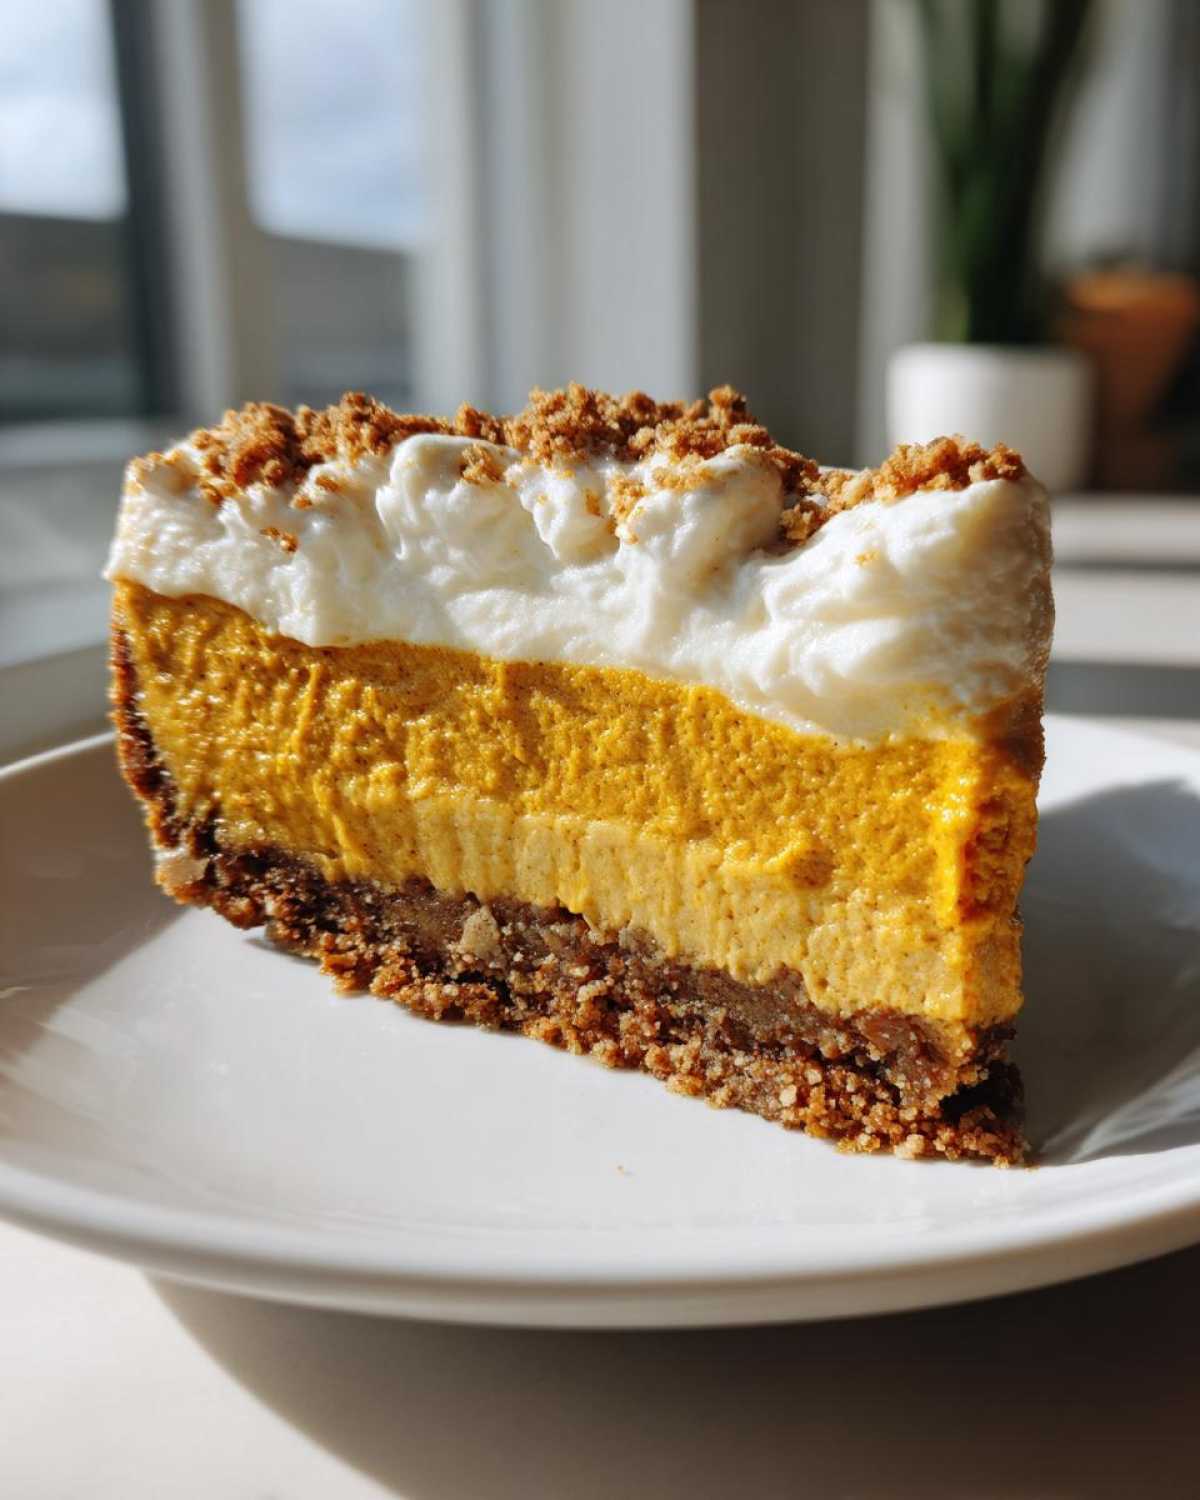
Oh friends, is there anything better than that first chill in the air that just screams, "Time to bake something rich and cozy?" I live for autumn baking, and while pie is classic, sometimes you need something truly decadent. That’s why I’m sharing what I honestly believe is the *best* version out there: my Creamy Baked Pumpkin Cheesecake with a Gingersnap Crust. Forget dry, crumbly cheesecakes that leave you reaching for a drink! This recipe delivers that unbelievably smooth, melt-in-your-mouth texture every single time. I’ve tested this specific pumpkin cheesecake countless times for family Thanksgiving gatherings, and it never fails to impress. It’s just pure, spiced, creamy happiness.
Why This Creamy Pumpkin Cheesecake Recipe Works (E-E-A-T)
I know, I know. Baked cheesecake sounds fussy, but trust me, this is the most reliable recipe for a truly decadent cheesecake you’ll ever try. The secret to that signature, flawlessly creamy pumpkin cheesecake texture isn’t luck; it’s all about managing moisture and temperature. We use a water bath, which sounds fancy, but it’s just keeping things steamy and gentle in the oven. That’s how we avoid those awful cracks!
Also, I always remind everyone: use room-temperature ingredients! Cold cream cheese gives you lumps, and nobody wants that struggle when aiming for a perfectly smooth cheesecake. The spice blend is also spot on—it has just enough warmth from the ginger and nutmeg to complement the pumpkin without overpowering the beautiful tang coming from the dairy. If you want more guidance on how these seasonal treats come together, you should check out my thoughts on other fall baking essentials.
Achieving the Best Pumpkin Cheesecake Texture
The main goal here is dense, velvety smoothness. The absolute non-negotiable step is the water bath because it insulates the sides, ensuring the edges don’t set too fast while the center is still cooking. After the eggs go in, you must stop mixing! Over-aerating the batter after the eggs incorporate introduces too much air. When that air heats up, it expands and then collapses upon cooling, which is the number one cause of cracks in your beautiful pumpkin cheesecake.
Ingredients for the Perfect Pumpkin Cheesecake with Gingersnap Crust
Okay, gathering your supplies is half the battle won when making a gorgeous pumpkin cheesecake! You want everything measured precisely because while my grandma was forgiving with her carrot cake, cheesecake just doesn’t allow for guesswork. We need two distinct lists here: one for our fantastic crust and one for that decadent, spiced filling. Remember, if your cream cheese is cold, you’re going to end up fighting lumps, so please, bring those blocks to room temperature first!
For the Gingersnap Crust
- 1 1/2 cups gingersnap cookie crumbs (I love how these give that spicy snap!)
- 1/4 cup granulated sugar
- 6 tablespoons unsalted butter, melted (Make sure this is fully melted, not just soft!)
For the Rich Pumpkin Flavored Dessert Filling
- 3 (8-ounce) packages cream cheese, softened to room temperature
- 1 1/2 cups granulated sugar
- 1 (15-ounce) can pure pumpkin puree (Crucial: don’t grab the pumpkin pie filling mix!)
- 1 teaspoon vanilla extract
- 1 teaspoon ground cinnamon
- 1/2 teaspoon ground ginger
- 1/4 teaspoon ground nutmeg
- 1/4 teaspoon salt
- 3 large eggs, also brought nearly to room temperature
How to Prepare Your Creamy Pumpkin Cheesecake
Alright, deep breaths! This is the fun part where we turn those wonderful ingredients into the ultimate baked treat. Don’t worry if you’ve never used a water bath before; I promise it’s easier than it sounds and it’s the non-negotiable secret weapon for a stunning, crack-free, creamy pumpkin cheesecake. We’re moving quickly, but gently, through the steps. If you’re looking for other decadent baked treats, keep my cheesecake brownie cookies in mind for later!
Preparing and Baking the Crust
First things first: get your oven preheated to 350°F (175°C). Now, grab that 9-inch springform pan and wrap the outside bottom section *tightly* with heavy-duty foil—make sure it goes up the sides a bit. This protects your crust from the water bath steam. In a bowl, mix your gingersnap crumbs and the 1/4 cup of sugar. Pour in the 6 tablespoons of melted butter and stir until everything looks like damp sand. Press this mixture firmly into the bottom of the prepared pan. Pop that crust into the oven and bake it for just 8 minutes, then pull it out so it can cool down a bit while you whip up that amazing filling.
Mixing the Perfectly Smooth Cheesecake Filling
This is where your room-temperature cream cheese pays off! Grab your large bowl and beat the softened cream cheese until it is completely smooth—no lumps allowed! Next, gradually beat in the 1 1/2 cups of sugar until it’s all combined. Now, add your pumpkin puree, vanilla, and all those lovely spices: cinnamon, ginger, nutmeg, and salt. Mix on low speed until it’s just blended, then scrape down the sides really well. The most important part is next: add your eggs one at a time, only mixing until *just* incorporated. Seriously, stop mixing as soon as you don’t see streaks of yellow. We want that silky, creamy pumpkin cheesecake texture!
Baking the Pumpkin Cheesecake Using a Water Bath
Pour that glorious spiced filling right over your pre-baked crust. Now for the water bath: carefully place the foil-wrapped springform pan into a larger roasting pan. Pour hot water into the roasting pan until it comes about halfway up the sides of the cheesecake pan. Place the whole setup gently into the oven. Bake for 55 to 65 minutes. You’ll know it’s ready when the edges look set, but if you give the pan a little nudge, the very center still jiggles slightly, like thick pudding. That jiggle means moisture!
Cooling and Chilling for the Best Pumpkin Cheesecake
This cooling process is just as important as the baking! Turn the oven off, crack the door open just a tiny bit, and let the pumpkin cheesecake hang out inside the warm oven for a full hour. This slow transition prevents sudden temperature drops. Next, take it out of the water bath, remove the foil, and let it cool completely on a wire rack. Then, you have to be patient—wrap it up and chill it in the fridge for a minimum of 6 hours, though I always say overnight is truly best for the ultimate slice.
Tips for Success with Your Homemade Pumpkin Dessert
Look, making the best pumpkin cheesecake comes down to a few non-negotiable habits I picked up over the years. You might think you can rush things, but cheesecake always knows when you’re trying to cheat! The first rule I live by is making sure every single cold ingredient—I mean *every* single one, especially the eggs and cream cheese—is fully at room temperature. This ensures they mix into one homogenous, beautiful batter rather than struggling to combine.
Secondly, remember what I said about overmixing? That’s your biggest enemy when trying to banish cracks! Once those eggs are in, you are barely stirring. Think “just combined,” not “mixing batter aggressively.” If you want more fun tips on getting rich textures, check out my notes on browning butter, because it’s all about managing fats correctly.
If you’re worried about accidental sticking—even with the water bath—lightly greasing the bottom of the springform pan before you put the crust in can be a nice insurance policy. A little bit of softened butter smeared on the very bottom just gives that crust an extra boundary to break free when it’s time to serve your incredible spiced cheesecake creation.
Variations on the Classic Pumpkin Cheesecake
Now, I absolutely adore this pumpkin cheesecake with its zesty gingersnap crust, but I know sometimes you want to switch things up, especially if you’re making it for the third time this month because everyone suddenly loves cheesecake! Feel free to play around without losing the perfect texture we worked so hard to achieve.
If you aren’t a big fan of that warming ginger flavor in the crust, swapping it out is super easy. You can absolutely use classic graham cracker crumbs, just follow the same butter ratios. Or, try crushing vanilla wafers or even shortbread cookies! It changes the supporting flavor profile but keeps the crust firmly established so your **creamy pumpkin cheesecake** filling stays happy on top.
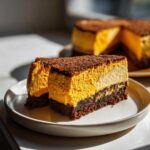
For those who want that beautiful decorative look, making a **Pumpkin Swirl Cheesecake** is surprisingly simple. After you pour your filling into the pan, take about 1 cup of the filling out and mix in an extra teaspoon of cinnamon and nutmeg. Dollop spoonfuls of that extra-spiced mixture on top, then take a thin knife or skewer and gently swirl it around. See how easy that is? It looks incredibly professional for almost zero extra effort!
If you really want to lean into that cozy holiday feel, you can transform this into a **Pumpkin Pie Cheesecake** almost instantly by adjusting the spices. Add another half teaspoon of cinnamon, a pinch of allspice, and maybe even a drizzle of molasses into the main batter mix. That really mimics the flavor profile of actual pumpkin pie while keeping that signature cheesecake richness. For visually stunning, layered desserts that show off this technique, you might like to look into how I handle a swirled cake.
And hey, if you just want simplicity, skip the swirl and the fancy crust additions. Just top this incredible baked good with a dollop of homemade whipped cream and a light dusting of cinnamon sugar. It’s still unbelievably good and ready faster!
Storage and Reheating Instructions for Pumpkin Cheesecake
This decadent dessert is actually wonderful the next day, but storing it correctly is key to keeping that creamy texture intact. Once fully chilled, cover your leftover pumpkin cheesecake tightly—plastic wrap directly on the surface often works best, followed by a layer of foil—and keep it tucked away in the fridge. It’s perfectly safe there for about four or five days.
I actually prefer eating it slightly cooler than room temperature, but if you’re taking out a slice that’s been chilling for ages, give it maybe 20 minutes on the counter first. That slightly softer edge makes all the difference!
If you need to freeze leftover pumpkin cheesecake, you absolutely can! Wrap that slice (or the whole cake if you must share!) really well in plastic wrap, then wrap it again in heavy-duty foil to protect it from freezer burn. It lasts great for up to a month. When you want to eat it, just thaw overnight in the fridge. Don’t even think about microwaving it, though—that will ruin that beautiful velvety structure we worked for!
Serving Suggestions for Your Autumn Dessert Ideas
Now that you’ve mastered the baking process for your incredibly rich pumpkin cheesecake, the final hurdle is presentation! Honestly, this cake is stunning all on its own, especially if you got that beautiful swirl going. But if you want to take it over the top and make it worthy of the absolute centerpiece on your Thanksgiving table, we play dress-up!
The wonderful thing about the warm spices in this dessert is that they pair well with so many earthy or boozy additions. Forget those tubs of generic whipped topping; you need something special! Make a quick, lightly sweetened whipped cream—maybe spiking it with just a splash of vanilla or even a hint of maple extract. That light airiness is the perfect counterpoint to this dense, decadent cheesecake.
For true showstoppers, thinking of this as one of your best Holiday Cheesecake Desserts means adding a drizzle. Bourbon caramel sauce is absolutely divine here. The slight sharpness of the bourbon cuts through the richness of the cream cheese and really elevates the pumpkin spice. If you’re looking for something equally cozy but caffeine-focused to serve alongside it, you should look at my recipe for an iced brown sugar latte—it’s the perfect pairing for a slice of autumn comfort.
If you want to keep it super simple? A final, very fine dusting of powdered sugar or even mixing a touch of cinnamon and ground cloves onto the sugar before dusting works wonders visually. Whatever you choose, serve these wedges cold or allow them to sit out for just 15 minutes before slicing to let that creamy texture really shine!
Frequently Asked Questions About Pumpkin Cheesecake
I know you’ve got questions, because I certainly did when I started tweaking this recipe over the years! Cheesecakes, especially the delightful pumpkin cheesecake kind, can be temperamental if you don’t know the little secrets. Don’t worry one bit; I’ve gathered the most common worries folks have when trying to achieve that perfect, custardy slice. You’ll find that most issues are easily solved with a little patience!
If you’re looking for other fall favorites involving apples, check out my apple cider doughnut recipe—it’s another guaranteed hit!
Can I skip the water bath when making this pumpkin cheesecake?
Oh, please don’t skip it! I know it feels tedious covering your pan in foil and setting it in hot water, but that water bath is what keeps the environment around your pumpkin cheesecake gentle and steamy. If you skip it, the high, direct heat will cook the edges much faster than the center, leading to dry, slightly rubbery sides and a big crack right across the top. We need that gentle environment for the decadent cheesecake; it ensures the entire thing sets evenly, resulting in that unbelievably smooth texture.
What is the best way to soften cream cheese for a creamy pumpkin cheesecake?
This is crucial for a smooth result! You absolutely must let your cream cheese sit out on the counter for at least an hour or two until it’s completely soft. I mean, when you gently press it, your finger should leave an easy indent without resistance. Don’t try to rush it in the microwave; that often leads to hot spots around the edges while the center stays firm. Cold cream cheese will never successfully blend with the sugar, and you’ll end up with little lumps throughout your beautiful pumpkin cheesecake batter. Plan ahead and keep those blocks out!
Here are a couple of other things people ask me all the time:
- Can I make this a no-bake recipe? Yes, you could, but frankly, the texture changes completely. The baking process is what gives this recipe its signature richness. If you need an Easy Pumpkin Cheesecake that requires zero oven time, you’ll need a different, gelatin-set recipe entirely.
- What if I want to make a Pumpkin Swirl Cheesecake? That’s easy! Before pouring the batter into the crust, set aside about one cup of the batter and mix in an extra dash of cinnamon and nutmeg. Drop dollops of the flavored batter on top of the main filling and swirl gently with a knife once.
Nutritional Estimates for This Spiced Cheesecake
I always try to keep track of what we’re eating, especially when something as rich and decadent as this spiced cheesecake makes an appearance on my table! But I always want to give you a heads-up: these numbers are just estimates based on the ingredients list I provided. If you use lower-fat cream cheese or a different type of cookie for the crust, those numbers will definitely jump around a bit, so treat this as a general guide, not a strict rulebook!
We’re talking about a small slice, yielding about 12 servings from the whole cake, so it’s a holiday treat, for sure!
- Serving Size: 1 slice
- Calories: 420
- Fat: 27g
- Saturated Fat: 16g (Yes, that’s high, but butter and cream cheese give us that dreamy texture!)
- Trans Fat: 0g (Phew, glad that’s gone!)
- Cholesterol: 115mg
- Carbohydrates: 40g
- Fiber: 1g
- Sugar: 35g (This accounts for the sugar in the filling and the gingersnap crust)
- Protein: 6g
So there you have it! It’s a rich dessert, perfectly portioned for maximum enjoyment with your holiday coffee or dessert wine. Don’t let the numbers stress you out too much; just enjoy that beautiful, creamy texture when you slice into it!
Share Your Pumpkin Cheesecake Experience
Alright, now that you’ve had a peek into my absolute favorite way to make a holiday **pumpkin cheesecake**, I really want to know how it went for you! Did that gingersnap crust give the perfect spicy counterpoint? Did you achieve that perfect, wobble-free center? Please, don’t be shy!
The best part of sharing these deeply cherished recipes is hearing your success stories. If you tried this out for Thanksgiving or maybe just a cozy Tuesday night treat, let me know in the comments below. How did you serve it? Did you stick to my simple vanilla cream topping, or did you try a fancy bourbon caramel drizzle?
I’m also always eager to see photos! If you snap a picture of your gleaming, perfectly smooth **pumpkin cheesecake**, share it on social media and tag me so I can squeal with delight! Your feedback helps me keep confirming that this method truly is the most reliable way to bake a show-stopping dessert. If you have any final burning questions or unique tips you discovered while making it, send them over via my contact page—I read every single message!
PrintCreamy Baked Pumpkin Cheesecake with Gingersnap Crust
This recipe yields a rich, creamy baked pumpkin cheesecake featuring a spiced gingersnap crust. It is ideal for fall gatherings and holidays.
- Prep Time: 25 min
- Cook Time: 60 min
- Total Time: 7 hours 25 min
- Yield: 12 servings
- Category: Dessert
- Method: Baking
- Cuisine: American
- Diet: Vegetarian
Ingredients
- 1 1/2 cups gingersnap cookie crumbs
- 1/4 cup granulated sugar
- 6 tablespoons unsalted butter, melted
- 3 (8-ounce) packages cream cheese, softened
- 1 1/2 cups granulated sugar
- 1 (15-ounce) can pure pumpkin puree
- 1 teaspoon vanilla extract
- 1 teaspoon ground cinnamon
- 1/2 teaspoon ground ginger
- 1/4 teaspoon ground nutmeg
- 1/4 teaspoon salt
- 3 large eggs
Instructions
- Preheat your oven to 350°F (175°C). Wrap the outside bottom of a 9-inch springform pan tightly with heavy-duty aluminum foil.
- Combine gingersnap crumbs and 1/4 cup sugar in a medium bowl. Pour in melted butter and mix until the crumbs are evenly moistened. Press the mixture firmly into the bottom of the prepared springform pan. Bake the crust for 8 minutes. Remove from the oven and let it cool slightly.
- In a large bowl, beat the softened cream cheese with an electric mixer until smooth. Gradually beat in the 1 1/2 cups sugar until fully combined.
- Add the pumpkin puree, vanilla extract, cinnamon, ginger, nutmeg, and salt. Mix on low speed until just blended. Scrape down the sides of the bowl.
- Beat in the eggs one at a time, mixing only until each egg is incorporated. Do not overmix.
- Pour the filling over the cooled crust. Place the springform pan inside a larger roasting pan. Carefully pour hot water into the roasting pan until the water reaches about halfway up the sides of the springform pan (this creates a water bath).
- Bake for 55 to 65 minutes, or until the edges are set but the center still jiggles slightly when gently nudged.
- Turn off the oven, crack the oven door open slightly, and let the cheesecake cool inside the oven for 1 hour.
- Remove the cheesecake from the water bath and foil. Cool completely on a wire rack, then chill in the refrigerator for at least 6 hours, or preferably overnight, before serving.
Notes
- For the smoothest texture, bring the cream cheese and eggs to room temperature before starting.
- To prevent cracks, do not overbeat the batter after adding the eggs.
- If you do not have gingersnaps, you can substitute graham crackers for the crust.
Nutrition
- Serving Size: 1 slice
- Calories: 420
- Sugar: 35
- Sodium: 310
- Fat: 27
- Saturated Fat: 16
- Unsaturated Fat: 11
- Trans Fat: 0
- Carbohydrates: 40
- Fiber: 1
- Protein: 6
- Cholesterol: 115

Comments are closed.