


Oh my gosh, you guys! If you are like me, you hit that 3 PM snack time wondering how on earth you can fit something truly satisfying into your macros without blowing your whole day. We all crave that luxurious, rich taste of real cheesecake, right? Well, I finally cracked the code for a version that actually supports my fitness goals. These No-Bake High-Protein Cheesecake Jars are an absolute game-changer. Seriously, I make a batch of these Protein Cheesecake recipes every Sunday, and they keep me happy and on track all week long. They are so creamy, unbelievably easy, and require zero oven time. Trust me, you’re going to want to steal this one.
Why This No-Bake Protein Cheesecake Jars Recipe Works for Your Goals
I know the struggle: wanting a dessert that tastes indulgent but fits a serious calorie budget. That’s why I keep coming back to these jars. They are genuinely some of the best Macro Friendly Desserts I’ve ever whipped up. Because we use cottage cheese and Greek yogurt instead of heavy cream cheese, we slash the fat content dramatically. This makes them a perfect Low Calorie Cheesecake option!
- Perfect for meal prepping—just pull one out when you need a sweet fix.
- Super high protein content keeps you feeling full longer.
- Amazingly simple cleanup since everything happens in the jar!
The beauty of this Protein Cheesecake format is that it hits every single mark without tasting like compromise. You deserve a treat that works *with* your goals, not against them.
Achieving Creamy Texture in a Protein Cheesecake
Okay, let’s talk texture because this is where most people get nervous about protein desserts. If you’ve ever tried a protein shake that felt gritty, I get it! The secret to making this a truly Creamy Protein Dessert is ditching the heavy cream cheese and relying on our powerful base team: cottage cheese and Greek yogurt.
The key is blending. You have to let your food processor or blender really work its magic until every single grain of cottage cheese disappears. Seriously, blend it until it looks glossy and smooth—like melting velvet! Don’t rush this part; scrape down the sides every minute or so. If you nail the blending step, you get all the flavor payoff of a traditional cheesecake without any chalkiness. Check out how I handle texture in my recipe for strawberry cheesecake bites for extra reassurance on texture control!
Essential Ingredients for Your Protein Cheesecake Jars
Getting the foundation right is everything when you’re building a Protein Cheesecake that actually tastes like dessert. We are leaning heavily on two main players here to get that fantastic, high-protein count: the cottage cheese and the Greek yogurt. Don’t worry if you turn your nose up at cottage cheese; once it’s blended properly, you cannot taste it at all—it just becomes pure, creamy goodness! We mix that with simple sweetener and a good scoop of vanilla protein powder.
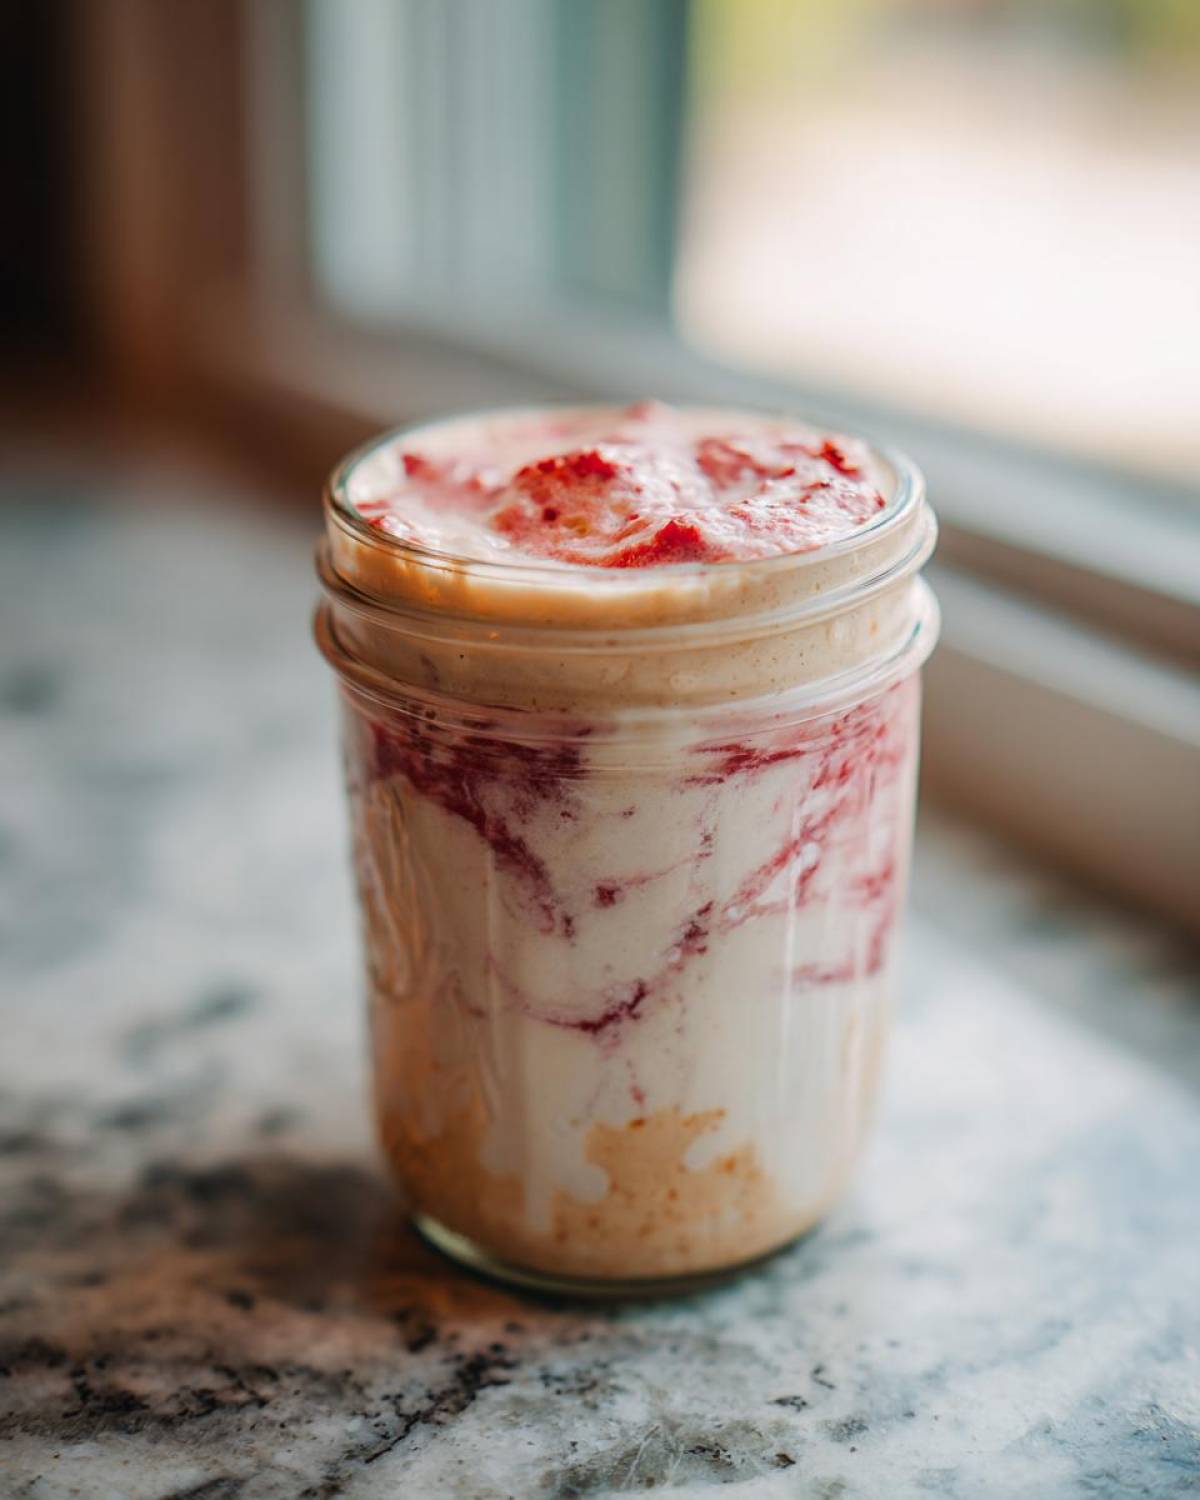
Make sure your strawberries are mashed—even if they are frozen, just give them a quick mash so they swirl nicely instead of staying in big, icy chunks. If you need texture contrast, we have options for a little crunch on top, but the main filling is where all the magic happens.
Ingredient Specifics and Substitutions for Protein Cheesecake
Choosing your powder matters big time here. If you use a high-quality vanilla or unflavored whey/casein blend, you’ll get the best texture. If you use straight whey, you might need just a tiny splash more yogurt to keep it from turning too stiff, so keep one eye on the blender!
For sweetness, I really push for powdered erythritol because it dissolves perfectly, leaving zero grittiness. But hey, if you prefer monk fruit or stevia, just taste and adjust slowly. Remember my note about substitutions? If you absolutely cannot find cottage cheese, you *can* use standard cream cheese, but know that you’ll lose a big chunk of the protein punch, and honestly, that’s why we’re making this specific Cottage Cheese Cheesecake Recipe!
If you want that optional graham cracker topping—which I always recommend for crunch—make sure you crush it super fine so it sits nicely on top. For a lighter touch, you could even skip the crust altogether! If you want to see how well cottage cheese works in another chilly treat, check out my recipe for cottage cheese ice cream—it’s just as revolutionary for high-protein cravings!
Step-by-Step Guide to Making No Bake Protein Cheesecake
Alright, this is the fun part! Making these No Bake Protein Cheesecake jars is faster than ordering takeout, I promise. It’s mostly just loading up the processor and hitting ‘Go’. We are starting simple: grab your cottage cheese, Greek yogurt, your protein powder, sweetener, vanilla, and just a tiny splash of lemon juice to give it that signature cheesecake tang. Get all those ingredients into your processor or a really powerful blender. Don’t try to do this by hand, trust me—you won’t get that smooth texture we are aiming for!
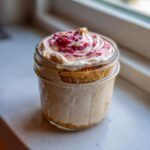
The most important step is blending until it’s truly homogeneous—I mean perfectly smooth. This is where we turn basic dairy into that beautiful filling. After blending, scoop that lovely mixture evenly into your four little jars. If you want a flourish, now is the time to gently swirl in some mashed strawberries. Then, sprinkle on your optional cracker topping for crunch. Finally, cover them up and move them right into the fridge. You need patience here, as this is what turns our mixture into actual Protein Cheesecake!
- Combine the cottage cheese, Greek yogurt, protein powder, sweetener, vanilla extract, and lemon juice in a food processor or high-speed blender.
- Blend until the mixture is completely smooth and creamy, scraping down the sides as needed. This step is crucial for texture.
- Divide the mixture evenly among four small mason jars or serving cups.
- If using strawberries, gently swirl a spoonful of mashed strawberries into the top of each jar.
- If using a crust, sprinkle the crushed graham crackers over the top of each jar.
- Cover the jars and refrigerate for at least 4 hours, or preferably overnight, to allow them to set completely.
- Serve cold directly from the jar.
If you are looking for other ridiculously simple recipes like this one, check out my guide to other easy protein dessert options that require minimal fuss!
Tips for Perfect No Bake Protein Cheesecake Setting
That 4-hour minimum chill time isn’t just a suggestion; it’s necessary! Because we aren’t using gelatin or eggs that firm up with heat, the fats and proteins in the yogurt and protein powder need time in the cold to solidify properly. If you try to eat them after just one hour, you’ll end up with soup, not dessert!
Here’s a pro tip for blending: If you notice any ingredients (especially the powdered sweetener) sticking stubbornly to the sides and not incorporating, you might need a tiny bit of liquid to stop separation. Add just one teaspoon of water or yogurt at a time, blend for 30 seconds, and check again. Adding too much liquid throws off the whole consistency of your future No Bake Protein Cheesecake set!
Variations on Your Favorite Protein Cheesecake
The base recipe for this Protein Cheesecake is fantastic because it’s secretly a chameleon! Once you master the smooth texture, you can totally customize the flavor profile depending on what you’re craving that day. We made a simple vanilla base, but mixing things up is half the fun!
If you are dreaming about a deep, rich treat, making a Chocolate Protein Cheesecake is unbelievably easy. Remember those notes I included? Just scoop out about a quarter-cup of your vanilla protein powder and swap it in for chocolate protein powder instead. That’s it! You get that satisfying dark chocolate flavor without adding any extra sugar or fat. For an extra decadent touch, you can even use a chocolate-flavored sweetener if you have one handy.
For something brighter, we use the optional strawberries we mentioned earlier. To make a true Strawberry Protein Cheesecake swirl, mash about half a cup of fresh or frozen strawberries—if they are frozen, let them sit out for about ten minutes first so they are soft enough to crush with a fork. When you layer the filling into the jars, drop in a spoonful of that mashed fruit and use a knife or toothpick to gently pull it through the batter once or twice. Too much swirling turns the whole jar pink, and that’s not the classic look we want!
If you need a totally different direction check out how I use strawberry glaze in my strawberry doughnut recipe for inspiration on other fruity toppings that might work here too! And hey, if you prefer a nutty flavor, you can always substitute the fruit with a tablespoon of finely chopped walnuts or pecans sprinkled on top right before chilling.
Storage and Meal Prep for Your Protein Cheesecake Jars
This is my absolute favorite part about this Protein Cheesecake recipe: it is built for meal prep! If you are trying to eat healthy all week but struggle when dessert cravings hit, this is your secret weapon. Since these are no-bake and portioned into individual jars, they are the ultimate grab-and-go Meal Prep Protein Desserts.
I usually make four jars, just like the recipe suggests, and they live in the fridge. Because they contain dairy (yogurt and cottage cheese), they last beautifully for about 4 to 5 days when stored tightly sealed in the refrigerator. I’ve often had one left on day five, and it tastes just as firm and creamy—no weird texture changes, which is a miracle for a dairy-based dessert!
Now, can you freeze them? Honestly, I don’t recommend it if you can help it. While freezing *will* keep them solid, when you start to thaw them, the texture of the yogurt base can sometimes get a little grainy later on. For the absolute best, velvety smooth experience, stick to the fridge. If you *must* freeze them, make sure they are completely solid before freezing, and thaw them overnight in the fridge before eating. Since they set up so perfectly cold, freezing them just isn’t worth risking that gorgeous texture we worked so hard to achieve in the blender!
If you want more ideas on how to streamline your week without sacrificing flavor, you should definitely check out my guide on making hearty salads for flavorful meal prep—it’s all about setting yourself up for success!
Frequently Asked Questions About Protein Cheesecake
I know when you find a killer Protein Cheesecake recipe, you’re bound to have a few questions running through your head before you even scoop the first ingredient. I’ve gathered the ones I get asked the most about these jar desserts because I want you to feel totally confident making these for your meal prep!
First thing’s first, are these truly Sugar Free Cheesecake compatible? Yes! Because we use erythritol or another zero-calorie sweetener, the actual sugar content is really low—just naturally occurring sugar from the yogurt and cottage cheese. It tastes sweet, but you skip the huge sugar load of regular dessert, which is why these are perfect for weight loss recipes!
And what if you’re sensitive to gluten? Don’t sweat it! This filling itself is naturally gluten-free, making it a wonderful Gluten Free Protein Dessert option. We only use graham crackers for an optional crust on top, so just skip that step or swap in some crushed nuts or a store-bought gluten-free vanilla wafer crumbs for the same textural hit!
Can I bake these Protein Cheesecake Jars?
This is a big one! No, please don’t try to bake these! This recipe is specifically designed as a No Bake Protein Cheesecake. We are relying on the cold refrigerator temperature and the specific proteins in the Greek yogurt and cottage cheese to firm up the mixture. If you introduce heat, the dairy components will break down and curdle, giving you hot, curdled yogurt instead of a creamy cheesecake slice. Keep the oven off for this one!
What is the best protein powder for this recipe?
Great question! The type of powder makes a difference in the final mouthfeel. If you can use a whey/casein blend, I find that gives the absolute *best* structure. Whey protein on its own tends to thicken up very quickly, sometimes leading to a slightly stiffer texture if you aren’t careful with your blending time. Casein, on the other hand, thickens slowly and provides that lovely, slow-setting creaminess.
No matter what you choose, just ensure it’s a flavor you genuinely like, as it will be the dominant flavor in your Protein Cheesecake! If you want to see how I incorporate some healthy baking into other recipes, check out my guide to gluten-free peach crisp—it shares some similar ingredient adjustment tips!
Nutritional Snapshot of This High Protein Dessert Recipe
Look, I know that when we talk about dessert—even a healthy one like our amazing Protein Cheesecake—we still care about the numbers! That’s why I always crunch the macros for you. It’s important to know exactly what you’re putting into your body, especially when you are prepping these for easy eating throughout the week.
Based on the standard recipe using the low-fat cottage cheese and vanilla powder, here is a quick breakdown for one jar serving. I love seeing that protein number jump up to 25 grams! That’s more than most protein bars, and it actually tastes amazing!
- Calories: Approximately 180
- Protein: 25g (Yes, really!)
- Fat: 3g (Mostly healthy unsaturated fats)
- Sugar: Just 4g (Naturally occurring)
- Carbohydrates: 12g
Now, I have to throw in my standard chef disclaimer here because you know I always keep it real. These numbers are estimates based on the ingredients I personally use—specifically a standard whey/casein blend and powdered erythritol.
If you decide to use full-fat cream cheese instead of cottage cheese, or if you swap in a different sweetener, those values are going to shift, so always double-check your specific product labels! If you want another example of how Greek yogurt fits perfectly into a balanced diet, you should check out my recipe for a vibrant Greek yogurt parfait—it’s another one of my weekly staples!
Share Your Experience Making This Protein Cheesecake
Okay, now that I’ve shared all my hard-won wisdom about making the creamiest Protein Cheesecake imaginable, I really, truly want to know what you think! This is one of those recipes I feel so passionately about because it changed my snack game, and I hope it does the same for you.
Did you go for the classic vanilla with the optional crushed topping? Or were you feeling adventurous and gave the chocolate swap a whirl? Maybe you tried a totally different fruit swirl—if so, tell me everything! I am always looking for new, Guilt Free Sweet Treats to try out.
Please, please leave a star rating for this recipe below. It helps other people who are nervous about using cottage cheese in their desserts feel confident enough to try it out. And if you snapped a picture of your beautiful jars—especially if they look perfectly set—I would absolutely love to see them! Tag me online so I can cheer you on!
If you want to learn more about my philosophy on making healthy food taste amazing and sticking to long-term fitness goals, you can always read a little more about me on my about page. Happy blending, everyone!
PrintNo-Bake High-Protein Cheesecake Jars
Make individual, creamy, high-protein cheesecakes in jars that require no baking and are simple to prepare for meal prep.
- Prep Time: 10 min
- Cook Time: 0 min
- Total Time: 4 hr 10 min
- Yield: 4 servings
- Category: Dessert
- Method: No-Bake
- Cuisine: American
- Diet: Low Fat
Ingredients
- 1 cup low-fat cottage cheese
- 1/2 cup plain Greek yogurt
- 1 scoop vanilla or unflavored protein powder
- 1/4 cup powdered erythritol or sweetener of choice
- 1 teaspoon vanilla extract
- 1 tablespoon lemon juice
- 1/4 cup crushed graham crackers or gluten-free crust mix (optional, for topping)
- 1/4 cup fresh or frozen strawberries, mashed (optional, for swirl)
Instructions
- Combine the cottage cheese, Greek yogurt, protein powder, sweetener, vanilla extract, and lemon juice in a food processor or high-speed blender.
- Blend until the mixture is completely smooth and creamy, scraping down the sides as needed. This step is crucial for texture.
- Divide the mixture evenly among four small mason jars or serving cups.
- If using strawberries, gently swirl a spoonful of mashed strawberries into the top of each jar.
- If using a crust, sprinkle the crushed graham crackers over the top of each jar.
- Cover the jars and refrigerate for at least 4 hours, or preferably overnight, to allow them to set completely.
- Serve cold directly from the jar.
Notes
- For a chocolate version, substitute 1/4 cup of the protein powder with chocolate protein powder and omit the strawberries.
- If you do not have cottage cheese, you can substitute it with an equal amount of cream cheese, though the protein content will decrease slightly.
- Use a high-quality protein powder for the best flavor and texture results.
Nutrition
- Serving Size: 1 jar
- Calories: 180
- Sugar: 4
- Sodium: 150
- Fat: 3
- Saturated Fat: 1
- Unsaturated Fat: 2
- Trans Fat: 0
- Carbohydrates: 12
- Fiber: 1
- Protein: 25
- Cholesterol: 15


Comments are closed.