


If you grew up around the holidays, you know the smell: rich peanut butter mixing with the sweet scent of melting chocolate. It’s the unofficial aroma of Christmas baking, hands down! For years, I chased that perfect combination—a cookie base that was soft and chewy, not crumbly, and a chocolate kiss wrapper that peeled off cleanly. After far too many flat, dry disappointments, I finally cracked the code. Trust me when I say this recipe for Peanut Butter Blossoms is the absolute best. My mom started making these when she was just learning to bake, and now that I’ve perfected her method, they are the first cookie to disappear off the platter every single year. Forget those sad, brittle versions you sometimes find; we’re making that gold standard cookie right here!
I even remember one year when I was trying to rush them. I skipped the chilling step when I was supposed to be whipping up some chocolate peanut butter bars—you can check out my recipe for those delicious lunchroom chocolate peanut butter bars—and let’s just say, those cookies spread into one giant, melty, peanut-butter-brick disaster. That taught me: time and temperature matter, even for quick cookies like these. This recipe is quick—you’re looking at about 25 minutes start to finish—but you need patience for that final smash of the kiss. Keep reading, and I’ll walk you through exactly how to get that chewy texture and perfect visual every single time.
Why This is the Best Peanut Butter Blossoms Recipe (Chewy Texture Guaranteed)
I’ve messed up batches of Peanut Butter Blossoms more times than I care to admit trying different ratios, but this version is the culmination of years of testing. I promise you, this is the Best Peanut Butter Blossoms Recipe you’ll ever need if you want that amazing classic cookie. The secret to truly Chewy Peanut Butter Blossoms isn’t chilling the dough—shockingly, we skip that! It’s all about the butter consistency when you start beating it and making sure you pull those babies out of the oven just a minute too soon.
Key Characteristics of Perfect Peanut Butter Blossom Cookies
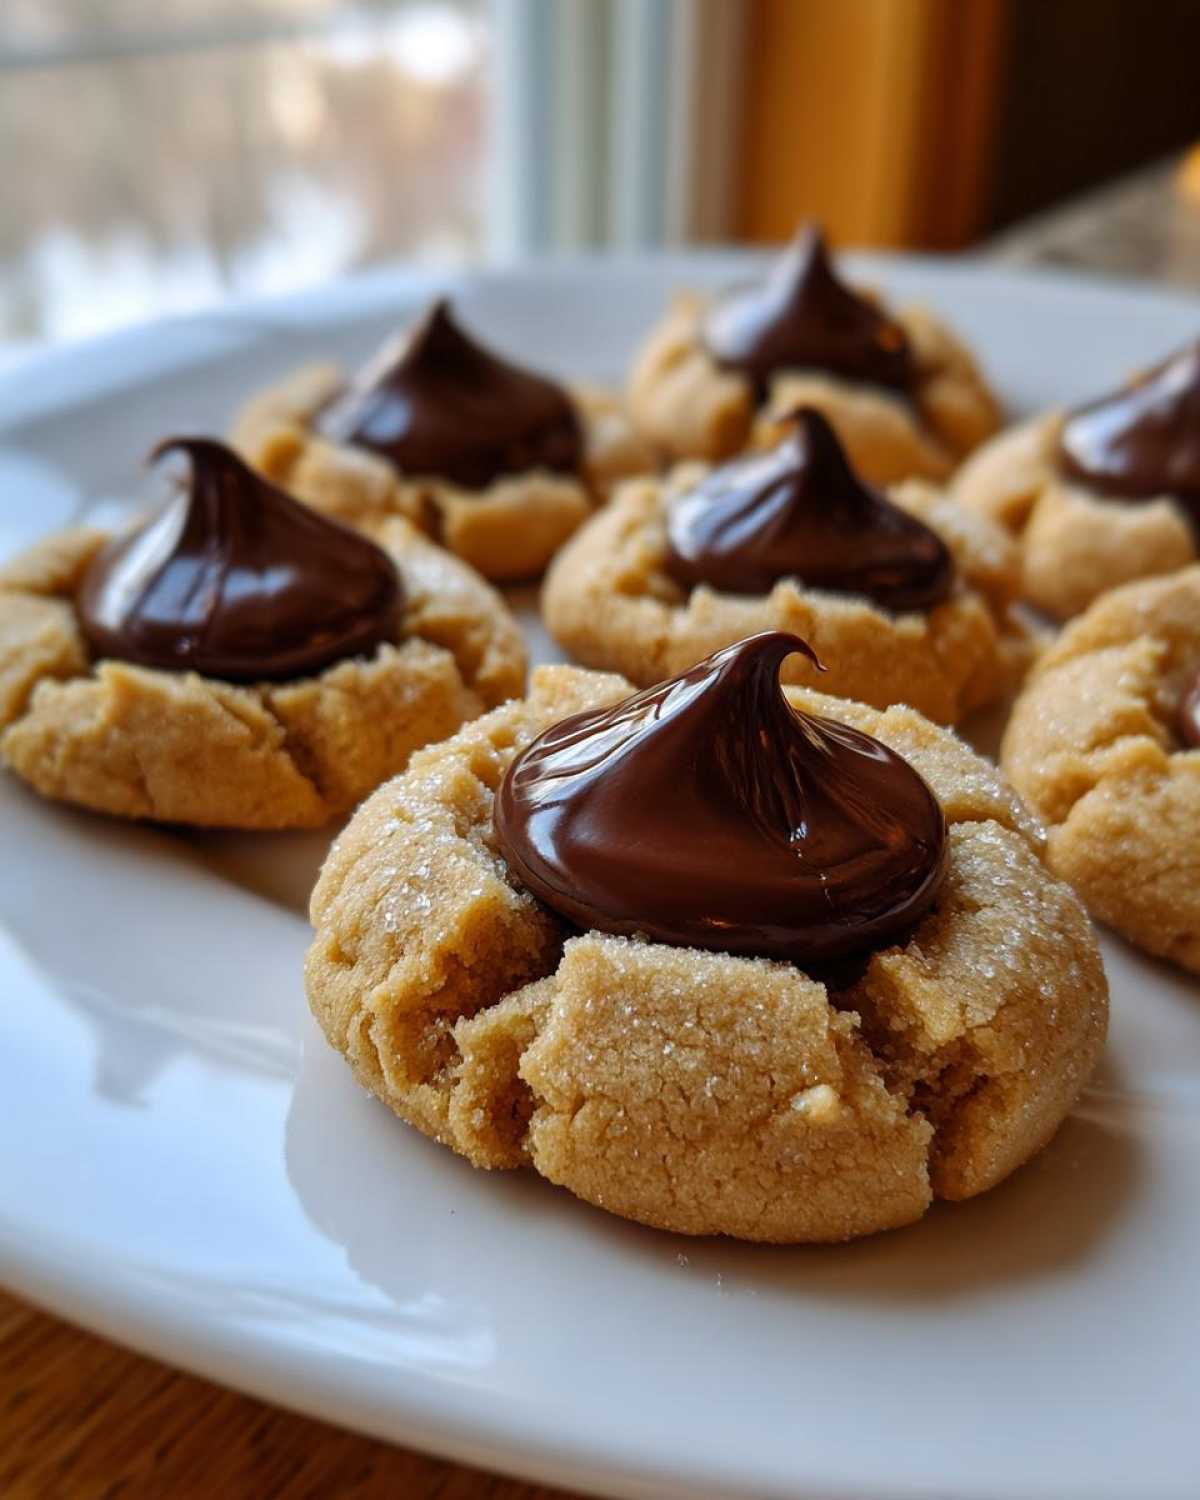
- The cookie base is beautifully soft and slightly dense in the middle.
- You get that gorgeous, crackled surface after the sugar coating melts slightly.
- The chocolate kiss sets perfectly, leaving you with a slightly fudgy center without it completely dissolving.
Gathering Ingredients for Classic Peanut Butter Blossoms
Okay, the wonderful thing about these Classic Peanut Butter Blossoms is that you probably have most of the stuff lying around already! We aren’t using any weird, fancy powders here. It’s all pantry staples we want for that truly authentic taste. I always lay everything out on the counter before I even think about turning the oven on—it keeps things moving fast later, especially since the baking time is so short!
When you look at this ingredient list, pay special attention to the kisses and the sugar—those are the non-negotiables for getting that classic look. And, yes, my recipe gives you enough for about four dozen, which is perfect for holiday cookie tins, though they usually vanish before I get to the tin stage!
- 1 cup unsalted butter, softened (Make sure it’s soft, not melted! This is crucial for creaming.)
- 1 cup granulated sugar (This is the sugar we beat into the dough.)
- 1 cup creamy peanut butter (I stick to creamy for the smoothest dough, but you can experiment if you’re feeling wild!)
- 2 large eggs
- 1 teaspoon vanilla extract
- 2 1/4 cups all-purpose flour
- 1 teaspoon baking soda
- 1/2 teaspoon baking powder
- 1/2 teaspoon salt
- About 48 Hershey’s Kisses, unwrapped (You need one for every cookie, so unwrap them all first. Ask my husband to do this part for me—it saves my sanity!)
If you happen to be making those chocolate peanut butter bars I mentioned earlier, you can find the recipe here, but stick to these ingredients for the cookies!
Step-by-Step Instructions for Soft Peanut Butter Cookies
This is where the magic happens, and honestly, it moves fast once you get going! Because these Peanut Butter Blossoms bake so quickly, your prep needs to be spot on. I always have my baking sheets lined with parchment paper ready to go before I even touch the flour. Don’t try to wing this part, or you’ll end up with unevenly baked cookies, and nobody likes a scorched bottom!
- First things first: Crank that oven up to 375 degrees F right now! Line up those baking sheets with parchment paper so they are ready for action.
- Grab your biggest mixing bowl. We need to beat the softened butter, that first full cup of granulated sugar, and the peanut butter until it looks creamy and totally combined. This aeration is important!
- Next, toss in those two eggs, one at a time, beating well after each addition, and finish it off with a splash of vanilla extract.
We need to start combining our dry stuff now, but do it gently!
Mixing the Dough for Peanut Butter Blossoms
In a separate bowl—don’t just dump it all in—whisk together your flour, baking soda, baking powder, and salt. This ensures your leavening agents are evenly distributed, which keeps the cookies from being too dense or too spread out! Once the dry ingredients are mixed, add them slowly to your wet mixture. I mean slowly. The second you dump it all in, you risk overmixing, and that’s how you get tough cookies. Stop mixing as soon as you see the last dusty streak of flour disappear. Remember those great brown butter cookies? Overmixing is the enemy there too!
Shaping and Rolling the Dough Balls
Okay, grab that second bowl with the remaining 1/2 cup of sugar. This sugar coating is what gives you those signature, beautiful crackles on top. Scoop your dough into nice, uniform 1-inch balls—a small cookie scoop is your best friend here, trust me, it keeps things consistent. Roll each ball fully until it is completely coated in that plain white sugar. You want that crust to be thick! Place them on your prepared sheets about 2 inches apart because they do spread just a little bit.
Baking and Adding the Chocolate Kiss
This is the moment that separates the good cookies from the *legendary* cookies. Bake these only for 8 to 10 minutes. I know, it seems fast! The edges must look set, but if you look closely, the center should still look slightly pale and soft, maybe even a little underdone. Why? Because we are going to finish cooking them outside the oven! Immediately pull the sheets out and gently press one unwrapped chocolate kiss right into the center of each warm cookie. The residual heat from the cookie is just enough to soften the kiss so it sinks in beautifully, giving you that iconic look without turning the chocolate into a soupy mess. If you wait even a minute too long, the kiss just sits on top, which means you waited too long!
Tips for Perfect Peanut Butter Blossoms Every Time
Look, baking is science, but with Peanut Butter Blossoms, it’s also a little bit about reading the room! I’ve learned a few tricks over the years to ensure you nail that perfect texture every time. My number one error, besides overmixing the dough, was always overbaking. If you bake them until the tops look totally done, they will absolutely harden up as they cool. I always aim for that slightly underdone center when pulling them out because that residual heat does all the final work for you.
Also, remember my note earlier about the peanut butter? While the recipe calls for creamy, feel free to swap in crunchy if you prefer a little texture surprise inside the dough. Just make sure that the peanut butter you select isn’t the super-oily natural kind you have to stir up constantly. Those oily PBs can make the cookies spread too much! For more reliable results in tricky cookie recipes, I always lean on the classic types, kind of like how I stick to my tried-and-true brown butter raspberry chocolate chip cookies when I need guaranteed success.
Achieving the Signature Soft Peanut Butter Cookies Texture
The key here is temperature control, honestly. Don’t try to bake these when your oven is running cold or fluctuating wildly; they need that steady 375 degrees F heat to bake the outside quickly while leaving the middle gooey. Make sure your oven thermometer is accurate! If you notice your cookies flattening out instantly on the sheet, your butter was probably too warm when you mixed it in. We want soft butter, yes, but it should still hold its shape somewhat before creaming.
Variations on Classic Peanut Butter Blossoms
While I will always stand by the original recipe—it’s perfect for a reason, you know?—I totally get wanting to tweak things based on what you have or who you’re baking for. Don’t let dietary needs stop you from enjoying these treats! We can make some easy swaps here that still keep the spirit of the original cookie alive. It’s all about making sure that peanut butter base is happy!
Making Gluten Free Peanut Butter Blossoms
If you need to switch things up to make Gluten Free Peanut Butter Blossoms, the good news is you don’t have to change the wet ingredients at all! Just swap out the all-purpose flour for a good quality 1-to-1 gluten-free baking blend. You want one that already contains xanthan gum if possible. Mix it in exactly how you would the regular flour. The dough might feel a tiny bit different or maybe a bit stickier, so don’t stress too much if the texture varies slightly when you roll it—it usually bakes up just as wonderfully chewy!
Serving Suggestions for Your Homemade Hershey Kiss Cookies
Once these Homemade Hershey Kiss Cookies are totally cool, the first thing I do is stand back and admire them. Seriously, they look so festive! They are the perfect little centerpiece for any holiday cookie platter, but sometimes they need a little friend next to them, right? They pair so perfectly with rich, warm beverages.
Since these are sweet but have that salty peanut butter base, they go amazingly well with something slightly spiced or perhaps a bit tangy. For true believers in festive baking, these are a star in the category of Holiday Baking Ideas. When I make a big batch, I often set up a little station with coffee and hot chocolate, and these cookies are always the first things people grab.
Speaking of coffee, if you’re making a big batch of these, you absolutely must try them alongside a really good, strong coffee drink. I’ve been obsessed with making a rich, creamy iced brown sugar latte shaken espresso lately; the sweetness of the brown sugar plays so nicely with the chocolate and peanut butter combo.
For presentation, don’t complicate things too much. These are incredibly fun Simple Dessert Treats as they are. I usually arrange them on a simple white platter to let the chocolate kiss shine. If you’re making tins for neighbors, place a small piece of wax paper between the layers. They smell fantastic just sitting on the counter, too—a true beacon of the holiday spirit!
Storage and Shelf Life for Peanut Butter Blossoms
It’s a good thing these make such great Family Favorite Cookies because they disappear fast, but if, by some miracle, you have a few left over, storage is simple. The key is to protect that chocolate kiss and keep the cookie base soft. You absolutely need an airtight container for these—no flimsy plastic bags allowed! If you stack them, slip a small piece of wax or parchment paper between the layers. This stops the kiss from sticking to the cookie above it, which is just the worst when you go to grab one later.
These Peanut Butter Blossoms stay wonderfully soft for about three to four days when stored correctly at room temperature. I find that if they sit out longer, they start to get just a little stiffer than I prefer. If you realize you’ve only got three cookies left but you know you want them next week, freezing is your best bet. You can actually freeze them with the kiss already on top! Just make sure they are completely cooled first, then pop them into a freezer-safe, airtight container. They hold up beautifully for about two months in the deep freeze. When you want one, just thaw them on the counter for about half an hour, and they taste almost just-baked!
Frequently Asked Questions About Peanut Butter Blossom Cookies
I know you’ve got questions! When you’re making something as classic as these cookies, people want to make absolutely sure they get that nostalgic perfection right. I’ve answered the most common things folks ask me about making the absolute best Peanut Butter Blossom Cookies so you can skip the guesswork. When it comes to Holiday Cookie Recipes, there’s no room for error, right?
Why do my chocolate kisses melt completely when I press them into the Peanut Butter Blossoms?
Oh, this is the number one problem I hear about! If your chocolate kisses are turning into puddles instead of setting nicely in that little crater, it almost always means one of two things. First, you baked them too long! You need to pull the cookies out when the edges look solid but the center still looks a little soft and maybe even a tiny bit underbaked. That residual heat is what does the softening job. Second, if your oven is running way too hot, that heat transfer is too intense. Trust me, a minute or two difference makes a huge deal when you’re trying to achieve that fudgy center look.
Can I make these Peanut Butter Blossoms ahead of time?
Absolutely! That’s one of the joys of these, they are fantastic for making ahead for your Christmas Cookie Favorites platter. The cookie base itself freezes really well, or you can store the plain baked cookies in an airtight container for several days. However, if you want that pristine look, I highly advise against pressing the chocolate kiss in until you are about ready to serve or box them up. The chocolate tends to get a little dull or sometimes sticks slightly to things if you press it in too early. Do the press-in step right before they hit the cookie stand!
Estimated Nutritional Data for These Simple Dessert Treats
If you’re counting macros, or just curious about what you’re enjoying, here is an estimate of the nutritional breakdown for one of these lovely Simple Dessert Treats. I always like to share this information because it helps you plan if you’re making a huge batch for a party!
Remember, this is just an estimate based on using all the standard ingredients listed—creamy peanut butter, butter, and the required sugar. If you use natural peanut butter or swap out sugar substitutes, obviously these numbers will shift! I always recommend checking out my full dietary disclaimer page for more context on how I calculate these figures.
- Serving Size: 1 cookie
- Calories: 140
- Fat: 7g (only 3g saturated)
- Carbohydrates: 18g
- Protein: 3g
- Sugar: 12g
See? Only 140 calories and they taste like pure holiday magic. They are surprisingly well-balanced for such a decadent-looking cookie! Enjoy them guilt-free—they are worth every single bite!
PrintClassic Soft and Chewy Peanut Butter Blossoms

Make soft, chewy peanut butter cookies topped with a chocolate kiss. This recipe yields classic holiday cookies quickly.
- Prep Time: 15 min
- Cook Time: 10 min
- Total Time: 25 min
- Yield: About 4 dozen cookies
- Category: Dessert
- Method: Baking
- Cuisine: American
- Diet: Vegetarian
Ingredients
- 1 cup unsalted butter, softened
- 1 cup granulated sugar, plus 1/2 cup for rolling
- 1 cup creamy peanut butter
- 2 large eggs
- 1 teaspoon vanilla extract
- 2 1/4 cups all-purpose flour
- 1 teaspoon baking soda
- 1/2 teaspoon baking powder
- 1/2 teaspoon salt
- About 48 Hershey’s Kisses, unwrapped
Instructions
- Preheat your oven to 375 degrees F. Line baking sheets with parchment paper.
- In a large bowl, beat the softened butter, 1 cup sugar, and peanut butter until creamy.
- Beat in the eggs one at a time, then add the vanilla extract.
- In a separate bowl, whisk together the flour, baking soda, baking powder, and salt.
- Gradually add the dry ingredients to the wet ingredients, mixing until just combined. Do not overmix.
- Place the remaining 1/2 cup of sugar in a shallow dish.
- Roll the dough into 1-inch balls. Roll each ball in the sugar until fully coated.
- Place the sugared balls about 2 inches apart on the prepared baking sheets.
- Bake for 8 to 10 minutes. The edges should be set but the centers should still look slightly soft.
- Immediately upon removing the cookies from the oven, press one unwrapped chocolate kiss gently into the center of each warm cookie. The heat will slightly melt the chocolate.
- Let the cookies cool on the baking sheet for 5 minutes before transferring them to a wire rack to cool completely.
Notes
- For the softest cookies, do not overbake. Remove them when the edges look set.
- If you want a slightly crisper cookie, bake for an extra minute or two.
- You can substitute creamy peanut butter with crunchy if you prefer texture in the dough.
Nutrition
- Serving Size: 1 cookie
- Calories: 140
- Sugar: 12
- Sodium: 65
- Fat: 7
- Saturated Fat: 3
- Unsaturated Fat: 4
- Trans Fat: 0
- Carbohydrates: 18
- Fiber: 1
- Protein: 3
- Cholesterol: 15


Comments are closed.