


Oh my goodness, are you ready to tackle the summer heat with something truly decadent? When the sun is blazing, nothing beats slicing into a beautiful, frosty **ice cream pie**! Forget turning on the oven—that’s sacred time I usually save for Sundays. That’s why I’m sharing this absolute winner: my No-Bake Peanut Butter version with the crunchiest **Oreo Crust Pie** base you can imagine. Trust me, I’ve tested this recipe dozens of times to make sure that peanut butter filling is perfectly balanced—creamy but sturdy enough to slice beautifully. This is pure ‘Sunday Flavor’ delivered straight to your freezer any day of the week! If you want to know more about why I traded corporate life for recipes like this, check out my story here.
Why This No-Bake ice cream pie is Your New Favorite Easy Frozen Dessert
Honestly, on those rushed weeknights, the last thing I want is to turn on the oven. That’s why this recipe is gold! It’s the definition of an Easy Frozen Dessert because you don’t have to bake anything at all. We’re talking 20 minutes of active time, and then the freezer does all the hard work. You get this incredibly Creamy Frozen Pie that tastes like it came from a fancy bakery. It’s my secret weapon for when I want maximum dessert impact with minimal Monday-through-Friday effort. If you’re looking for fast inspiration during those busy times, take a peek at what I make for lunch sometimes right here!
Quick Prep for the Best ice cream Pie Recipe
Seriously, the clock stops at 20 minutes of actual mixing and layering. Yes, you have to wait for the deep freeze, but the hands-on time is so short! This makes it a fantastic Quick Ice Cream Pie when you realize you forgot dessert for an impromptu gathering. The freezer time is just chill time for you, right?
Indulgent Flavor Combination: Peanut Butter and Chocolate
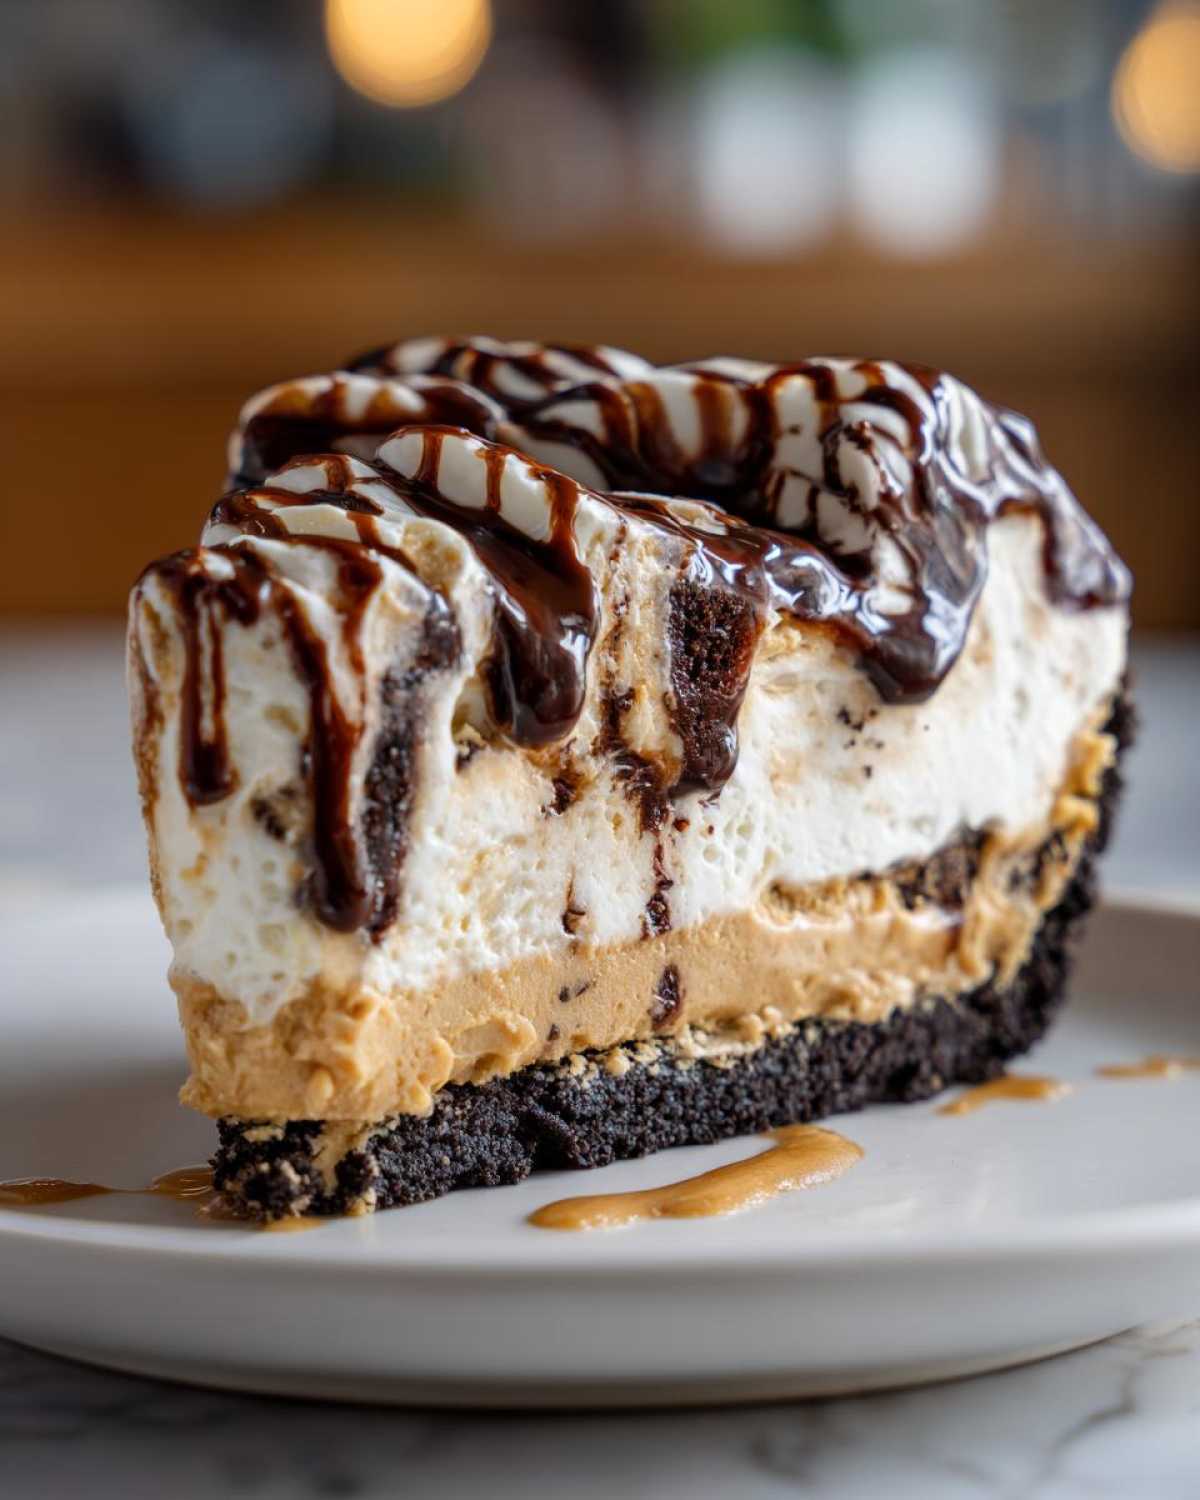
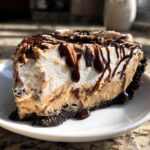
The flavor payoff here is just stunning. We have that salty, rich peanut butter mousse layer nestled right between sweet vanilla ice cream and a dark chocolate fudge swirl. It hits those sweet and salty cravings all at once! It makes this the most satisfying ice cream pie you’ll ever put in your mouth. It’s pure indulgence, perfectly layered!
Gathering Ingredients for Your Homemade ice cream Pie
Okay, let’s talk inventory! Before we start assembly, we need everything lined up, just like I do on a busy Sunday morning. Because this is a no-bake recipe, how you prep your ingredients matters a ton for that super Creamy Frozen Pie finish. Don’t worry about cooking anything, just getting things to the right temperature is key!
For the Crunchy Oreo Crust Pie Base
First up is the base that holds all the glory. You need 1 1/2 cups of crushed Oreo cookies—that’s roughly 30 cookies, give or take a few that sneak into my mouth during prep! Make sure you have 6 tablespoons of unsalted butter, melted, ready to mix it all together. That buttery mix will press into a perfect, sturdy base.
For the Creamy Frozen Pie Filling
Now for the magic layer! You’ll need one 16-ounce container of thawed whipped topping—I usually just let mine sit on the counter for about 15 minutes. Crucially, grab 1 cup of creamy peanut butter, and make sure it’s softened! If it’s cold, it won’t blend properly. Then, one 14-ounce can of sweetened condensed milk and 1 teaspoon of vanilla extract to sweeten everything up perfectly.
For Assembly and Garnish of the ice cream Pie
For the layers, grab 2 quarts (about 8 cups) of vanilla ice cream, and this is important: let it sit out for just a few minutes so it’s slightly softened—not soupy, just spreadable! You’ll also need about 1/2 cup of rich chocolate fudge sauce—use a good quality one; it really impacts the final flavor of your ice cream pie. If you’re feeling extra, grab some chopped peanuts for a little crunch on top!
Step-by-Step Instructions for This No Bake Ice Cream Pie
Alright, let’s get this masterpiece assembled! Since this is a No Bake Ice Cream Pie, the actual work is quick, but timing the freezing is our secret weapon for structure. I find laying everything out in order really helps, just like organizing my camera gear before a big shoot! Once you master this structure, you’ll find that many layered frozen treats, like my favorite no-bake cheesecake recipes, follow similar principles.
Creating and Freezing the Oreo Crust Pie
First things first, get that crust locked in. Mix your crushed Oreos and melted butter together until it looks like wet sand. You need to press this mixture firmly and evenly into the bottom and right up the sides of your 9-inch pie plate. Don’t be shy! The firmer you pack it now, the less it crumbles later. Pop that whole plate straight into the freezer while you whip up the filling. We need it rock solid!
Mixing the Peanut Butter Filling
In a big bowl, grab your softened peanut butter, the can of condensed milk, and vanilla. Beat those together until they are completely smooth. No lumps allowed! Next, take your thawed whipped topping and gently, I mean *gently*, fold it in. Stop mixing the second you don’t see white streaks anymore. Overmixing here will deflate all those beautiful air bubbles, and we want this filling super light!
Layering and Swirling the ice cream Pie
Time for layering! Take your slightly softened vanilla ice cream—remember, spreadable, not melted—and spread half of it over your frozen Oreo crust. Drizzle about half of that gorgeous chocolate fudge sauce right on top. Then, spread all of your peanut butter mixture evenly over the fudge. Top that with the rest of your ice cream. Now, take the remaining fudge and drizzle it artistically. Grab a butter knife or a skewer and just gently make waves through the top layer. See how that chocolate swirls? That’s what makes it look so gourmet!
Final Freeze Time for the ice cream Pie
Cover the pie loosely with plastic wrap—we don’t want any frost on top! Now, this needs time to set up properly. You absolutely need at least 6 hours, but honestly, go for overnight. When it’s frozen solid, you know you’ve achieved the perfect structure for slicing. You’ll thank yourself later when you go to serve your incredible ice cream pie!
Tips for Success with Your Customizable Ice Cream Pie
I love seeing how everyone makes this recipe their own! That’s the beauty of a great ice cream pie—it’s practically begging to be tweaked. Since this is such a foundational dessert, I want to share a couple of little secrets I’ve learned over the years to make sure yours turns out exactly how you need it. This is how we turn a great recipe into your personal favorite Customizable Ice Cream Pie!
Crust Swaps for Your Perfect ice cream Pie
If you aren’t completely obsessed with Oreos (though, honestly, who isn’t?), don’t sweat it! You can absolutely swap that black cookie base for a graham cracker crust. Just use the same butter ratio, and you get a totally different but equally delicious flavor profile. It pairs wonderfully with the peanut butter! If you loved the texture of pretzel crusts in other desserts, I’ve experimented with those too; you can check out my thoughts on that recipe here for inspiration!
Flavor Variations: Making it Your Own
This is where we really lean into customization! Instead of using all vanilla ice cream for those two layers, try swapping one of them out for coffee ice cream. That rich, slightly bitter note plays beautifully with the peanut butter. Also, if you’re making this for a big celebration, don’t be afraid to tuck crushed candy bars or extra cookies between the layers when you assemble it. It’s an easy way to add textural surprises!
Serving Suggestions for This Summer Ice Cream Pie Recipe
Now that your beautiful ice cream pie has finished its marathon freeze, it’s time for the best part: serving it! Since this is such a fantastic Summer Ice Cream Pie Recipe, presentation matters almost as much as taste, right? I love making things look effortlessly beautiful, even when they’re frozen solid!
My absolute number one tip before you even touch a knife is to let it rest. This is crucial for any thick, frozen dessert like this amazing Homemade Ice Cream Pie. Pull it out of the freezer and let it sit on the counter for about 5 to 10 minutes. This isn’t long enough to melt, but it allows the peanut butter filling and the ice cream layers to soften just slightly so your knife glides right through instead of chunking out messy slices. Think of it as letting the pie take a deep breath!
When it comes to finishing touches, keep it simple so those peanut butter and fudge layers remain the stars. I usually go for a quick dusting of those chopped peanuts we talked about earlier. But if you need something extra special for a party, try:
- A dollop of fresh whipped cream right on top of each slice—it gives a lovely temperature contrast.
- A drizzle of extra, slightly warmed fudge sauce—it looks glossy and inviting.
- For a truly vibrant look, maybe some fresh raspberry sauce drizzled over the plate, not the pie itself. It looks so professional!
If you’re looking for other refreshing, make-ahead drinks to serve alongside this frozen treat during the heatwave, you should check out the recipe for my frozen peach rose slushy; it’s a real game-changer for those hot days! You can find that recipe here. Enjoy every cool, creamy bite!
Make Ahead Dessert and Storage for Your ice cream Pie
This is perhaps my favorite part about this whole incredible ice cream pie: it is the ultimate Make Ahead Dessert! I mean, that’s why we love frozen treats, right? You can completely take the stress out of dessert planning for a big crowd or a busy week. Since this lovely creation needs a long chill time anyway, I always make mine a day or two ahead of time when things are a little calmer.
This recipe is honestly solid for up to two weeks in the freezer based on my experience. But, you have to wrap it right, or you’ll end up with little crunchy ice crystals all over your beautiful peanut butter layer. We want that texture to stay dreamy and soft!
The key to excellent freezer storage for any Homemade Ice Cream Pie is using two layers of protection. First, put a sheet of plastic wrap right on top of the pie—we’re talking touching the surface of the fudge swirl. This prevents freezer odors from seeping in and stops condensation from forming on the surface. Then, wrap the entire pie plate tightly in a layer of aluminum foil. Keep it toward the back of your freezer where the temperature stays the most consistent.
If you’re interested in whipping up some fantastic make-ahead breakfast options for the rest of your week—because who doesn’t love waking up to something already done?—I have a bunch of great no-fuss ideas over on my breakfast page!
Troubleshooting Common ice cream Pie Issues
Even the best recipes hit a snag sometimes, right? Mostly, with an ice cream pie, the issues come down to temperature control—or lack thereof! Since we aren’t baking, we have to be super mindful of how cold or soft everything is at every single stage. Don’t panic if something feels a bit off; I’ve been there, staring into the freezer wondering where I went wrong. We can usually fix these little hiccups!
If your crust is crumbling when you try to slice it, it usually means you didn’t press it firmly enough, or you skipped the vital step of freezing it solid before layering. Remember, a firm crust is your foundation! Also, if you’re doing a lot of substitutions, that can change the chemistry, so stick to the recipe the first few times you make it. For everything else, I’m happy to help troubleshoot. If you ever just need to chat about recipe disasters or successes, feel free to reach out to me!
Why is my Peanut Butter Filling too Stiff?
Oh, this is a classic freezing problem! If you taste that peanut butter layer and it feels more like a frozen block of peanut butter instead of that beautiful, Soft and Creamy Frozen Pie texture we’re aiming for, I can usually pinpoint the culprit. It happens when the whipped topping—you know, the Cool Whip—is either too cold when you fold it in, or you accidentally knocked all the air out of it during mixing.
Whipped topping is delicate! If it’s too icy, it won’t incorporate smoothly into the thick peanut butter and condensed milk mixture. It just stays in icy little chunks. If you overmix it trying to get rid of the chunks, you deflate the air, and then it freezes rock hard. My rule? Work quickly, fold gently, and ensure that whipped topping is fully thawed but still cold!
Frequently Asked Questions About Making an ice cream Pie
I always get so many great questions after posting a recipe, and that’s wonderful! It just means you’re getting ready to make this incredible dessert. Here are the top things readers ask me all the time about creating the perfect ice cream pie.
Can I use Homemade Ice Cream in this ice cream Pie Recipe?
Absolutely! If you’ve got a stash of delicious homemade vanilla ice cream, please use it! The most important thing—whether it’s store-bought or your own amazing creation—is making sure it’s just slightly softened before you layer it. We need it soft enough to spread nicely into those layers so we end up with that smooth, gorgeous texture we talked about, not a frozen block that tears up your crust!
What is the best way to get clean slices of ice cream pie?
This is the eternal struggle with any frozen dessert! To get those Instagram-worthy, clean slices of your Homemade Ice Cream Pie, you need hot water. Before you cut, grab a long, sharp knife and plunge the blade into a tall glass of boiling water for about 10 seconds. Wipe the knife completely dry—this is essential! Then make your slice. The heat melts just enough of the ice cream and filling around the knife edge to release perfectly. Wipe and reheat the knife for every single slice!
Is this considered a Dessert for Parties?
Oh, 100%! This is one of my go-to recipes for entertaining because it ticks every box for a perfect Dessert for Parties. It’s completely no-bake, which saves your oven for appetizers, and since it must be made ahead, you literally have zero worries on party day except pulling it out of the freezer to temper! It serves eight easily, so it handles a crowd beautifully.
If you need more information on the process or just want to read general disclaimers about ingredients and substitutions, you can always check out my official policy page right here!
Nutritional Estimates for This Indulgent Frozen Dessert
Alright, now I know not everyone wants the deep dive into calories and sugar when they’re planning a happy dessert day, but since so many of you ask, I wanted to share the estimations I pulled together for this incredible ice cream pie. Please, take these numbers as a general guide, okay? Because this is a rich, Indulgent Frozen Dessert, relying on condensed milk, peanut butter, and Oreos, the numbers are definitely on the generous side—which is exactly what we want for a celebratory treat!
These figures are calculated based on slicing the recipe to yield 8 perfect servings. If you manage to stretch it to 10, these numbers will drop, but honestly, who stops at one slice of this deliciousness?
Here is the breakdown based on my standard ingredient use:
- Serving Size: 1 slice
- Calories: 550
- Sugar: 55g
- Sodium: 350mg
- Fat: 35g (including 15g Saturated Fat)
- Carbohydrates: 58g
- Protein: 10g
As you can see, this Peanut Butter Ice Cream Pie packs a punch! It’s definitely one of those desserts you plan for, not one you eat every day. But remember, the joy of cooking isn’t just about the macros; it’s about the memory you create when you pull that massive, frozen, chocolate-swirled treat out of the freezer!
PrintNo-Bake Peanut Butter Ice Cream Pie with Oreo Crust
Make this easy, creamy, no-bake peanut butter ice cream pie featuring a crunchy Oreo crust. It is a perfect make-ahead dessert for parties or a simple, indulgent frozen treat.
- Prep Time: 20 min
- Cook Time: 0 min
- Total Time: 6 hr 20 min
- Yield: 8 servings
- Category: Dessert
- Method: No-Bake
- Cuisine: American
- Diet: Vegetarian
Ingredients
- 1 1/2 cups crushed Oreo cookies (about 30 cookies)
- 6 tablespoons unsalted butter, melted
- 1 (16 ounce) container frozen whipped topping, thawed (like Cool Whip)
- 1 cup creamy peanut butter, softened
- 1 (14 ounce) can sweetened condensed milk
- 1 teaspoon vanilla extract
- 2 quarts (about 8 cups) store-bought or homemade vanilla ice cream, slightly softened
- 1/2 cup chocolate fudge sauce, for swirling and topping
- 1/4 cup chopped peanuts, for garnish (optional)
Instructions
- Prepare the crust: In a medium bowl, combine the crushed Oreo cookies and melted butter. Press the mixture firmly and evenly into the bottom and up the sides of a 9-inch pie plate. Place the crust in the freezer while you prepare the filling.
- Make the peanut butter filling: In a large bowl, beat together the softened peanut butter, sweetened condensed milk, and vanilla extract until smooth.
- Fold in the whipped topping: Gently fold the thawed whipped topping into the peanut butter mixture until just combined. Do not overmix.
- Assemble the pie: Spread half of the slightly softened vanilla ice cream evenly over the frozen Oreo crust. Drizzle about half of the chocolate fudge sauce over the ice cream layer. Spread the entire peanut butter mixture over the ice cream and fudge layer. Top with the remaining vanilla ice cream.
- Swirl and freeze: Drizzle the remaining chocolate fudge sauce over the top layer of ice cream. Use a knife or skewer to gently swirl the fudge into the top layer of ice cream. Cover the pie loosely with plastic wrap.
- Freeze until firm: Freeze the ice cream pie for at least 6 hours, or preferably overnight, until completely firm.
- Serve: Before serving this easy frozen dessert, let the pie sit at room temperature for 5 to 10 minutes to allow for easier slicing. Garnish with chopped peanuts, if desired. Slice and enjoy your homemade ice cream pie.
Notes
- You can substitute the Oreo crust with a graham cracker crust for a different flavor profile.
- For a richer flavor, use coffee ice cream instead of vanilla for one of the layers.
- If you want to make this a customizable ice cream pie, layer in crushed candy bars or cookie pieces between the ice cream layers.
- This is a great make ahead dessert; it keeps well in the freezer for up to two weeks.
Nutrition
- Serving Size: 1 slice
- Calories: 550
- Sugar: 55
- Sodium: 350
- Fat: 35
- Saturated Fat: 15
- Unsaturated Fat: 20
- Trans Fat: 0.5
- Carbohydrates: 58
- Fiber: 2
- Protein: 10
- Cholesterol: 45


Comments are closed.