


Oh, listen to me, you absolutely HAVE to try making your own *homemade caramel*!
There is nothing—and I mean NOTHING—like that first bite of a warm, buttery square that you made yourself. It’s pure magic! For years, I thought candy making was this impossible, scary thing you only trusted to professionals. I even scorched a batch once that smelled like burnt tires, honestly! But I finally cracked the code on the absolute best soft, chewy homemade salted caramel candy, and I swear, it changed my kitchen forever.
The best part? This recipe is a miracle worker because we aren’t just making candy here. If you pull the pot off the heat just a little sooner, bam! You have the most luxurious, best homemade caramel sauce you’ve ever drizzled over ice cream or, let’s be real, eaten with a spoon straight from the jar. It’s genuinely a two-for-one deal that I want everyone to master. Trust me, once you nail the temperatures, you’ll feel like a kitchen wizard!
Why This is the Best Easy Homemade Caramel Recipe
I know the phrase “candy making” makes people nervous, but I promise you this is the easy homemade caramel recipe you’ve been hunting for! Forget complicated techniques; this works perfectly for a beginner caramel recipe, provided you respect one thing: the thermometer.
This isn’t the kind of recipe where you can just guess; it’s how we guarantee those luxurious, melt-in-your-mouth caramels we all dream about. Knowing exactly when to pull the pot off the heat separates the chewy perfection from the hard toffee disaster. I’ve read about so many people struggling, but honestly, once you watch that temperature climb, you’re golden. If you want to know more about my time spent perfecting kitchen hobbies, check out my journey here!
Achieving Soft and Chewy Caramels Perfection
The magic ingredient, besides the butter, is precision. We are aiming for that sweet spot of 248 degrees Fahrenheit. That target ensures your homemade caramel candy sets up beautifully firm enough to cut but remains wonderfully soft inside, giving you those satisfyingly soft and chewy caramels. Too low, and you’ll have soup; too high, and they turn into candy rocks! That specific number locks in the perfect yielding texture every single time you make this buttery batch.
Ingredients for Soft and Chewy Homemade Salted Caramel Candy
Okay, let’s talk supplies! When you’re making something this decadent, you can’t just grab anything. I always line up my ingredients—mise en place is key here, even though we’re just making candy. You need high-quality stuff because there aren’t enough ingredients to hide behind!
For this homemade caramel, you’re going to need the following things, and please pay attention to my notes about preparation! They really matter:
- 1 cup granulated sugar – Just regular white sugar is perfect for this starting base.
- 1 cup light corn syrup – This is crucial, guys! It stops the sugar from crystallizing, keeping your homemade caramel smooth.
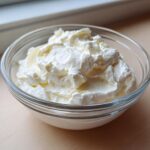
- 1 cup heavy cream – Make sure this is warmed gently in a separate little pot before you add it. Cold cream into hot sugar is a recipe for disaster, trust me!
- 1 cup unsalted butter, cut into 1-inch pieces – You need it cut up so it melts evenly into the mixture later on. Butter equals flavor!
- 1 teaspoon vanilla extract – Add this right at the very end when everything is off the heat.
- 1/2 teaspoon salt, plus more for topping – Generous sprinkling of flaky salt on top gives you that fantastic salted caramel flavor contrast.
Step-by-Step Instructions for Homemade Caramel
Alright, let’s get down to business! This is where the magic truly happens, and with these steps, I’m giving you my no fail caramel tutorial. Don’t rush the heat! We are essentially making beautiful, rich, homemade caramel, and that takes a little focused time on the stove. Grab your heavy saucepan—I really like using my thick-bottomed one because it distributes heat so evenly—and let’s get cooking.
Preparing the Pan and Initial Sugar Cook
First things first, get your pan ready! Take that 8×8 inch dish and line it completely with parchment paper, making sure you leave lots of overhang on the sides. Think of those overhangs as little handles for lifting the whole batch out later! Give the paper a super light greasing too. Next, in your saucepan, combine the sugar and corn syrup. Over medium heat, stir gently until you can’t see any sugar crystals clinging to the bottom anymore. As soon as it starts bubbling, you have to stop stirring completely! Let it go until your candy thermometer sighs quietly at 245 degrees Fahrenheit. This initial stage builds the caramel foundation for your homemade caramel.
Incorporating Dairy and Reaching Final Temperature for Homemade Caramel
While that sugar mix is heating, you should have already warmed up your heavy cream until it’s just steaming, right? Once that sugar hits 245°F, pull the pan off the heat immediately. Now, this next part requires concentration: slowly, slowly drizzle in that warm cream while whisking. It’s going to bubble up like crazy, so stand back a little! Whisk until it calms down and everything looks uniform. After that, start knocking in those pieces of butter, one at a time, waiting for each piece to melt in before adding the next. Once the butter is dissolving, put the pot back on medium-low heat. Stir constantly! We need to reach 248°F for our perfect homemade caramel candy consistency. This is the secret to those amazing chewable centres.
Cooling and Cutting Your Buttery Caramel Sweets
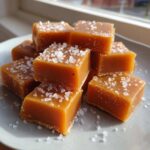
When 248°F hits, yank it off the heat permanently! Stir in the vanilla and that half-teaspoon of salt—sniff that aroma! Pour the glorious, hot liquid into your waiting parchment-lined pan. Sprinkle the top enthusiastically with a little extra salt for a pretty finish and great taste. Now comes the hard part: waiting! Let it cool completely at room temperature for at least three hours. Honestly, leave it alone overnight if you can! Once it’s rock solid, use those parchment handles to lift the whole slab out. Now you can bring out your sharp, lightly oiled knife and cut them into little squares. Remember to wrap these beauties individually in wax paper right away—that’s the secret to keeping your buttery caramel sweets from sticking together, especially if they are destined for holiday sharing later on. You can check our terms of service if you have questions about your baking results!
Turning Your Homemade Caramel into Sauce
Okay, here’s the amazing trick for when you want a river of golden sweetness instead of a chewy block! Remember how we cooked the candy caramel to 248 degrees? For the best homemade caramel sauce, we stop the cooking process much sooner. You want to pull the mixture off the heat when the thermometer reads 235 degrees Fahrenheit.
That slightly lower temperature keeps the sugar base softer and pourable. Also, a little secret for the sauce version: instead of using the full cup of heavy cream we used for the candy, you actually only need about a half cup! Whisk that in slowly after you hit 235°F. If you’re curious about how we handle user data while you’re here getting all these great recipes, you can read about it on our privacy policy page. Keep stirring until smooth, and boom—you have a luscious, perfect caramel topping for ice cream or coffee!
Tips for Guaranteed Gourmet Homemade Candy Success
Even though this recipe is designed to be straightforward, candy making always benefits from a little extra insider knowledge. These quick fixes and flavor boosters are what elevate a good batch of homemade caramel to truly gourmet homemade candy status. I wouldn’t share them if I hadn’t tested them thirty times myself!
First up: what if your candy thermometer decides to stage a tiny protest and won’t read right or you just don’t trust it? Don’t panic! You can always use the ice water test. Drop a tiny bit of your bubbling caramel into a glass of ice water. If it immediately forms a ball that holds its shape and feels pliable when you squish it between your fingers, you’re good to go for the candy stage. If it dissolves or is too soft, let it cook longer!
Next, let’s talk color and richness. If you want a deeper, almost molasses-like flavor—perfect for the holidays—try swapping out the granulated white sugar for dark brown sugar. It’s a fantastic way to boost the flavor profile of your homemade caramel. But here’s the catch: brown sugar is already a bit more moist, so you need to watch your temperature closely. You might find it browns a little faster, so keep that eye glued to the thermometer when you make that substitution, just like we talk about being mindful on our site disclaimer page.
Also, remember that salt is your friend! Don’t skimp on that final sprinkle over the top while the caramel is still cooling in the pan. That flaky sea salt breaking through the buttery sweetness makes all the difference between ‘nice’ and ‘absolutely addictive’ caramel.
Storage and Presentation for Caramel Candy for Gifting
Now that you’ve made this incredible, soft, melt-in-your-mouth homemade caramel, we have to talk about keeping it perfect and presenting it beautifully! If you’re making these as caramel candy for gifting—which, hello, everybody wants these—presentation is everything. But even if you’re just stashing them away for yourself, we need to protect that beautiful, soft texture.
When the caramel has cooled completely and you’ve cut it into those perfect squares, they will be slightly tacky, even though they held their shape. If you just toss them all into a container together, they’ll melt into one giant, glorious, but ultimately disappointing brick of sugar the next day! Don’t let that happen!
The #1 absolute secret to keeping your soft and chewy caramels separate and perfect is wrapping them individually. You want wax paper, not plastic wrap. Plastic wrap hates cold caramel and will try to stick to it aggressively. Cut small squares of wax paper—maybe 3 or 4 inches square works well—and wrap each piece snugly, twisting the ends like little candies. It feels like it takes forever, but honestly, this is what maintains that professional quality.
For shelf life, these honest-to-goodness homemade caramel treats last quite well at room temperature in an airtight tin for about two weeks. If your kitchen is super warm or humid, they might soften a little too much. If that’s the case, you can pop them in the fridge, but let them come to room temperature for about 20 minutes before serving. Cold caramel is always much harder!
If you’re packaging them up for someone special, stack the individually wrapped pieces layered between sheets of slightly larger parchment or wax paper inside a cute tin or box. That separation prevents them from getting sweaty against each other. You can even tie a pretty ribbon around the whole tin—it makes these simple homemade sweets look like gourmet goodies. It’s amazing what a little wax paper and effort can do for your homemade caramel presentation! If you want to know more about how we manage cookies and data usage around the site, make sure to check out our cookie policy page before you go!
Serving Suggestions for Your Homemade Caramel Sauce
So, you made the sauce! Congratulations, you little kitchen genius! Now, the fun part: the immediate consumption phase. Honestly, I’ve walked right past the ice cream just to spoon a bit of this warm homemade caramel sauce into my coffee—don’t judge!
But if you want to be slightly more civilized about it, this sauce is the ultimate drizzle. Think about drizzling it generously over vanilla bean ice cream; it sets just slightly when it hits the cold, which I adore. It’s the perfect rich, buttery caramel topping for ice cream! Warm it up slightly, and it’s incredible poured over waffles or pancakes instead of maple syrup, too. When you have this level of simple, gorgeous flavor, you have to show it off! If you have any questions for me, feel free to reach out through the contact page—I love hearing how you all use my recipes!
Frequently Asked Questions About Making Homemade Caramel
It’s totally normal to have a few worries when you decide to tackle something like making candy from scratch. I remember being so nervous about ruining a huge batch of sugar! But honestly, most issues pop up because of a very small slip-up early on. Here are the things I get asked about most often when people are trying out this homemade caramel recipe for the first time. If you’re looking for other sweet things to make soon, check out my baking page here!
Can I make this old fashioned caramel recipe without a candy thermometer?
Yes, you absolutely can, especially if you’re trying this old fashioned caramel recipe for the very first time and don’t own a thermometer yet! As I mentioned earlier, the key is the ice water test. The trick is to drop a very small spoonful of the hot mixture into a bowl of ice water without splashing. If you can pull it out and easily form a soft, pliable ball that squishes nicely between your fingers, you’ve hit that perfect ‘soft and chewy’ zone we are aiming for!
Why did my homemade caramel crystallize or become grainy?
Oh, the dreaded graininess! This almost always comes down to stirring when you shouldn’t be, or introducing something sharp to the sugar. Remember when I said to stop stirring once the sugar boils? That’s critical. Crystals form easily when sugar molecules get agitated or if a stray sugar granule splashes onto the side of the pot above the liquid line and then falls back in. Make sure your pan sides are clean, or if you see any tiny sugar crystals forming on the edge, swipe them down very gently with a wet pastry brush!
How do I ensure my caramels are truly soft and chewy?
This question gets right to the heart of the matter! If you want perfectly soft and chewy caramels, you must trust your candy thermometer. The absolute non-negotiable temperature for these homemade caramel squares is 248 degrees Fahrenheit when you take the mixture off the final time (after the butter is incorporated). If you let it climb to 250°F or higher, the sugar shifts into a harder candy stage, and those lovely chewable qualities disappear. Stick rigidly to 248°F, and you’ll get that perfect, buttery pull every single time!
Estimated Nutrition for This Homemade Caramel Recipe
Now, I know we are making these luxurious, buttery treats because they taste amazing, not because they’re health food! But I always like giving you the rundown just in case you need to log it or you’re trying to be mindful during the holidays. Please remember that this information is just an estimate based on the ingredients list we used earlier, and it uses a serving size of just one little square of the finished homemade caramel candy. If you sneak a few extra—which, let’s be honest, I usually do—the numbers go up, naturally!
Here’s a quick peek at what a single one of these incredible soft and chewy caramels contains, based on about 60 squares total:
- Serving Size: 1 square
- Calories: About 110 calories
- Total Fat: Roughly 5 grams
- Total Carbohydrates: Around 17 grams
- Sugar: Expect about 16 grams of pure, delicious sugar!
Since we used a good amount of real butter to guarantee that fantastic texture, the fat content is something to note, but it is what makes them rich and keeps them from drying out. For the sweet tooths out there, the sugar content is high, as you’d expect from any great candy! If you’re making these for a big party or for cookie exchanges, you can always find other dinner-time recipes on my dinner page when you need a savory break!
PrintSoft and Chewy Homemade Salted Caramel Candy
Make soft, chewy salted caramel candies from scratch. This recipe is simple enough for beginners and yields a rich, buttery confection that can also be adapted into a versatile sauce.
- Prep Time: 15 min
- Cook Time: 30 min
- Total Time: 3 hours 45 min
- Yield: About 60 pieces
- Category: Candy
- Method: Stovetop Cooking
- Cuisine: American
- Diet: Vegetarian
Ingredients
- 1 cup granulated sugar
- 1 cup light corn syrup
- 1 cup heavy cream
- 1 cup unsalted butter, cut into pieces
- 1 teaspoon vanilla extract
- 1/2 teaspoon salt, plus more for topping
Instructions
- Line an 8×8 inch pan with parchment paper, leaving an overhang on the sides for easy removal. Lightly grease the paper.
- Combine the sugar and corn syrup in a heavy-bottomed saucepan over medium heat. Stir until the sugar dissolves completely.
- Stop stirring once the mixture boils. Cook until the mixture reaches 245 degrees Fahrenheit on a candy thermometer, which should take about 10 to 15 minutes.
- While the sugar cooks, gently heat the heavy cream in a separate small saucepan until it is warm, but not boiling.
- Remove the sugar mixture from the heat. Carefully and slowly whisk in the warm heavy cream. The mixture will bubble vigorously. Continue whisking until smooth.
- Add the butter pieces one at a time, whisking until each piece is fully incorporated before adding the next.
- Return the saucepan to medium-low heat. Cook, stirring constantly with a wooden spoon or heat-proof spatula, until the mixture reaches 248 degrees Fahrenheit. This stage takes about 5 to 8 minutes.
- Remove from heat. Stir in the vanilla extract and 1/2 teaspoon of salt.
- Pour the hot caramel into the prepared pan. Sprinkle the top lightly with extra salt. Let it cool completely at room temperature for at least 3 hours, or until firm.
- Once firm, lift the caramel out using the parchment overhang. Cut into 1-inch squares. Wrap individually in wax paper for gifting or storage.
Notes
- To make caramel sauce: After step 6, if you prefer a sauce consistency, stop cooking when the mixture reaches 235 degrees Fahrenheit. Stir in the vanilla and salt, then slowly whisk in 1/2 cup of heavy cream instead of the full cup. Use immediately or store in the refrigerator.
- If you do not have a candy thermometer, the caramel is ready for the next step when a small drop placed in ice water forms a firm, pliable ball.
- For a deeper flavor, use dark brown sugar instead of granulated sugar, but reduce the cooking time slightly.
Nutrition
- Serving Size: 1 square
- Calories: 110
- Sugar: 16g
- Sodium: 45mg
- Fat: 5g
- Saturated Fat: 3g
- Unsaturated Fat: 2g
- Trans Fat: 0g
- Carbohydrates: 17g
- Fiber: 0g
- Protein: 0g
- Cholesterol: 15mg

Comments are closed.