


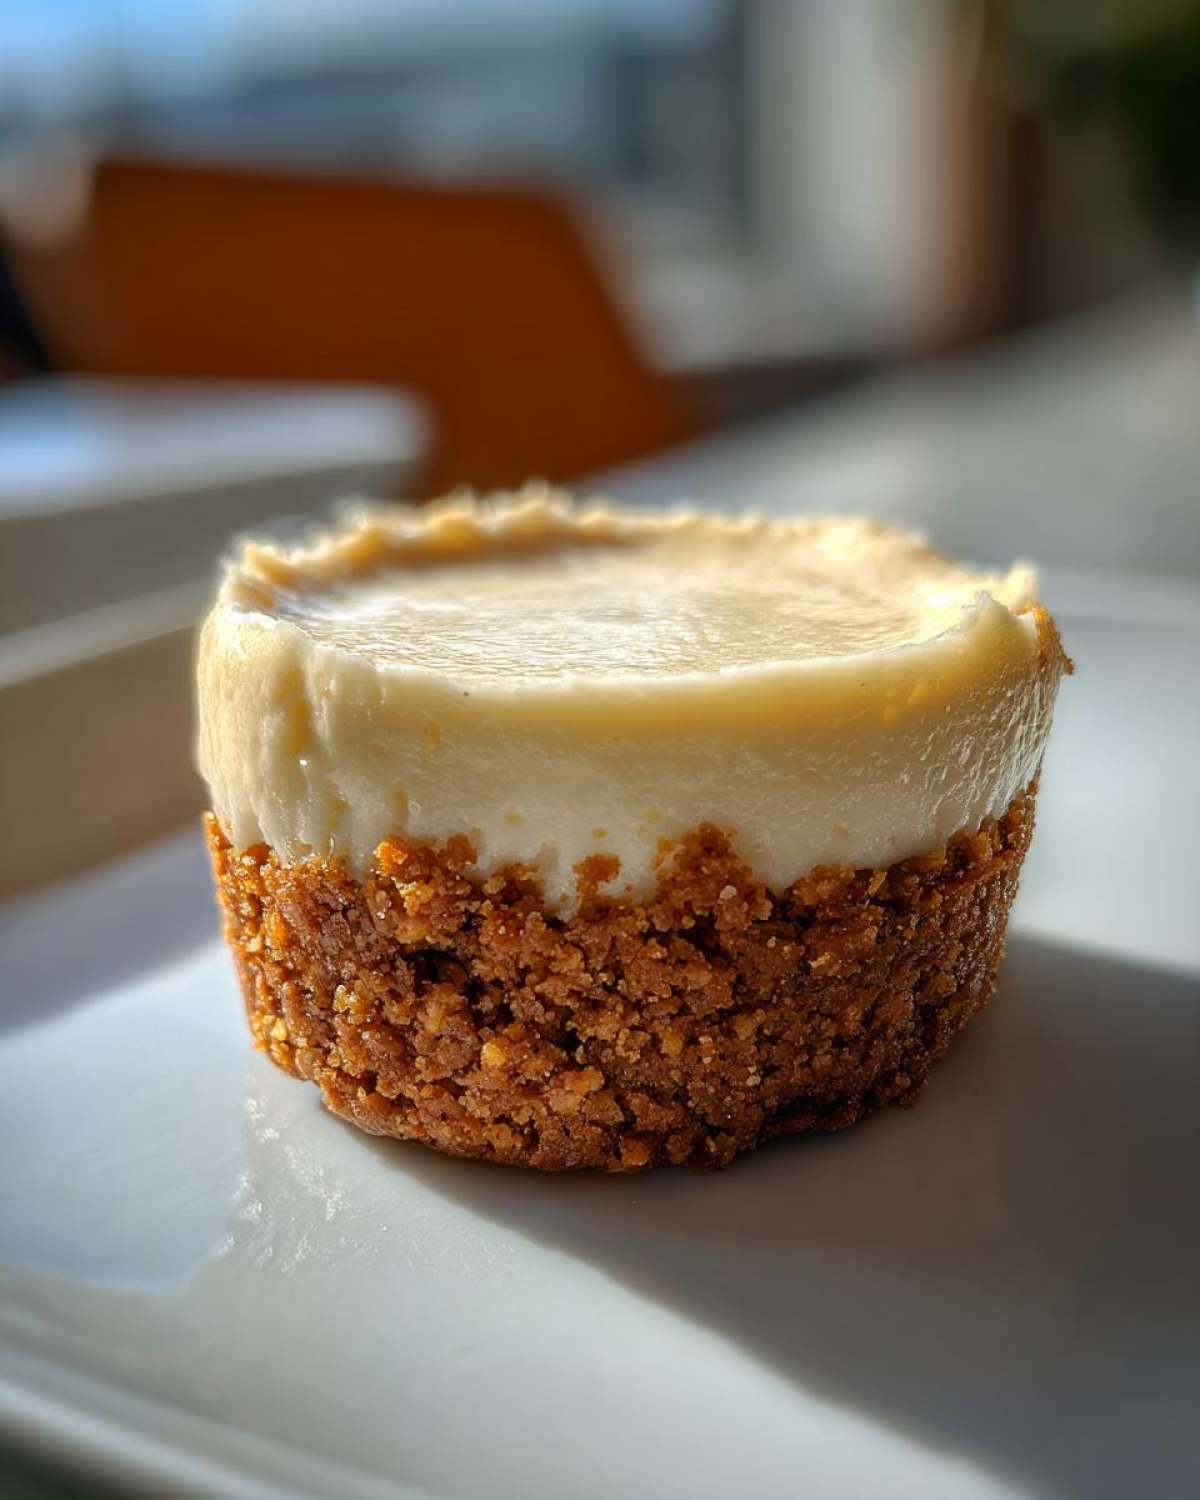
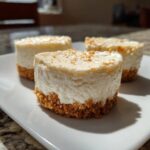
When you need a dessert that disappears lightning-fast at any gathering, you absolutely have to go small. Forget slicing giant pies! I live for making these perfect little rounds. Seriously, I think I’ve made three batches this month alone because everyone begs for them. If you’re looking for the very best easy mini cheesecake recipe—the one guaranteed to get you asked for the instructions—this is it. They deliver that rich, creamy New York style flavor we all obsess over, but they bake up right in a standard muffin tin. Truly, these bite sized cheesecake wonders are my go-to party desserts!
Why This Is the Best Easy Mini Cheesecake Recipe
I’ve tried the no-bake versions, I’ve tried the fancy water bath methods, and honestly? This simple baked recipe wins every single time. They are just perfect for taking anywhere, which makes them ideal party desserts. Plus, baking them in paper liners means zero fuss when it comes to cleanup!
- They bake up reliably just like homemade mini cheesecake versions—no cracking!
- The crust is a snap using crushed graham crackers and comes out perfectly firm.
- They come together incredibly fast, making them great quick dessert ideas.
- These are the ultimate bite sized cheesecake portions for controlling servings.
- You can grab a healthy strawberry swirl variation later if you want!
Essential Ingredients for Creamy Mini Cheesecake Bites
Okay, let’s talk supplies, because even simple cheesecake bites rely on quality ingredients. You can’t fake that dense, creamy mini cheesecake flavor, trust me. For the crust, you need about a cup and a half of graham cracker crumbs—I just crush mine right in the Ziploc bag! Mix that with 6 tablespoons of butter that’s been melted down perfectly, and a quarter cup of regular white sugar.
For the filling, this is where the magic happens. You absolutely must use 16 ounces of cream cheese, and it has to be fully softened. If you rush this, you’ll get lumps, and nobody wants lumps in their individual cheesecake desserts! You’ll need two large eggs, just a half cup of sugar for sweetening, and a full teaspoon of vanilla extract for that beautiful background note. That’s it! Simple, but powerful.
Step-by-Step Instructions for Your Homemade Mini Cheesecake
Putting these together is nearly as satisfying as eating them! Since we’re using a standard muffin tin for these individual cheesecake desserts, the process moves super fast. Just follow my lead here, especially when it comes to cooling, because that’s the secret to keeping those pretty tops smooth!
Preparing the Graham Cracker Crust Cheesecake Base
First thing’s first: heat that oven up to 325°F (that’s 160°C). You need to line your 12-cup muffin tin with those little paper liners—don’t skip that step! Once your crust mixture is combined (the crumbs, melted butter, and a quarter cup of sugar), grab about a tablespoon and a half of it. Press it down firmly into the bottom of each liner. I use the back of a small spoon for this to make sure it’s really packed in there. Pop that crust into the hot oven for just 5 minutes to set it, then pull it out and let it hang out while we make the filling.
Mixing the Creamy Mini Cheesecake Batter
Now for what I consider the most important part for getting that smooth, creamy mini cheesecake texture: beating the cold out of the cream cheese! Get your mixer going and beat the softened cream cheese until it’s totally lump-free and velvety smooth. Then, slowly add that last half cup of sugar and beat until it’s just combined. Remember, we are *gently* incorporating the next bits! Add your two eggs one at a time—a quick mix after each one is plenty. Stir in the vanilla by hand so you don’t whip too much air in there. Less mixing equals less cracking later!
Baking and Cooling the Individual Cheesecake Desserts
Spoon that gorgeous batter evenly over the cooled crusts, making sure you only fill them about three-quarters of the way up. Bake them for about 18 to 20 minutes. How do you know they’re done? The edges will look set, but the very center should still have a tiny bit of wobble left. Now, here’s the golden rule to prevent cracks: turn the oven OFF, crack the door open a tiny bit, and let them just sit in that residual heat for a full 30 minutes. Don’t rush it! After that slow cool-down, take them out, let them come to room temp, and then chill them for at least two hours before you even think about adding any delicious topping!
Tips for Perfect New York Style Mini Cheesecakes
If you are chasing that ultra-dense, sophisticated texture found in true New York style mini cheesecakes, you need to pay attention to a couple of things before you even grab the mixer. First, make sure your cream cheese and eggs are truly at room temperature. I usually pull mine out first thing in the morning if I plan on baking in the afternoon. Cold ingredients just don’t emulsify properly, giving you that slightly grainy texture we are trying to avoid here.
The other huge tip, which I mentioned above but deserves shouting out again, is the cooling process. Don’t just yank them straight from the 325°F oven to a cold counter! That temperature shock causes them to shrink too fast and crack. Baking these individual cheesecake desserts slowly inside the turned-off oven is the key to perfection. Follow that method, and your small portion desserts look like they came straight from a fancy bakery!
Creative Cheesecake Topping Ideas for Your Mini Cheesecake
This is my favorite part! Once your amazing homemade mini cheesecake bites are perfectly chilled—and only then!—it’s time to make them truly yours. Half the fun of making these in a muffin tin is how easy it is to customize every single one. You can have chocolate lovers covered on one side of the party tray and fruit fans thrilled on the other. These cheesecake topping ideas really let your creativity shine when you’re finishing up your small portion desserts.
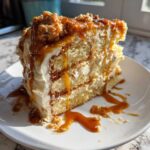
For a classic, crowd-pleasing look, you can’t go wrong with fresh fruit. Just a quick dollop of whipped cream with a gorgeous slice of strawberry or a few bright raspberries makes them look elegant. If you need something richer, try drizzling on a thick layer of chocolate ganache. Seriously, just melting good quality chocolate chips with a splash of heavy cream will make the best chocolate mini cheesecake you’ve ever had!
If you want something gooey and decadent, caramel sauce works wonders. Maybe try topping half with caramel and sprinkling on a few flaky sea salt crystals for that salty-sweet hit? Don’t forget that you can mimic other treats too! If you love chocolate chip cookies, you can crush up some of my brown butter cookies and press those right on top of the caramel layer. Honestly, the possibilities for cheesecake topping ideas are endless once you master that creamy base!
Variations: Oreo Mini Cheesecakes and Other Flavors
Once you’ve got the core of this recipe down, you can totally start playing around with flavors! That’s the beauty of these individual cheesecake desserts; the basic graham cracker crust cheesecake formula is so solid that it holds up to almost anything you throw at it. I usually have someone asking for Oreo mini cheesecakes at every party, and they are so easy to pivot to.
To pivot to the Oreo mini cheesecakes? Simple switch! Instead of mixing up the graham cracker crumbs for the crust, you just crush up about a cup and a half of Oreos—make sure you leave the filling in, that butter glue works perfectly! Press that right into the muffin tin liners and follow the base steps, starting with the blind bake. I find the Oreo crust gets a little darker under the heat, so watch it closely during that initial 5 minutes.
What if you want a chocolate mini cheesecake instead? That’s a batter change, and it’s a winner every time. Take about two tablespoons of your dry cocoa powder—use a good unsweetened kind—and whisk it right into your dry ingredients (the flour/crumb mix) before you add the butter. Or, if you want a deeper, richer chocolate experience, whisk a tablespoon of cocoa powder right into the wet cheesecake batter alongside the vanilla! You’ll get this gorgeous, dark batter that bakes into the richest little handheld desserts.
If you’re looking for something truly festive, check out my recipe for Red Velvet Cheesecake Bites when you’re feeling adventurous—it uses a similar base but adds that beautiful cocoa red hue for holidays or special occasions!
Storage and Reheating Instructions for Small Portion Desserts
Luckily, these individual cheesecake desserts are fantastic make-aheads, which is why they are the best party desserts! Once they are totally chilled, you want to keep them in an airtight container in the fridge. They stay perfectly creamy and delicious for about four to five days. That’s great if you need to prep ahead of time!
Now, here’s the thing about cheesecake—reheating small portion desserts isn’t really necessary. They are meant to be served cold or just slightly cool. If you happen to eat one that’s rock solid straight from the fridge, just let it sit on the counter for about 15 minutes before diving in. That little bit of warming brings out the best of the creamy texture!
Frequently Asked Questions About Mini Cheesecake
I always get so many questions whenever I bring these out because everyone wants to know my secrets for perfect homemade mini cheesecake! Here are a few of the things I hear most often whenever people try making these handy little delights.
Can I make a no bake mini cheesecake version?
That’s a common request! While this delicious recipe is baked—which gives you that sturdy, creamy mini cheesecake texture—you absolutely *can* make a no bake version. For a no bake mini cheesecake cups, skip the oven steps entirely. You’ll press the crust mixture into your muffin tin and chill for 30 minutes to set it. Then, you’d mix the cream cheese filling with powdered sugar instead of granulated sugar, and use something like dissolved gelatin or whipped topping to help it firm up in the fridge without baking. It’s good, but trust me, the baked version is better for that true New York style flavor!
Do I really need the paper liners for my muffin tin cheesecake?
Yes, please use the liners! They aren’t just for easier cleanup, although that’s a major perk for these party desserts. Since these are little handheld desserts, the liners help the sides set firmly without sticking to the metal. If you tried to make these cheesecake bites directly in a greased muffin tin, removing the delicate crust without it crumbling would be a nightmare. If you’re out of liners, you can use very liberally greased parchment paper cut into little squares to line the cups, but honestly, the liners are worth keeping stocked up for quick dessert ideas.
What is the simplest way to prevent cracking?
Preventing cracks in your homemade mini cheesecake is all about gentle handling, especially during the cooling phase. The number one tip I swear by helps achieve that perfect, smooth look: the slow cool-down inside the turned-off oven for 30 minutes, door cracked open. This lets the temperature drop gradually. Also, make sure you really beat the cream cheese until it’s silky smooth *before* adding the eggs, and then only mix until the eggs are just barely incorporated. Overmixing adds air bubbles that expand and then collapse, causing cracks!
What if I want to try a chocolate mini cheesecake variation?
Oh, I love when people get creative! If you want a richer chocolate mini cheesecake, you can modify the batter easily. Whisk in about two tablespoons of high-quality unsweetened cocoa powder right into your softened cream cheese mixture when you add the sugar. It gives you this gorgeous, deeper flavor profile that contrasts beautifully with the typical graham cracker crust cheesecake base. You can find inspiration for other chilled treats like my minted ice cream swirls to use as a topping later if you wanted something really fun!
Nutritional Estimate for One Mini Cheesecake Bite
Everyone always asks about the damage, right? Because these are individual cheesecake desserts, it’s super easy to keep track of portions, which is great for keeping those party totals low! I want to be super clear, though: the numbers below are just an estimate for one single serving, based on the standard ingredients listed in the recipe with a plain graham cracker crust—no fancy toppings added here.
If you decide to go heavy on the caramel drizzle or add a thick chocolate topping, those values are going to jump up a bit, so keep that in mind when you’re counting calories on your amazing homemade mini cheesecake!
- Serving Size: 1 cheesecake bite
- Calories: 210
- Fat: 14 grams
- Saturated Fat: 8 grams
- Carbohydrates: 18 grams
- Sugar: 15 grams
- Protein: 4 grams
- Cholesterol: 55 mg
These estimates use standard measurements for the full-fat cream cheese and granulated sugar, so they reflect the creamy mini cheesecake experience perfectly. Enjoy them guilt-free, because they are small portions, after all!
Share Your Bite Sized Cheesecake Creations
I truly hope you get to whip up a batch of these easy mini cheesecakes soon! They are just such showstoppers for any gathering, and they are so simple to manage when you’re trying to serve a crowd. Once you’ve made that perfect creamy mini cheesecake filling and they’ve chilled properly, I really want to see what you do with them!
Please, if you try this recipe, take a star rating for me on the side of the recipe card. It helps other busy bakers find this simple cheesecake recipe! And if you end up making some killer cheesecake topping ideas—maybe you tried a salted caramel explosion or a lemon curd swirl—snap a picture and tag me on social media! I absolutely love seeing how you customize your handheld desserts. You can also check out my recipe for the Ultimate Party Subs if you need a savory option to balance out all this sweetness!
So, tell me, what topping will you choose for your first batch of mini cheesecake?
PrintEasy Mini Cheesecake Bites
Make simple, creamy, bite-sized cheesecakes using a muffin tin. This recipe is perfect for parties and allows for many topping variations.
- Prep Time: 15 min
- Cook Time: 20 min
- Total Time: 2 hours 35 min
- Yield: 12 servings
- Category: Dessert
- Method: Baking
- Cuisine: American
- Diet: Vegetarian
Ingredients
- 1 1/2 cups graham cracker crumbs
- 1/4 cup granulated sugar
- 6 tablespoons unsalted butter, melted
- 16 ounces cream cheese, softened
- 1/2 cup granulated sugar
- 2 large eggs
- 1 teaspoon vanilla extract
Instructions
- Preheat your oven to 325°F (160°C). Line a standard 12-cup muffin tin with paper liners.
- In a small bowl, combine the graham cracker crumbs, 1/4 cup sugar, and melted butter. Mix until the crumbs are evenly moistened.
- Press about 1 1/2 tablespoons of the crumb mixture firmly into the bottom of each liner to form the crust. Bake the crusts for 5 minutes. Remove from the oven and let them cool slightly.
- In a large bowl, beat the softened cream cheese with an electric mixer until smooth. Add the remaining 1/2 cup sugar and beat until combined.
- Beat in the eggs one at a time, mixing just until incorporated after each addition. Stir in the vanilla extract. Do not overmix.
- Spoon the cheesecake batter evenly over the cooled crusts, filling each liner about three-quarters full.
- Bake for 18 to 20 minutes, or until the edges are set and the centers are mostly firm.
- Turn off the oven, crack the oven door open slightly, and let the cheesecakes cool inside the oven for 30 minutes. This prevents cracking.
- Remove the cheesecakes from the oven and let them cool completely on a wire rack. Chill in the refrigerator for at least 2 hours before serving.
Notes
- For a New York style texture, use full-fat cream cheese and avoid overmixing the batter.
- Top these bites with fresh berries, chocolate ganache, or a drizzle of caramel after they are chilled.
- If you prefer an Oreo crust, substitute 1 1/2 cups of finely crushed Oreo cookies for the graham cracker crumbs.
Nutrition
- Serving Size: 1 cheesecake bite
- Calories: 210
- Sugar: 15
- Sodium: 180
- Fat: 14
- Saturated Fat: 8
- Unsaturated Fat: 6
- Trans Fat: 0
- Carbohydrates: 18
- Fiber: 1
- Protein: 4
- Cholesterol: 55
Comments are closed.