


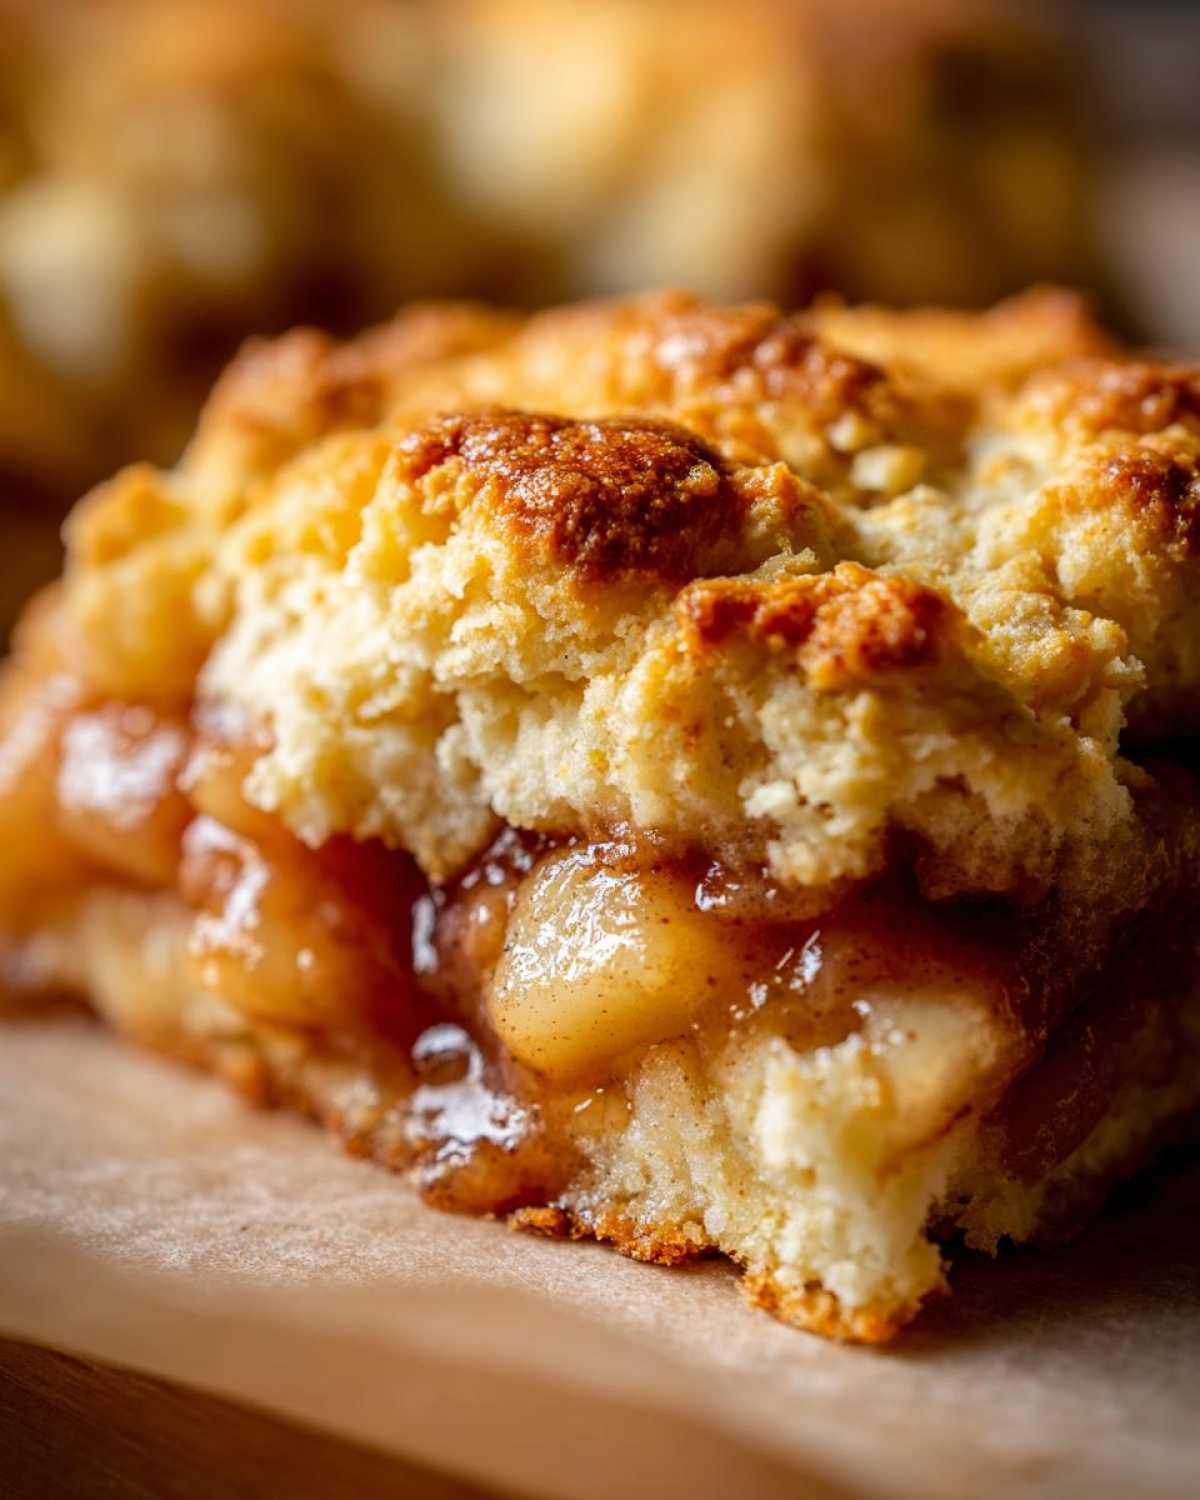
When the air gets crisp and you just crave something warm and deeply comforting, honestly, nothing beats a bubbling fruit dessert straight from the oven. Forget complicated pies or fussy cakes—my absolute go-to when I need a quick, show-stopping **apple cobbler** is this version right here. This isn’t just any dessert; it’s my **Easy Old-Fashioned Apple Cobbler with a Buttermilk Biscuit Topping**, and trust me, it’s the best. I’ve made countless batches for fall gatherings and holiday potlucks because it’s incredibly simple but tastes like it took all day. The cinnamon-spiced apples are tender, and that topping? It’s pure, buttery gold.
Why This Easy Apple Cobbler Recipe is a Comfort Food Dessert Favorite
If you’re looking for a dessert that delivers huge cozy vibes without demanding hours of your precious time, this is it! I lean on this recipe whenever I need **Quick Dessert Ideas**, especially when unexpected guests drop by. It’s my secret weapon for achieving that genuine, homemade **Comfort Food Dessert** feel, instantly.
Here is why this particular **apple cobbler** always wins in my kitchen:
- Speedy Prep: We’re talking minimal chopping and mixing. You can toss this together faster than you can decide what movie to watch.
- Perfect Apples: The filling cooks down until you get incredibly tender, beautifully **cinnamon spiced apples**. No tough chunks here, I promise!
- That Topping: Since it uses a buttermilk biscuit base, the topping bakes up golden, slightly crisp on top, and stays wonderfully tender underneath. It’s miles better than a standard crisp topping.
- Crowd Pleaser: Honestly, because it’s so easy to scale up or down, it’s the perfect **apple dessert for a crowd**, and it makes your house smell amazing while baking.
If you’ve ever made my five-ingredient soup, you know I love simplicity that shines. This cobbler follows the same ethos—simple ingredients resulting in something truly special.
Gathering Ingredients for Your Old Fashioned Apple Cobbler
Okay, assembling the ingredients is my favorite part because it feels like gathering treasures before a cozy baking session. This **Old Fashioned Apple Cobbler** relies on simple pantry staples, but the quality of your apples really matters, so pay attention!
When choosing fruit for this recipe, I almost always reach for a mix. Granny Smith holds its shape beautifully and gives you that essential tartness, which is perfect against the sweet filling. If you want a slightly softer texture, Honeycrisp works wonders too. But whatever you pick, make sure they’re peeled, cored, and sliced up—aim for about a quarter-inch thick. This thickness ensures those **Cinnamon Spiced Apples** get meltingly tender without turning to mush before the topping is done.
You’ll need two main groups of ingredients ready before you even think about mixing. Don’t forget that cold butter for the topping; getting it ready now saves time later!
For the Cinnamon Spiced Apples Filling
- 6 medium apples (like Granny Smith or Honeycrisp), peeled, cored, and sliced
- 1/2 cup granulated sugar
- 1/4 cup packed light brown sugar
- 2 tablespoons all-purpose flour
- 1 teaspoon ground cinnamon
- 1/4 teaspoon ground nutmeg
- 1 tablespoon lemon juice
- 1/4 cup (4 tablespoons) cold unsalted butter, cut into small pieces
For the Buttery Cobbler Topping
This topping is where things get really fun. We are cutting cold butter right into the dry mix for that gorgeous, flaky lift on the biscuit topping. If you want the best **Buttery Cobbler Topping**, your butter truly needs to be icy cold.
- 1 1/2 cups all-purpose flour
- 2 tablespoons granulated sugar
- 1 tablespoon baking powder
- 1/2 teaspoon salt
- 1/2 cup cold buttermilk
- 1 large egg, beaten (for brushing)
- 1 tablespoon coarse sugar (for sprinkling)
If you love perfecting ingredients like I do, you might enjoy seeing how I handle butter in my brown butter cookie recipe—it’s all about treating that fat right!
Step-by-Step Instructions for the Best Apple Cobbler
You are going to be astonished at how quickly this comes together. Since we want that golden, bubbly perfection, start by getting your oven warmed up to 375°F (190°C). While it heats, casually grease up a 9-inch square baking dish.
Preparing the Apple Filling and Dish
Now for the stars! Grab that big bowl and toss those sliced apples with both sugars, the two tablespoons of flour, that gorgeous cinnamon, nutmeg, and just a splash of lemon juice. You want everything evenly coated in those **Cinnamon Spiced Apples** spices. Once mixed well, pour this mixture right into your prepared dish and spread it out flat. This is a little trick Grandma taught me: take that cold butter you cut up earlier and dot those little pieces all over the top of the apples. They melt down while baking and enrich the bottom of the fruit layer.
Making the Buttery Cobbler Topping Dough
This is key for that incredible **Buttery Cobbler Topping** texture! In a separate bowl, whisk together the 1 1/2 cups flour, sugar, baking powder, and salt until they are totally combined. Then, grab your pastry blender or just use your fingertips (make sure those hands are cold!) and cut in the cold butter until it looks like coarse crumbs—you still want small pebbles of butter in there, don’t worry about getting it super fine.
Pour in that cold buttermilk and stir it just until a shaggy dough forms. Stop mixing immediately! Seriously, you don’t want smooth dough here; overmixing makes tough biscuits, and we want tender ones. Think ‘just combined.’
Assembling and Baking Your Apple Cobbler
Take spoonfuls of that shaggy topping and just drop them randomly over the apples. Don’t stress about covering every single gap—those holes let the apple steam escape and keep the filling bubbling nicely. Brush the tops of those biscuits lightly with your beaten egg and sprinkle on that coarse sugar for sparkle and crunch!
Bake for about 40 to 45 minutes. You’ll know it’s done when the filling is sputtering violently around the edges and the biscuit topping is deeply golden brown. Let it rest for about 15 minutes before diving in. If you want to see another great use of baking time, check out my instructions for cinnamon quick bread!
Expert Tips for a Perfect Apple Cobbler Every Time
So you have your **apple cobbler** baking, but how do you guarantee it lands in the ‘Best Apple Cobbler’ category? It all comes down to a few small details I learned over years of testing. First, let’s talk about that topping lift! Keeping your butter and your buttermilk ice-cold is non-negotiable. Those tiny, distinct pieces of butter create pockets of steam when they hit the hot filling, which is exactly what gives you that light, slightly flaky lift in your biscuit topping. Don’t skip the egg wash either; that’s what gives you that gorgeous, deep golden color on top!
To prevent a soggy bottom, make sure you dot the top of the apples with those small cubes of cold butter *before* putting the dough on. That tiny bit of melted butter steam helps seal things up.
Also, if you happen to be out of buttermilk—it happens to me all the time!—don’t worry. Just take regular milk, stir in a half teaspoon of white vinegar, and let it sit for five minutes. It turns into a perfect substitute!
If you’re obsessed with great texture, you absolutely have to check out my guide on getting that perfect crunch on my buttermilk waffles—the principles for that airy texture are surprisingly similar to getting lift in this cobbler topping!
Serving Suggestions for Your Warm Apple Dessert
This **Warm Apple Dessert** is genuinely best served still warm from the oven—I mean, who doesn’t love that steam wafting up? While it’s fantastic on its own, let’s be real, what’s an **apple cobbler** without something cold melting right over the top?
The classic move is a big, generous scoop of high-quality vanilla ice cream. The contrast between the hot, cinnamon-spiced fruit and the cold cream is just heavenly. That’s why I always mention **Serving Apple Cobbler with Ice Cream** in my notes!
If you’re feeling slightly lighter (or just out of ice cream), a big dollop of freshly whipped cream is fantastic. It catches the spices perfectly. If you happen to have some homemade ice cream on hand, like my fresh minted white chocolate swirl, that makes it an even more special occasion dessert!
Storage and Reheating Instructions for Leftover Apple Cobbler
This **apple cobbler** is so good you might actually have leftovers—which, lucky you! If you have any left, cover the baking dish tightly with plastic wrap or foil, or transfer it into an airtight container. It keeps beautifully at room temperature for about a day. After that, I always recommend moving it to the fridge, where it stays good for another three or four days.
Now, reheating is crucial for keeping that **Buttery Cobbler Topping** happy! The microwave works if you are in a huge rush, but honestly, it turns the topping a little soft. For the best results—to re-crisp that glorious crust—pop a slice onto a baking sheet and heat it at 350°F (175°C) for about 8 to 10 minutes. It heats the fruit through and crisps the biscuit right back up. This is the only way to enjoy it the next day!
Variations on This Simple Fruit Cobbler Recipe
Part of the joy of making a base recipe like this **Simple Fruit Cobbler** is knowing you can twist it throughout the seasons! While the core spiced apple filling is perfect, sometimes I just don’t want apples again, or maybe I want to lean into a different spice profile. Don’t feel like you have to stick to the script—that’s just my starting point!
If you’re trying to use up fruit from a late-summer haul, this topping base works like a charm with other fillings. Try swapping out half, or even all, of the apples for firm pears or a mix of blackberries and peaches. The baking time might shift slightly depending on the fruit’s water content, but the biscuit topping handles it beautifully.
For spice lovers, I always recommend experimenting with the flavor. A half teaspoon of cardamom mixed in with the cinnamon adds this amazing floral warmth that feels really sophisticated—but still cozy! If you want something with a little bite, try replacing the nutmeg with a pinch of ground ginger. The ginger plays so well with the brown sugar in the filling.
If you’re feeling adventurous with savory pairings, you might be surprised by how versatile fruit can be. I love seeing people rethink fruit pairings, kind of like how I took a standard sandwich and turned it into a sweet-and-savory blackberry peach grilled cheese! Just think about what flavors complement the spice you choose.
Another great trick is adding a splash of pure vanilla extract directly into the fruit mixture along with the lemon juice. It just deepens everything else beautifully, making the whole dish taste richer without adding any actual fat or sugar.
Frequently Asked Questions About Making Apple Cobbler
I get so many messages about this **apple cobbler**—it seems everyone wants to make sure their first batch is absolutely perfect! It’s the most popular of my **Fall Baking Recipes**, so I’ve put together the questions I answer most often.
What apples are best for apple cobbler?
This is the most common question! For the **Best Apple Cobbler**, you absolutely need apples that hold their shape when baked, so they don’t turn into applesauce. My favorite combination is Granny Smith for tartness and Honeycrisp or Fuji for a bit of sweetness and great texture. If you only use sweeter apples, you might find your filling tastes a little flat, so adding that splash of lemon juice is crucial for balancing things out, just like we did in the recipe!
Can I make the topping ahead of time?
You can prep the dry ingredients for the **Buttery Cobbler Topping** ahead of time, sure, but I strongly advise against mixing the buttermilk in until you are ready to bake. As soon as the flour hits the liquid, the leavening agent (baking powder) starts working, and you lose that wonderful lift we are aiming for. Plus, if you try to store the mixed dough, the butter warms up, and you lose the tenderness that makes this topping so special.
How do I prevent the apples from being too tart?
While I love a little tartness, if you are worried about the final product being too sharp, you can easily adjust it! You have two cups of sugar total in the filling! Try swapping about a quarter cup of your granulated sugar for an extra quarter cup of dark brown sugar. The molasses content in the brown sugar adds a deeper, richer sweetness that counters the tartness of the Granny Smiths better than white sugar alone. Speaking of apples, if you love that cozy flavor, you might also adore my recipe for apple cider doughnuts!
Can this be made ahead of time for a party?
Yes, this is a great **Apple Dessert for a Crowd** because you can assemble the whole thing—apples layered, topping dropped on top—and cover it tightly. Keep it in the fridge for up to 12 hours. Just before you need to serve it, let it sit on the counter for about 30 minutes while the oven preheats. Baking time might need an extra 5 to 10 minutes since it’s starting colder, but it works beautifully!
Nutritional Estimates for This Apple Cobbler
Okay, so nobody is making this glorious, buttery, spiced creation because they are worried about calories, right? Let’s be honest! But I always think it’s helpful to have a rough idea of what goes into this amazing **comfort food dessert**. These numbers are just estimates, of course, because one person’s Granny Smith is another person’s massive Honeycrisp, and the exact amount of butter that ends up in my topping versus yours can vary slightly.
Generally speaking, this is a rich, satisfying end to any meal, perfect for those cozy autumn nights. If you are looking for something lighter but still delicious, you might want to check out my trick for making healthier zucchini bread, which uses a similar mindset about balancing richness!
Here is the breakdown for what I estimate one generous serving of this **apple cobbler** comes out to be:
- Serving Size: 1 serving
- Calories: 380
- Sugar: 35g
- Fat: 16g (with about 10g of that being saturated fat, thanks to that amazing butter!)
- Carbohydrates: 60g
- Protein: 5g
- Sodium: 250mg
Remember, this is based on 6 servings. If you stretch it to 8 portions, those numbers come down nicely! Either way, enjoy every spoonful, especially when you top it with that cold vanilla ice cream!
PrintEasy Old-Fashioned Apple Cobbler with Buttermilk Biscuit Topping

Make this simple apple cobbler featuring tender, cinnamon-spiced apples covered with a rich, buttery biscuit topping. It is a comforting dessert perfect for any gathering.
- Prep Time: 20 min
- Cook Time: 45 min
- Total Time: 65 min
- Yield: 6 servings
- Category: Dessert
- Method: Baking
- Cuisine: American
- Diet: Vegetarian
Ingredients
- 6 medium apples (like Granny Smith or Honeycrisp), peeled, cored, and sliced
- 1/2 cup granulated sugar
- 1/4 cup packed light brown sugar
- 2 tablespoons all-purpose flour
- 1 teaspoon ground cinnamon
- 1/4 teaspoon ground nutmeg
- 1 tablespoon lemon juice
- 1/4 cup (4 tablespoons) cold unsalted butter, cut into small pieces
- 1 1/2 cups all-purpose flour
- 2 tablespoons granulated sugar
- 1 tablespoon baking powder
- 1/2 teaspoon salt
- 1/2 cup cold buttermilk
- 1 large egg, beaten (for brushing)
- 1 tablespoon coarse sugar (for sprinkling)
Instructions
- Preheat your oven to 375°F (190°C). Lightly grease a 9-inch square baking dish.
- In a large bowl, combine the sliced apples, granulated sugar, brown sugar, 2 tablespoons of flour, cinnamon, nutmeg, and lemon juice. Toss gently until the apples are evenly coated.
- Pour the apple mixture into the prepared baking dish and spread it into an even layer. Dot the top of the apples with the small pieces of cold butter.
- Prepare the topping: In a separate medium bowl, whisk together the 1 1/2 cups of flour, 2 tablespoons of sugar, baking powder, and salt.
- Cut in the cold butter using a pastry blender or your fingers until the mixture resembles coarse crumbs.
- Pour in the cold buttermilk and stir just until a shaggy dough forms. Do not overmix.
- Drop spoonfuls of the biscuit dough evenly over the top of the apples. You do not need to cover the entire surface; gaps are fine.
- Brush the tops of the biscuits lightly with the beaten egg and sprinkle with coarse sugar.
- Bake for 40 to 45 minutes, or until the topping is golden brown and the apple filling is bubbly and tender when pierced with a fork.
- Let the cobbler cool for at least 15 minutes before serving.
Notes
- Serve this dessert warm. It pairs well with a scoop of vanilla ice cream or a dollop of whipped cream.
- You can substitute the buttermilk with regular milk mixed with 1/2 teaspoon of white vinegar, letting it sit for 5 minutes before using.
- For a different flavor, use half apple and half pear in the filling.
Nutrition
- Serving Size: 1 serving
- Calories: 380
- Sugar: 35
- Sodium: 250
- Fat: 16
- Saturated Fat: 10
- Unsaturated Fat: 6
- Trans Fat: 0
- Carbohydrates: 60
- Fiber: 4
- Protein: 5
- Cholesterol: 55


Comments are closed.