


Listen, if you’re still cracking open that can of stuff that smells vaguely of cinnamon and wishes—stop right now! I’m serious. Store-bought apple filling is just sad. It turns into watery mush inside the crust every single time. I learned that lesson the hard way during my very first Thanksgiving attempt. That disaster is exactly why I worked overtime to nail down **The Best Easy Stovetop Apple Pie Filling (Thick & Gooey)**.
This recipe is my absolute go-to when I need something rich, glossy, and bursting with real fall flavor. We’re talking perfectly cooked apples, that deep molasses note from brown sugar, and spices that smell like home. The best part? You whip up this amazing homemade apple pie filling right on the stove in less than 30 minutes. Trust me, once you try this vibrant recipe, you won’t ever think about going back to the can again!
Why This Homemade Apple Pie Filling Recipe Beats the Can (E-E-A-T Focus)
Look, store-bought jars are convenient, I get it, but they cheat us out of the best part: control! When you’re making your own Homemade Apple Pie Filling Recipe on the stovetop, you are the boss of the entire experience. I can ensure I’m using crisp, fresh apples, not those sad, mushy things that sometimes sneak into the cans. Plus, we get to use real, packed brown sugar.
That brown sugar is non-negotiable for me. It gives the sauce a rich, caramel background note that plain white sugar just can’t replicate. It turns a good filling into something truly spectacular and deep. This simple switch ensures you get that lovely, rich color and taste. If you want that truly Thick and Gooey Apple Filling everyone raves about, homemade is the only way to go because you control the thickness!
I’ve tested this version countless times, and the stovetop method guarantees the apples cook just right—softened, but never dissolving into baby food. If you’re looking for deep expertise on getting dessert elements just right, check out my baking philosophy; it guides everything I do here in the kitchen.
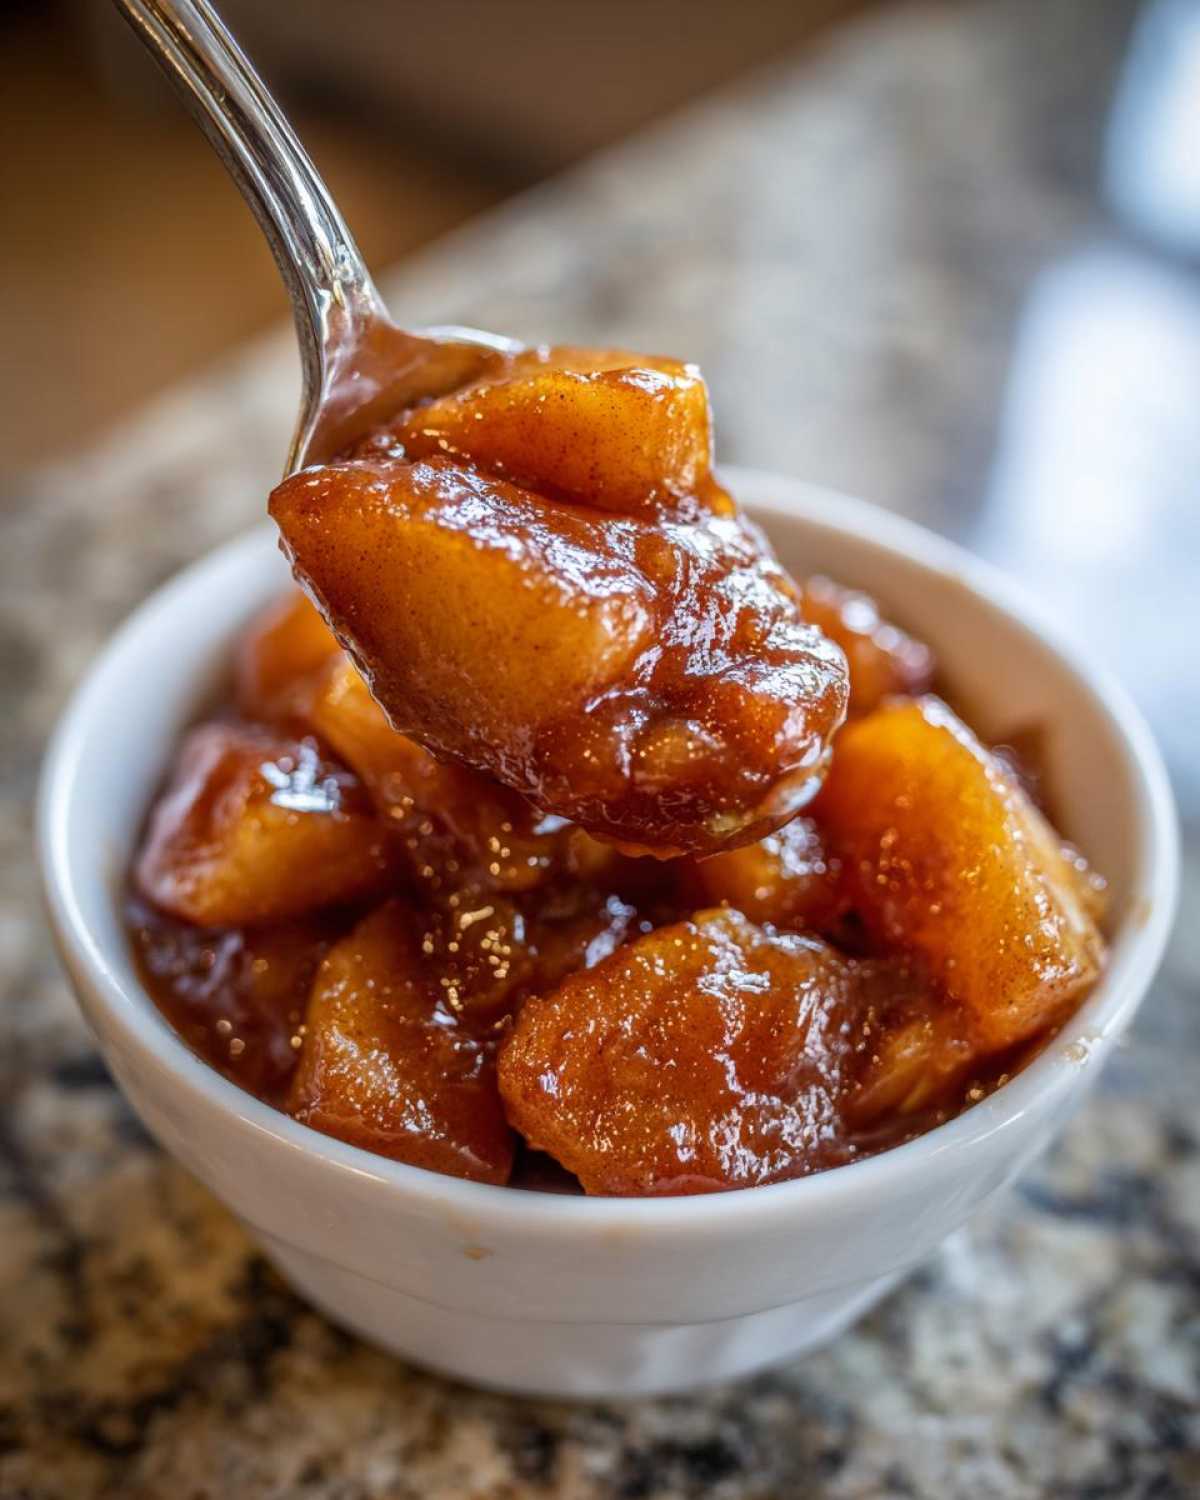
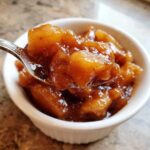
Achieving That Perfect Thick and Gooey Apple Filling Texture
The secret weapon here to prevent that watery mess is cornstarch, plain and simple. But you can’t just dump it in there, oops! You have to whisk it thoroughly with *both* sugars and the spices *before* adding any liquid or apples. Make sure that mixture is completely smooth and there are absolutely no white clumps hiding at the bottom of the pan.
When you heat everything up, the cornstarch activates, grabbing onto all that delicious apple juice and creating that beautiful, glossy sheen that coats every slice. It’s this careful mixing process that guarantees you end up with a luscious, thick apple pie filling that holds its shape perfectly when sliced, not a soup!
Gathering Ingredients for Your Best Apple Pie Filling Brown Sugar Edition
Alright, let’s talk about what you need to pull off this magic. This recipe is wonderfully straightforward, which means the quality of what you use really shines through. For the sugar element, forget about plain white stuff dominating this mix. We are aiming for the Best Apple Pie Filling Brown Sugar flavor profile, so make sure that brown sugar is packed tightly into your measuring cup. It brings that fantastic molasses depth that just screams autumn dessert.
You’ll need six apples total, but don’t just grab whatever is sitting around! A mix of firm, tart apples—like Granny Smiths—and sweeter, crisp ones—like Honeycrisp—is my absolute favorite combination. They balance each other out perfectly in the finished pie. Have your spices ready too—cinnamon is the star, but a little nutmeg and allspice really round out the warmth.
Apple Selection and Preparation for Apple Pie Filling
When it comes to apples, we need structure! If you use something too soft, like Red Delicious, they’ll just disintegrate into applesauce instead of giving you that wonderfully textured apple pie filling. I swear by Granny Smith for tartness and structure, paired with a sweeter apple that softens just a bit more.
Also, the slicing matters! Make sure every apple slice is about a quarter-inch thick. If they are too thin, they break down; too thick, and they stay crunchy. That quarter-inch thickness allows them to cook evenly on the stovetop, absorbing the spice mixture while keeping just enough integrity to show off in the final slice.
Easy Apple Pie Filling Stovetop Instructions: Step-by-Step
Okay, this is where the magic happens, and honestly, it’s so quick you’ll wonder why you ever bothered with anything else. This Easy Apple Pie Filling Stovetop method means great things happen fast. Remember, this filling is going to be fantastic in a baked pie, but it’s equally great just spooned warm over ice cream right away. Grab a medium saucepan—nothing too big, we want things to mix efficiently.
First things first, before the heat is on, you have to get your thickening slurry just right. Follow the instructions exactly here, because skipping a step means a runny pie, and we are not having a runny pie!
Mixing the Thickening Agents and Spices for Cinnamon Spiced Apple Filling
In your *cold* saucepan, whisk together both sugars, the cornstarch, cinnamon, nutmeg, and allspice. Don’t even turn the stove on yet! You need to whisk this dry mixture vigorously until everything is completely homogenous. That cornstarch has to fully dissolve into the sugar so it doesn’t clump up when it hits the heat later. Trust me, thoroughly dissolving your thickening agents is the key to that perfect texture in your apple pie filling.
Cooking Down the Apple Pie Filling Until Glossy
Once the dry ingredients are mixed, add your water and lemon juice. Give it a quick stir, then toss in all those beautiful apple slices. Now, set the heat to medium. You need to stir this frequently—don’t just set it and walk away! We’re looking for the mixture to start bubbling, which usually takes about 8 to 10 minutes. Watch for that glossy sheen to develop; that means the cornstarch is doing its brilliant job, and your apples are softening just enough to be tender inside your pie.
When it looks thick and bubbly, pull it right off the heat immediately! You don’t want mushy apples, just tender ones. Stir in that last tablespoon of butter—it adds a final, beautiful richness—and let it cool down before you pop it into your crust. For more great quick recipes, check out how I make my Caesar dressing; speed and flavor go hand-in-hand here!
Tips for Success When Making Apple Pie Filling From Scratch
Even though this apple pie filling recipe is super quick, paying attention to a few details makes it taste like you slaved over it all day. My Granny used to write in the margins of her recipe cards, “Don’t rush the finish line!” That’s where we nail that perfect texture.
Remember how I stressed dissolving the cornstarch completely before turning on the heat? That’s tip number one! If you don’t, you’ll end up with streaks of starch in your sauce, and it won’t get that uniform, thick coat we’re dreaming of. It’s all about making sure that thickening agent is fully suspended in the sugars before it sees any warmth at all.
Tip number two is all about texture preference. If you absolutely love your apples soft—like, melt-in-your-mouth soft—just leave the filling on the stove for an extra three to five minutes after it starts bubbling. But if you’re like me and want a bit of a bite when you slice into the baked pie, pull it off the heat right when it first thickens. You can always add a touch more water or stock when reheating later for a pie, but you can’t really take texture away once the apples have broken down too much! If you run into any issues or just want to chat about your baking successes, feel free to reach out on my contact page!
Versatile Uses for Your Quick Apple Dessert Filling
I always make a double batch of this because honestly, sticking it all in one pie feels selfish sometimes! While this is officially the best apple pie filling ever invented, don’t limit yourself to just baking. This stuff is spectacular used warm over almost anything. I mean, why wait for Thanksgiving?
It makes an absolutely heavenly, warm Apple Pie Topping Recipe for vanilla bean ice cream. Seriously, that cold cream meeting the warm, spiced apples? Perfection. I also love taking a scoop or two of this Quick Apple Dessert Filling and topping my Sunday morning pancakes or waffles with it instead of plain syrup. It feels so decadent, but since it took you five minutes to make, it’s basically breakfast!
Oh, and if you happen to have a little leftover, it’s fantastic scooped over cinnamon rolls instead of icing. If you’re looking for more breakfast magic like this, check out my post on my favorite breakfast recipes; maybe you’ll find your next obsession!
Storage and Reheating Instructions for Leftover Apple Pie Filling
You’ve made the best apple pie filling ever, so naturally, you might have some left over—lucky you! Store any extra filling in an airtight container right in the fridge. It keeps beautifully for about five to seven days because of the sugar and lemon juice acting as natural preservatives. Don’t try to bake with it warm though; always let it cool completely first.
When you are ready to use those leftovers, whether for the next day’s breakfast topping or a second pie, reheat it gently on the stovetop over low heat. Stir it frequently so it heats evenly and doesn’t scorch on the bottom. If it thickened up a little *too* much overnight, just stir in a tablespoon of water or apple juice while reheating to bring back that perfect, glossy consistency mentioned in the instructions.
Frequently Asked Questions About Apple Pie Filling
I know when you make something this good, you’re bound to have a few questions pop up before you start that crust. It’s totally normal! I’ve gathered the ones I get asked all the time about this apple pie filling process. Hopefully, this helps you jump right past any worries and get straight to the baking part!
If your filling seems a little runnier than you hoped after cooking, don’t panic! That means your fruit released more juice than expected. The fix is easy: just mix one teaspoon of cornstarch with one tablespoon of cold water in a tiny cup. Stir that slurry into your simmering filling and continue to cook for about one minute until it thickens up perfectly. That’s my secret for guaranteeing a Thick and Gooey Apple Filling every time, even if the initial batch was a bit thin.
Also, yes, you can absolutely freeze this! This apple pie filling from scratch freezes like a charm. Let it cool completely, transfer it to a freezer-safe bag or container, and it’ll be good for about three months. Thaw it overnight in the fridge before using it in your next baked dessert.
Can I use apples other than Granny Smith for this apple pie filling?
Oh, yes, absolutely! While Granny Smiths are reliable, I really recommend blending apples if you can. Try using half a tart apple like Granny Smith and half a sweeter, firmer apple like Honeycrisp or Fuji. This blend ensures great flavor while guaranteeing that the slices hold their shape nicely in our Cinnamon Spiced Apple Filling.
If you want to read through the legal stuff about what you find here on the blog, you can review my disclaimer page anytime!
Estimated Nutritional Data for This Apple Pie Filling
Now, I’m no nutritionist, so please take these numbers with a big grain of salt—or maybe a dollop of whipped cream! This data is just an estimate based on my standard ingredient amounts for about half a cup of this amazing apple pie filling.
Per serving, you’re looking at roughly 245 calories, with about 42 grams of sugar dominating the count. You get 3 grams of total fat and about 56 grams of carbs. The good news is you do get a little fiber in there! Remember, if you use less brown sugar or swap out apples, these numbers change. This is just a basic guide for your comfort food dessert filling!
Share Your Perfect Apple Pie Filling Creations
I genuinely hope you loved making this easy stovetop apple pie filling as much as my family loves eating it! It means the world to me when you try something from my kitchen. If this recipe saved your dessert plans, please head over and give it a solid 5 stars!
I absolutely adore seeing what you create! Did you use it in a lattice pie? Did you make an epic bowl of ice cream topping? Snap a photo and share honestly in the comments below, or send me a note through my contact page. I read every single comment, and sharing your success stories truly makes my day!
PrintThe Best Easy Stovetop Apple Pie Filling (Thick & Gooey)
Make a thick, glossy, and perfectly spiced apple pie filling on your stovetop using brown sugar for deep flavor. This recipe is quick and superior to canned versions.
- Prep Time: 15 min
- Cook Time: 10 min
- Total Time: 25 min
- Yield: About 4 cups
- Category: Dessert
- Method: Stovetop
- Cuisine: American
- Diet: Vegetarian
Ingredients
- 6 medium apples (like Granny Smith or Honeycrisp), peeled, cored, and sliced 1/4 inch thick
- 3/4 cup packed light brown sugar
- 1/4 cup granulated sugar
- 1/4 cup water
- 2 tablespoons cornstarch
- 1 teaspoon ground cinnamon
- 1/4 teaspoon ground nutmeg
- 1/8 teaspoon ground allspice
- 1 tablespoon lemon juice
- 2 tablespoons unsalted butter
Instructions
- Combine the brown sugar, granulated sugar, water, cornstarch, cinnamon, nutmeg, and allspice in a medium saucepan. Whisk until the cornstarch is fully dissolved and the mixture is smooth.
- Add the sliced apples and lemon juice to the saucepan. Stir gently to coat the apples evenly with the sugar mixture.
- Place the saucepan over medium heat. Cook, stirring frequently, until the mixture begins to bubble and thicken, about 8 to 10 minutes. The apples should soften slightly but still hold their shape.
- Once the filling is thick and glossy, remove the pan from the heat. Stir in the butter until it melts completely.
- Allow the filling to cool for at least 30 minutes before using it in your pie crust or as a topping.
Notes
- For the thickest filling, ensure you dissolve the cornstarch completely before heating.
- If you prefer softer apples, simmer the mixture for an extra 3 to 5 minutes before removing it from the heat.
- This filling works well for one 9-inch double-crust pie or as a topping for 4 servings of ice cream.
Nutrition
- Serving Size: 1/2 cup
- Calories: 245
- Sugar: 42
- Sodium: 5
- Fat: 3
- Saturated Fat: 2
- Unsaturated Fat: 1
- Trans Fat: 0
- Carbohydrates: 56
- Fiber: 2
- Protein: 0
- Cholesterol: 6

Comments are closed.